Tools / Air Tools
WEN 61722 18-Gauge 2-in-1 Brad Nailer & Stapler User Manual
Comprehensive user guide for the WEN 61722 18-Gauge 2-in-1 Brad Nailer & Stapler. Includes setup, air pressure requirements, loading instructions, operation modes, maintenance, and troubleshooting.
Quick answers from the manual
Quick answer
- The WEN 61722 is a pneumatic 2-in-1 brad nailer and stapler. It requires 60-100 PSI of clean, dry, regulated air. Always lubricate the tool with 3-4 drops of air tool oil before each use. p. 3, 8, 12
Key actions
- Lubricate the tool p. 8, 12
- Load fasteners p. 9
First start
- Connect to a regulated air supply (60-100 PSI), lubricate the tool, and test-fire into scrap wood. p. 8, 10
Problems and fixes
Air leaking at trigger area
Check and replace O-ring or trigger valve head.
p. 13
Fasteners are jammed
Disconnect air, remove fasteners, open jam-clearing latch, clear debris.
p. 11, 13Maintenance and reset
- Regularly check the air filter and drain the compressor tank. p. 12
Technical specifications
| Parameter | Value | Meaning | Pages |
|---|---|---|---|
| Operating Pressure | 60-100 PSI | Required air pressure range. | p. 3 |
| Magazine Capacity | 100 Fasteners | Maximum number of nails/staples. | p. 3 |
Where to find it in the PDF
- Specifications p. 3
- Troubleshooting p. 13
- Parts List p. 14, 15
Table of contents
Manual images
Click an image to enlargeQuick Guide from the Manual
The WEN 61722 is a pneumatic 2-in-1 tool designed for driving 18-gauge brad nails and 1/4" narrow-crown staples. Before use, ensure you have a regulated air supply (60-100 PSI) and lubricate the tool with 3-4 drops of air tool oil. Always wear eye and hearing protection during operation.
Specifications
- Model Number: 61722
- Operating Pressure: 60-100 PSI
- Nail Type: 18-Gauge Brad Nails (5/8" to 2")
- Staple Type: 18-Gauge 1/4" Narrow-Crown Staples (5/8" to 1-5/8")
- Magazine Capacity: 100 Fasteners
- Air Inlet: 1/4" NPT
Preparation & Setup
Lubrication: This tool requires lubrication before each use. If an inline oiler is not used, place 3-4 drops of pneumatic tool oil into the air inlet at the beginning of each workday.
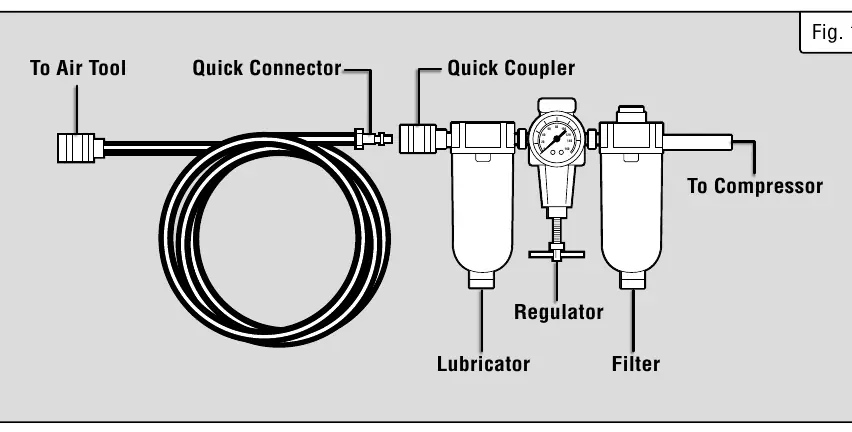
Air Connection: Connect the tool to a regulated compressed air supply. The pressure must be between 60 and 100 PSI. Use a quick connector for easy attachment. Ensure the nailer magazine is empty and pointed away from you when connecting.
Operation
Loading Fasteners: Depress the magazine lock, pull out the movable magazine, insert the fasteners (nails or staples), and push the magazine forward until it clicks shut.
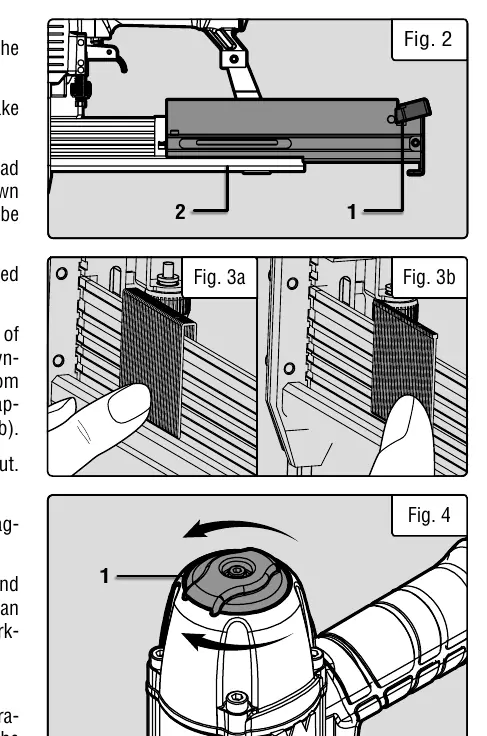
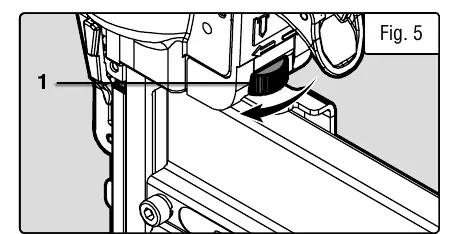
Depth Adjustment: Use the depth-adjustment wheel to set the penetration depth. Turn clockwise to increase depth and counterclockwise to decrease it.
Driving Modes: The tool supports single-sequential and full-sequential firing. It does not support bump-fire.
Clearing Jammed Fasteners
- Disconnect the tool from the air supply.
- Open the magazine and remove all fasteners.
- Flip open the jam-clearing latch and pull up the front plate.
- Remove the jammed fastener using pliers.
- If the piston is stuck, use a screwdriver to push it back into position.
- Close the front plate, reconnect air, and test-fire into scrap wood.
Maintenance
- Cleaning: Wipe the tool with a damp towel and mild soap. Do not soak in cleaning solutions.
- Inspection: Regularly check the trigger, safety mechanism, and screws for tightness.
- Storage: Store in a dry, frost-free place between 50 to 86 °F (10 to 30 °C).
Practical help
Common problems
Air leaking at trigger area
Check and replace the O-ring or trigger valve head.
Tool skips a fastener
Clean the drive channel, check for adequate airflow, or replace a worn bumper.
Fasteners are jammed
Disconnect air, remove fasteners, open the jam-clearing latch, and clear debris.
Tool will not drive down tight
Adjust to adequate air pressure or replace the piston assembly if the blade is worn.
Before use
- Check that air pressure is set between 60-100 PSI.
- Lubricate the tool with 3-4 drops of air tool oil.
- Ensure the safety bracket is functional and moves freely.
- Wear appropriate eye and hearing protection.
- Test-fire into a piece of scrap wood.
Specs in practice
- Operating Pressure
- 60-100 PSI. Do not exceed 100 PSI to avoid damage or injury.
- Staple Length
- Compatible with 18-gauge 1/4" narrow-crown staples from 5/8" to 1-5/8".
Images and diagrams
- Fig 1 illustrates the correct air supply setup, including the regulator, lubricator, and filter.
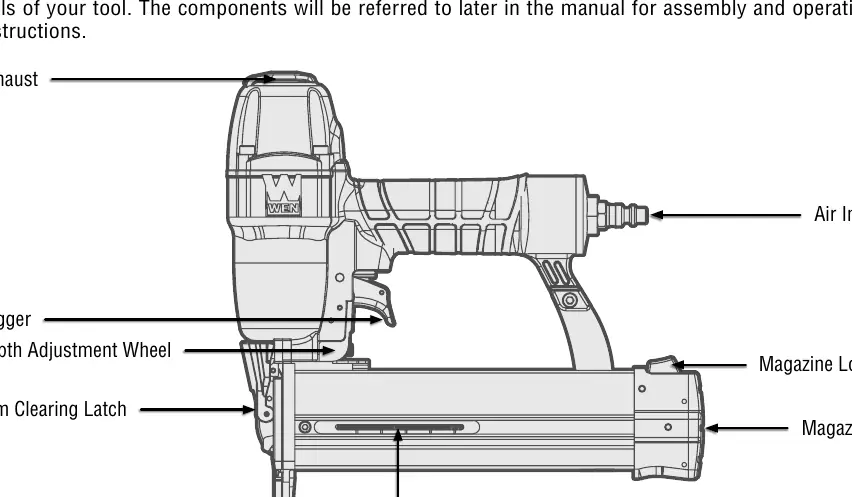
- The tool diagram identifies the trigger, depth adjustment wheel, jam clearing latch, and safety bracket.
- The exploded view provides a detailed breakdown of all internal parts for maintenance and repair.
Model compatibility
- Requires 18-gauge brad nails (5/8" to 2").
- Requires 18-gauge 1/4" narrow-crown staples (5/8" to 1-5/8").

Manual page author
David Miller
Documentation analyst
Organizes user manual content into clear summaries, with attention to model details, product context, and everyday usability.