Tools / Air Tools
User Manual for WEN 16-Inch Dethatcher & Scarifier DT1516
Quick guide for the WEN 16-Inch Dethatcher & Scarifier (Model DT1516). Learn how to assemble, operate, adjust depth, maintain, and troubleshoot your lawn tool.
Table of contents
Manual images
Click an image to enlargeQuick guide from the manual
The WEN 16-Inch Dethatcher & Scarifier (Model DT1516) is designed to remove thatch and debris from your lawn to improve oxygen absorption and drainage. Important: Always operate in daylight, keep the work area clear of debris, and never use on wet lawns. Ensure you use an outdoor-rated extension cord and a GFCI-protected power supply.
Assembly and Adjustments
Before assembly, ensure the machine is disconnected from the power source.
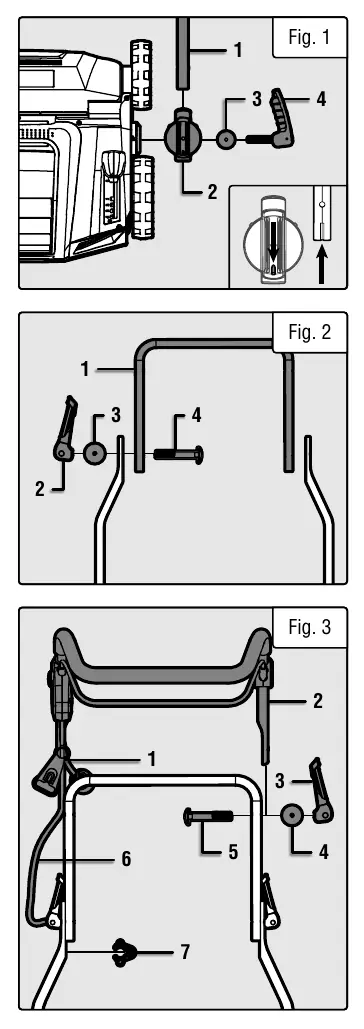
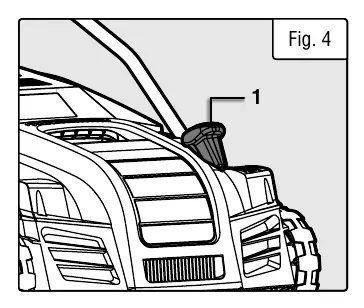
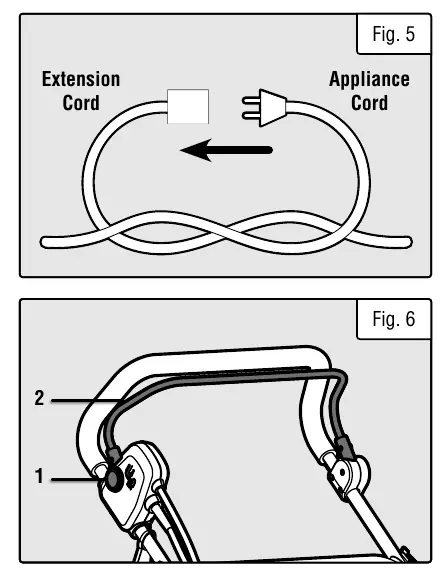
- Handle Assembly: Attach the lower handles to the body using the angle adjustment brackets and cam knobs. Install the middle handle onto the lower handles, then attach the upper handle. Secure the power cord using the provided cable clips.
- Thatch Bag: Lift the thatch bag cover and secure the bag to the mounting hooks on the back of the body. Clip the sides of the bag to the rack frame.
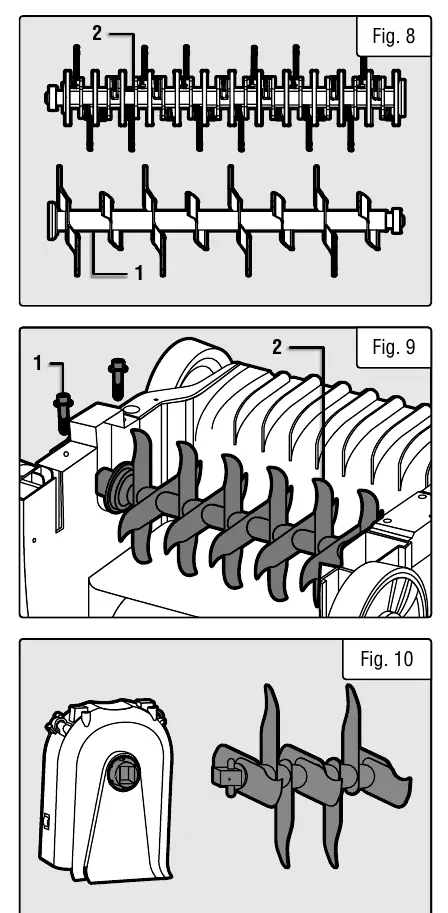
- Depth Adjustment: Move the depth adjustment lever to the right and select the desired gear. Note: Negative depth settings indicate the blades are digging into the ground. Use position 0 for transport, 1-2 for dethatching, and 3-4 for scarifying.
Operation
Connecting Power: Use an outdoor-rated extension cord. Pass the cord through the holder and make a knot with the appliance cord to secure the connection.
Powering On/Off: Press the safety lock button on the side of the handle while simultaneously pulling the switch handle towards the upper handle. To turn off, release the switch handle.
Scarifying vs. Dethatching: Scarifying is more intense and cuts grooves into the ground to remove moss and fungus. Dethatching is less intense and picks up surface thatch. Perform these tasks when the grass is actively growing and the soil has some moisture.
Maintenance
Routine Inspection: Before each use, check for loose hardware, misalignment, or cracked parts. Lubricate the tines and shaft once per season.
Cleaning: Always clean after use. Do not use a water hose. Use a scrubbing brush and damp cloth to clean the underside of the tine guard and motor housing. Wipe tines dry and apply a light coat of oil to prevent rust.
Blade Replacement: Ensure the machine is off and unplugged. Unscrew the hex screws on the bottom of the body to remove the blade bracket and blade. Align the square end of the new blade shaft with the output gear and secure it back in place.
Troubleshooting
If the motor does not start, ensure it is connected to power and the safety lock button is pressed. If the product does not reach full power, check that the extension cord is suitable and air vents are not blocked. If results are unsatisfactory, check if the cutting device is worn or if the scarifying depth is incorrect.
Practical help
Common problems
Motor does not start
Check power connection, ensure safety lock button is pressed, or contact customer service if there is an electrical defect.
Product does not reach full power
Ensure the extension cord is suitable (see chart on page 8), check for low voltage, or clean blocked air vents.
Unsatisfying results
Replace worn tine cylinder, ensure material does not exceed machine capacity, or adjust the scarifying depth.
Before use
- Inspect for loose hardware or improper mounting.
- Check for cracked or broken parts.
- Ensure the lawn is clear of stones, sticks, and wires.
- Verify the extension cord is rated for outdoor use.
- Ensure the safety lock and switch lever are functioning.
- Remove the plastic safety cover from the power plug.
Specs in practice
- Working Width
- 16 inches, the width of the path cleared in one pass.
- Working Depth
- Adjustable from +1/4" to -1/2" for different levels of scarifying or dethatching.
- No Load Speed
- 3300 RPM, the speed of the blades when not under load.
Images and diagrams
- Fig 1-3: Handle assembly steps showing cam knob locking positions.
- Fig 4: Depth adjustment lever location and operation.
- Fig 5: Proper way to secure the extension cord to the appliance cord.
- Fig 6: Operation of the safety lock and switch lever.
- Fig 8-10: Blade replacement procedure including aligning the square shaft.
Model compatibility
- Requires an outdoor-rated extension cord.
- Use a residual-current device (RCD) or GFCI-protected power supply.
- Not recommended for use on wet lawns.
- Warranty applies to items sold in the USA, Canada, and Puerto Rico.

Manual page author
Emily Carter
User documentation editor
Prepares concise manual descriptions and highlights the most useful setup, operation, and maintenance information for readers.