Garden / Lawn Care
User Manual for WEN 20716 20V Max Cordless Dethatcher and Scarifier
Quick guide for the WEN 20716 20V Max Cordless Dethatcher and Scarifier. Includes assembly instructions, depth adjustment, operation, maintenance, and blade replacement steps.
Quick answers from the manual
Quick answer
- The WEN 20716 is a 20V cordless dethatcher and scarifier. It requires two batteries to operate. It features adjustable depth settings and interchangeable blades for scarifying and dethatching. p. 3, 11, 14
Key actions
- Assemble the handle and attach the thatch bag. p. 12, 13
- Power on by engaging the safety lock and switch handle simultaneously. p. 15
First start
- Charge batteries, install handle, insert safety key, and select depth. p. 12, 13, 14
Problems and fixes
Overload protection activation
Switch off, remove from power source, let cool, and remove build-up.
p. 16Maintenance and reset
- Clean after each use, lubricate tines once per season, and store in a dry place. p. 17
Technical specifications
| Parameter | Value | Meaning | Pages |
|---|---|---|---|
| No Load Speed | 3000 RPM | Rotational speed of the tines | p. 3 |
| Working Width | 15 Inches | Width of the path covered | p. 3 |
Where to find it in the PDF
- Assembly p. 12, 13
- Operation p. 15, 16
- Maintenance p. 17, 18
Table of contents
Manual images
Click an image to enlargeQuick guide from the manual
The WEN 20716 is a 20V cordless dethatcher and scarifier designed to improve lawn health by removing thatch and moss. Important: The unit requires two batteries to operate. For best results, use batteries with a capacity of 4Ah or higher. Always remove the safety key and batteries before performing any maintenance, cleaning, or adjustments.
Assembly and adjustments
Follow these steps to prepare your tool for use:
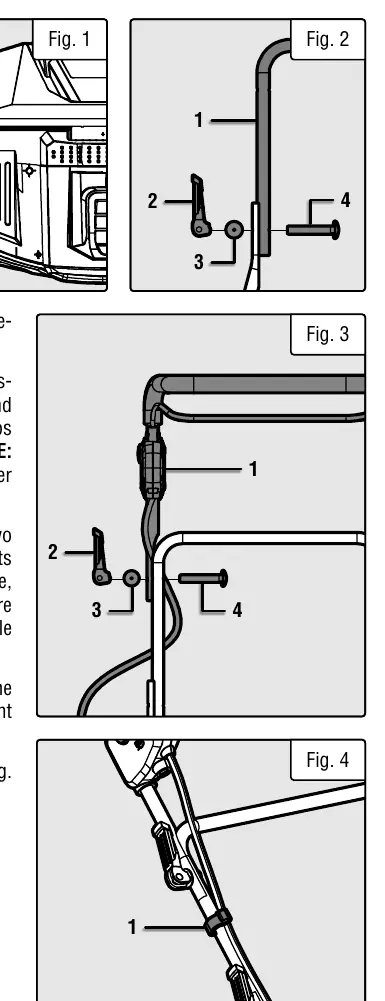

- Handle Assembly: Attach the lower handles to the body using the angle adjustment cam knobs. Install the middle handle onto the lower handles, then attach the upper handle to the middle handle using the provided cam knobs, washers, and bolts. Secure the power cord with the provided cable clips.
- Thatch Bag Installation: Lift the thatch bag cover and secure the bag to the mounting hooks on the back of the body. Clip the sides of the bag onto the thatch bag rack frame.
- Depth Adjustment: Move the depth adjustment lever to the right and down to select the desired gear. Negative depth settings indicate the blades are digging into the ground. Use position 1 for transport or thin thatch, and positions 4-5 for scarifying.
Operation
To power on the machine:
- Install the batteries and connect the safety key.
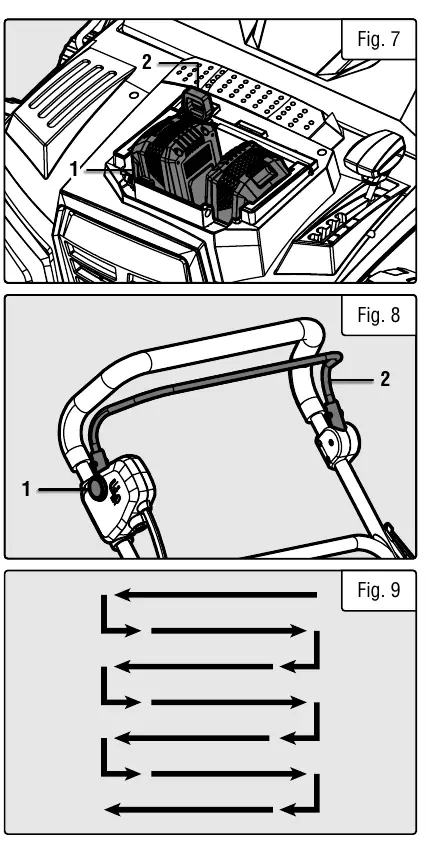
- Press the safety lock button on the side of the upper handle.
- While holding the safety lock, pull the switch handle towards the upper handle.
- Release the safety lock button and hold the switch handle against the upper handle to continue operation.
To power off, release the switch handle and remove the batteries and safety key.
Maintenance and blade replacement
Regular maintenance ensures longevity:
- Cleaning: Clean the underside of the tine guard and motor housing after each use using a scrubbing brush and a soft cloth with mild soap. Never use a water hose.
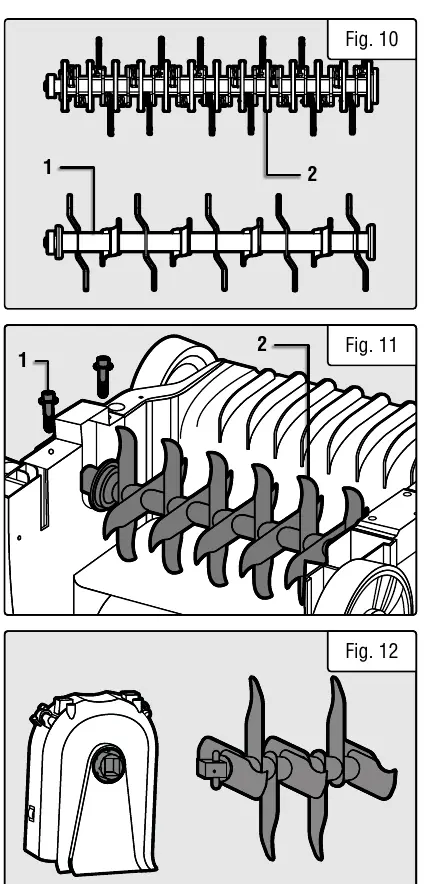
- Blade Replacement: The unit comes with two blades. To change them, unscrew the hex screws on the bottom of the body, remove the blade bracket, and swap the blade. Ensure the square end of the blade shaft aligns with the square hole of the output gear.
Overload protection
If the machine stops due to overload (e.g., build-up of materials or too much resistance), switch the machine off, remove it from the power source, and clear the obstruction before restarting.
Practical help
Common problems
Machine will not start
Ensure the safety key is inserted, batteries are charged, and both the safety lock and switch handle are engaged simultaneously.
Overload protection triggered
Switch off, remove from power source, and clear any build-up or large materials from the cutting device.
Poor performance or clogging
Check for clogged air vents, dull blades, or incorrect depth setting. Ensure the lawn is not wet.
Before use
- Charge batteries fully before first use
- Clear lawn of stones, sticks, wires, and other obstacles
- Ensure all accessories are secure
- Check that air vents are clean and unobstructed
- Verify safety key is inserted
Specs in practice
- Working Width
- 15 inches
- No Load Speed
- 3000 RPM
- Working Height
- -1/2 inch to +1/4 inch
Images and diagrams
- Exploded view on page 19 shows all components
- Assembly diagrams on pages 12-13
- Blade replacement steps on page 18
Model compatibility
- Compatible with WEN 20V MAX batteries
- Recommend 4Ah or higher for best results
- Model 20716BT does not include battery or charger

Manual page author
Michael Turner
Technical manual editor
Reviews PDF manuals for structure, safety notes, and practical product details so readers can find the right information quickly.