Power / Power Inverters
User Manual for Westinghouse 24-Light 48ft Color Changing Solar LED String Light SR29ST01C-99
Quick guide for the Westinghouse 24-Light 48ft Color Changing Solar LED String Light (SR29ST01C-99). Includes installation steps, remote control operation, battery replacement, and troubleshooting.
Quick answers from the manual
Quick answer
- This manual covers the installation, operation, and maintenance of the Westinghouse 24-Light 48ft Solar LED String Light. Key steps include charging the unit for 8-12 hours before first use and using the remote control for lighting adjustments. p. 1
Key actions
- Charge the solar light for 8-12 hours in direct sunlight with the switch in the ON position before first use. p. 1
First start
- Ensure the power switch is set to ON during the initial 8-12 hour charging period. p. 1
Show 3 more answers Show less
Problems and fixes
Light does not turn on
Remove battery, clean ends with a dry cloth, check terminal contact, or replace with a new 3.7V 18650 lithium battery.
p. 1Technical specifications
| Parameter | Value | Meaning | Pages |
|---|---|---|---|
| Battery (Solar Unit) | 3.7V 2400 mAh 18650 lithium | Rechargeable battery for solar light | p. 1 |
| Remote Battery | 2 x AAA | Batteries required for remote control | p. 1 |
Where to find it in the PDF
- Installation and Operation p. 1
- FCC Regulatory Information p. 2
Table of contents
Manual images
Click an image to enlargeQuick Guide for First Use
Before using your solar string light for the first time, it is essential to charge the unit. Place the solar panel in direct sunlight for 8-12 hours with the power switch in the ON position to ensure the rechargeable batteries reach maximum capacity.
Installation
The solar panel offers multiple mounting options:
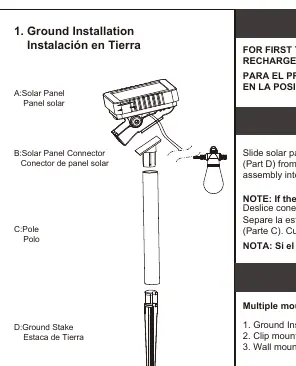
- Ground Installation: Assemble the solar panel connector (Part B), pole (Part C), and ground stake (Part D). Insert the stake into the ground. If the ground is hard, moisten it with water first to avoid breakage. Apply pressure to the pole, not the solar panel, when inserting.
- Clip Mount Installation: Use the provided clip mount to attach the panel to desired surfaces.
- Wall Mount Installation: Use the provided wall mount hardware to secure the panel.
Remote Control Operation
The remote control operates the lights within a range of 49 feet (15 meters). Ensure the 2 AAA batteries (included) are installed. Point the remote towards the string light to use the following functions:
- POWER: Turns the string lights ON or OFF.
- DIMMER: Adjusts the brightness of the string light.
- RGBW SELECTOR: Changes the LED color to Red, Green, Blue, or White.
- COLOR SELECTOR: Cycles through additional colors including Orange, Yellow, Light Blue, Pink, Purple, and Neon Green.
- LIGHT EFFECTS: Selects different lighting effects.
Note: The remote control is intended for dry locations only.
Battery Replacement
If the light fails to turn on, first try cleaning the battery contacts. If replacement is necessary:
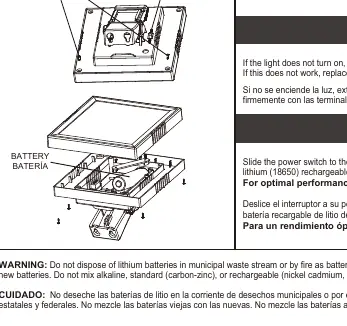
- Slide the power switch to the OFF position.
- Remove the four screws from the top section using a Phillips head screwdriver.
- Remove the old battery and replace it with a new 3.7V, 2400 mAh 18650 lithium rechargeable battery.
- Replace the top section and secure it with the four screws.
- Slide the power switch back to the ON position.
Troubleshooting
If the light does not turn on, remove the battery and wipe both ends with a clean, dry cloth. Reinstall the battery, ensuring it makes secure contact with the terminals. If the issue persists, replace the battery with a new one.
Safety and Regulatory
Do not dispose of lithium batteries in the municipal waste stream or by fire, as they may explode. Dispose of batteries in accordance with local, state, and federal regulations. Do not mix old and new batteries, or different types of batteries (alkaline, standard, or rechargeable). This device complies with Part 15 of the FCC Rules.
Practical help
Common problems
Light does not turn on
Remove the battery, wipe both ends with a clean, dry cloth, and reinstall to ensure secure contact. If it still does not work, replace with a new 3.7V 18650 lithium battery.
Before use
- Charge in full sunlight for 8-12 hours
- Ensure the power switch is in the ON position during charging
- Install 2 AAA batteries in the remote control
Show more Show less
Specs in practice
- Battery (Solar Unit)
- 3.7V 2400 mAh 18650 lithium rechargeable battery
- Remote Range
- Up to 49 feet (15 meters)
- Remote Battery
- Requires 2 AAA batteries
Images and diagrams
- Ground installation: Assemble parts A, B, C, and D. Insert the stake into the ground.
- Battery replacement: Remove 4 screws from the top section to access the battery compartment.
Model compatibility
- Remote control is intended for dry locations only

Manual page author
Michael Turner
Technical manual editor