Lighting / Fixtures
User Manual for Westinghouse 14-inch LED Flush Mount Light
Quick guide for the Westinghouse 14-inch LED Flush Mount Light. Includes installation steps, wiring diagrams, safety warnings, and technical specifications.
Quick answers from the manual
Quick answer
- This manual provides installation instructions, safety guidelines, and technical specifications for the Westinghouse 14-inch LED Flush Mount Light. p. 1, 2
Key actions
- Install the fixture p. 2
First start
- Ensure power is disconnected at the circuit breaker before installation. p. 1
Problems and fixes
Dimming issues
Check compatibility with residential dimmers at www.satco.com
p. 2Maintenance and reset
- Clean with a soft or damp cloth. Ensure power is OFF. p. 2
Technical specifications
| Parameter | Value | Meaning | Pages |
|---|---|---|---|
| Operating Voltage | 120V AC | Standard residential voltage | p. 1 |
Where to find it in the PDF
- Safety and Specifications p. 1
- Installation and Maintenance p. 2
Table of contents
Quick guide from the manual
This document provides essential instructions for the safe installation and operation of the Westinghouse 14-inch LED Flush Mount Light. Before beginning, ensure the power is disconnected at the circuit breaker or fuse box. This fixture is designed for interior use and is suitable for damp locations.
Safety recommendations
- Electrical Safety: Installation must be performed by a person familiar with applicable electrical codes. Always disconnect power before installing or servicing.
- Usage: This product is for interior use only and is suitable for damp locations.
- Handling: Protect the product against direct contact with water.
- Assembly: Use only the provided parts and housing. Improper assembly may cause the device to fail, resulting in damage or injury.
- Children: Keep out of reach of children.
Specifications
- Operating Voltage: 120V AC
- Power Consumption: 20W
- Color Temperature: 2700K/3000K/4000K/5000K
- Life Span: 40,000 hours
- Illumination Authorization:<5% per 10,000h
Installation
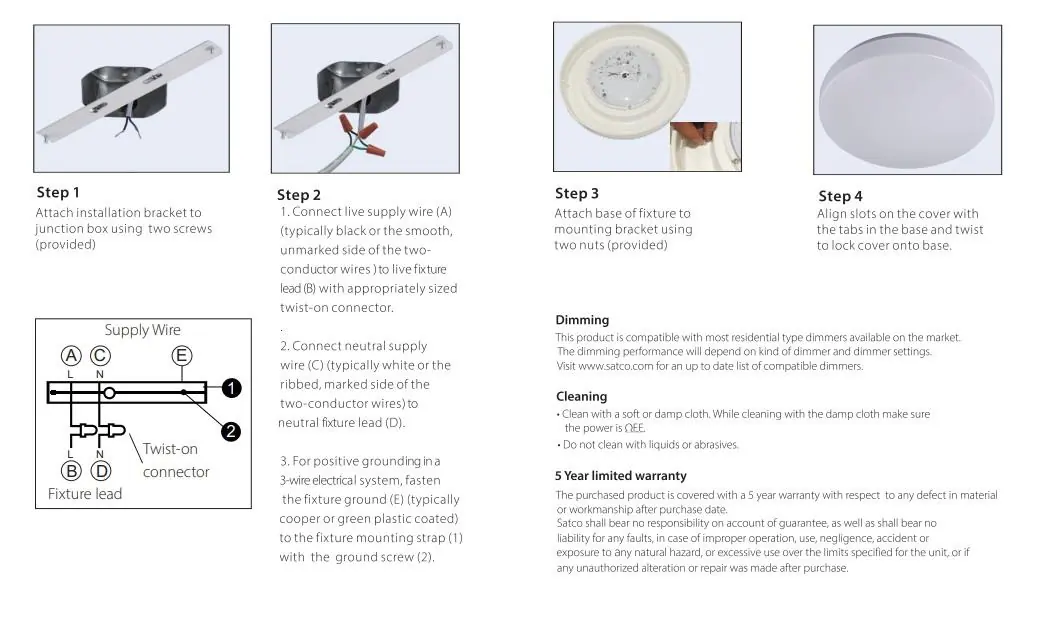
- Attach Bracket: Secure the installation bracket to the junction box using the two provided screws.
- Wiring: Connect the live supply wire (typically black or smooth) to the live fixture lead using a twist-on connector. Connect the neutral supply wire (typically white or ribbed) to the neutral fixture lead. For 3-wire systems, fasten the fixture ground (typically copper or green) to the fixture mounting strap using the ground screw.
- Mount Fixture: Attach the base of the fixture to the mounting bracket using the two provided nuts.
- Secure Cover: Align the slots on the cover with the tabs in the base and twist to lock the cover onto the base.
Dimming and Cleaning
This product is compatible with most residential dimmers. Dimming performance depends on the specific dimmer type. For a list of compatible dimmers, visit www.satco.com.
To clean the fixture, use a soft or damp cloth. Ensure the power is OFF before cleaning. Do not use liquids or abrasives.
Warranty
The product is covered by a 5-year limited warranty regarding defects in material or workmanship after the purchase date.
Official resources from the manual
Practical help
Common problems
Light not dimming correctly
Ensure the dimmer switch is compatible with LED fixtures. Visit www.satco.com for a list of compatible dimmers.
Before use
- Turn off power at the circuit breaker or fuse box before starting.
- Ensure the installation location is suitable for damp locations.
- Verify you have all provided parts.
- Consult a qualified electrician if you are unfamiliar with wiring connections.
Specs in practice
- Operating Voltage
- 120V AC
- Power Consumption
- 20W
Images and diagrams
- Step 1: Attach bracket to junction box.
- Step 2: Connect wires (Live to Live, Neutral to Neutral, Ground to Ground).
- Step 3: Attach fixture base.
- Step 4: Twist cover to lock.
Model compatibility
- Compatible with most residential type dimmers.
- Suitable for damp locations.
- For interior use only.

Manual page author
Emily Carter
User documentation editor
Prepares concise manual descriptions and highlights the most useful setup, operation, and maintenance information for readers.