Home Appliances / Cooktops Hobs
User Manual for Whirlpool 1R-2SR Series Built-in Hob
Comprehensive user guide for the Whirlpool 1R-2SR Series built-in gas hob. Includes installation instructions, daily operation, safety warnings, cleaning, and troubleshooting.
Quick answers from the manual
Quick answer
- To ignite the burner, turn the knob anti-clockwise to the maximum flame setting, press it against the control panel, and hold for 5-10 seconds after ignition to activate the safety device. p. 6
Key actions
- Igniting the burner p. 6
- Cleaning the hob p. 7
First start
- Check gas compatibility and pressure. p. 2
- Install the gasket and secure the hob. p. 5
Show 3 more answers Show less
Problems and fixes
Burner fails to ignite
Check gas/electrical supply, gas cylinder, burner openings, and ignition plug.
p. 7Technical specifications
| Parameter | Value | Meaning | Pages |
|---|---|---|---|
| Rapid Burner (R) | 3.00 kW | Maximum heat output for rapid burner. | p. 4 |
Where to find it in the PDF
- Safety Instructions p. 1, 2, 3
- Installation p. 5
- Daily Use p. 6
- Cleaning and Maintenance p. 7
Table of contents
Manual images
Click an image to enlargeQuick guide from the manual
This manual provides essential information for the safe installation and operation of your Whirlpool 1R-2SR Series built-in gas hob. Before using the appliance, read the safety instructions carefully. Ensure the hob is installed by a qualified technician in compliance with local regulations.
Product description
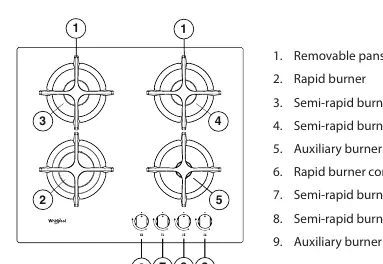
The hob features a layout of four burners: one rapid burner, two semi-rapid burners, and one auxiliary burner. Each burner is controlled by a dedicated knob on the control panel. Symbols indicate the status of the burner: closed, maximum flame/ignition, and minimum flame.
Installation
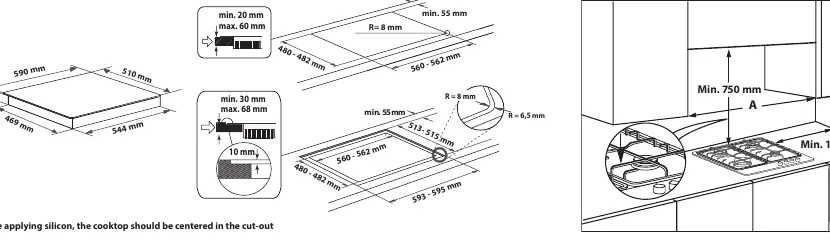
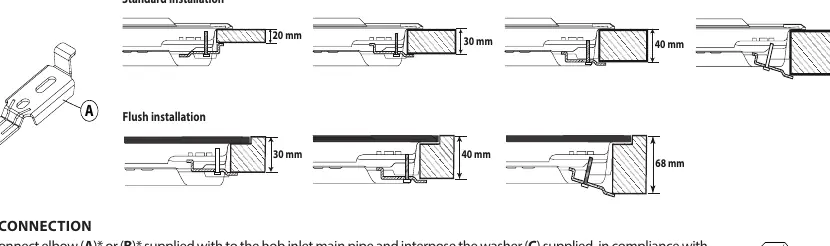
The appliance must be installed by two or more persons. Ensure the worktop is between 20-60 mm thick for standard installation or 30-68 mm for flush installation. If no oven is installed beneath the hob, a separator panel must be installed in the compartment below. Ensure the power cable is long enough for upward extraction. Secure the hob using the provided brackets (A) and screws.
Gas and electrical connection
Gas connections must comply with local regulations. Use only flexible or rigid metal hoses. After connection, check for leaks using soapy water. The electrical connection must be earthed and comply with national standards. Ensure the power cable is not damaged during installation.
Daily use
To ignite a burner, turn the corresponding knob anti-clockwise to the maximum flame setting. Press the knob against the control panel to ignite. Hold the knob pressed for 5-10 seconds after ignition to allow the safety device to activate. If the burner does not remain lit, wait at least one minute before trying again.
Cleaning and maintenance
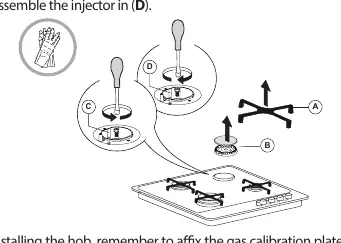
Disconnect the appliance from the power supply before any maintenance. Clean enamelled and glass parts with warm water and a neutral solution. Stainless steel surfaces should be cleaned with a soft cloth or sponge; avoid abrasive or chlorine-based products. Grids, burner caps, and burners can be removed for cleaning. Cast-iron grates may be cleaned in the dishwasher.
Troubleshooting
If the hob does not operate correctly, check the following before calling service: ensure gas/electrical supplies are open, the gas cylinder is not empty, burner openings are not clogged, and all parts are correctly positioned. If the burner fails to stay lit, ensure the knob is pressed long enough during ignition.
Manufacturer information
Whirlpool Corporation
Practical help
Common problems
Burner fails to ignite
Check that gas/electrical supplies are open, the gas cylinder is not empty, burner openings are not clogged, and the ignition plug is clean.
Burner does not stay lit
Ensure the knob is pressed for 5-10 seconds during ignition to activate the safety device, and check that the thermocouple area is clean.
Containers are not stable
Ensure the container bottom is perfectly flat, centered on the burner, and that grids are correctly positioned.
Before use
- Ensure gas type and pressure match the rating plate.
- Verify that ventilation requirements are met.
- Check that the electrical connection is earthed.
- Ensure all burner parts are correctly positioned.
- Remove all packaging materials.
Show more Show less
Specs in practice
- Rated thermal flow rate
- The total heat output of the burner in kW.
- Injector marking
- A code identifying the size of the gas nozzle for specific gas types.
- Gas pressure (mbar)
- The required pressure range for the gas supply to operate correctly.
Images and diagrams
- Installation dimensions: Shows the required cut-out size for the worktop.
- Gas connection: Illustrates the elbow fitting and washer installation.
- Electrical connection: Shows the L, N, and Ground cable wiring.
Model compatibility
- Compatible with Natural Gas (G20) and LPG (G30/G31).
- Worktop thickness: 20-60mm (standard), 30-68mm (flush).

Manual page author
Michael Turner
Technical manual editor