Lighting / Outdoor Lighting
Instruction Manual for Winston Porter 1PC Iron Bar Table
Quick guide for assembling and maintaining your Winston Porter 1PC Iron Bar Table. Includes parts list, step-by-step assembly instructions, and care tips.
Quick answers from the manual
Quick answer
- This manual provides assembly instructions for the Winston Porter 1PC Iron Bar Table, including a parts list and maintenance guidelines. p. 1, 2, 3, 4
Key actions
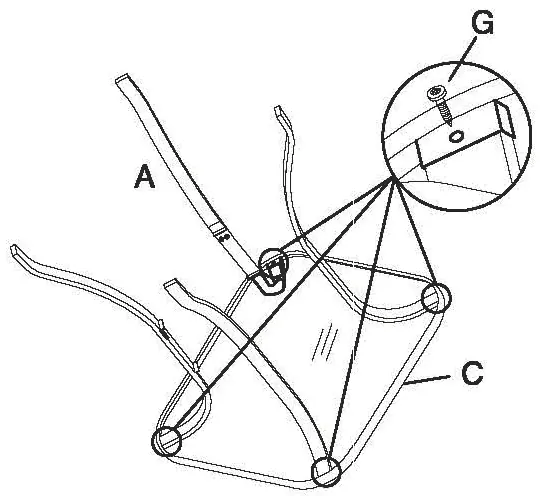
- Assemble the table by attaching legs to the tabletop first, then securing the fixed rings. p. 3, 4
First start
- Unpack and check for damage. Verify all parts (A-G) are present before starting assembly. p. 2, 3
Problems and fixes
Bolts are difficult to align
Keep the product lying flat and do not fully tighten any bolts until all are correctly positioned.
p. 4, 5Maintenance and reset
- Check the stability of screws, nuts, and nut caps before each use. Tighten them up after one to two months' use whenever required. p. 6
Technical specifications
| Parameter | Value | Meaning | Pages |
|---|---|---|---|
| Bolt size | M6*25 | Standard bolt for assembly | p. 3 |
Where to find it in the PDF
- Parts List p. 3
- Assembly Instructions p. 4, 5
- Care and Maintenance p. 6
Table of contents
Manual images
Click an image to enlargeQuick guide from the manual
Before beginning assembly, unpack the product and inspect it for any damage. Ensure all parts and hardware listed in the manual are present. If any parts are missing or damaged, contact customer service. During assembly, keep the product lying flat and do not fully tighten any bolts until all bolts are correctly placed to avoid misalignment.
Parts list
- A: Legs (4)
- B: Fixed rings (2)
- C: Tabletop (1)
- D: Bolts M6*25 (16)
- E: Washers (16)
- F: Allen key (1)
- G: Bolts (4)
Assembly instructions
Step 1: Attach the 4 legs (A) to the tabletop (C) using one bolt (G) per leg. Do not over-tighten.
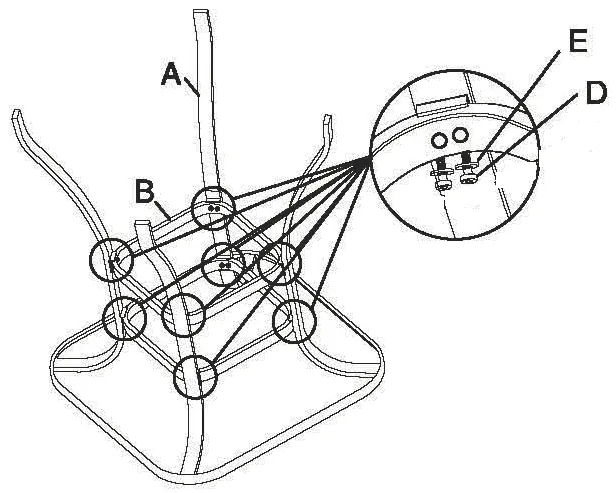
Step 2: Attach the 2 fixed rings (B) to the leg tube structure using 4 washers (E) and 4 bolts (D). Once all components are assembled and bolts are in place, tighten all screws down securely.
Care and maintenance
- Rinse the furniture thoroughly with clean water to remove dirt and grime.
- Avoid using abrasive cleansers, as they can scratch the surface.
- For stubborn stains, use a soft sponge and mild soapy water, then dry with a cloth or paper towel.
- Periodically check the stability of screws, nuts, and caps. Tighten them every one to two months if necessary.
- When moving the furniture, lift it rather than pulling or pushing to prevent damage to the floor and the product's legs.
Practical help
Common problems
Bolts are difficult to align during assembly
Ensure the product is lying flat on the ground and do not tighten any bolts until all bolts are inserted into their positions.
Surface stains or grime
Clean using a soft sponge and mild soapy water, then dry with a cloth or paper towel.
Before use
- Unpack the product and inspect for damage
- Verify all parts (A, B, C) and hardware (D, E, F, G) are present
- Ensure you have a flat surface for assembly
Images and diagrams
- The parts list provides a visual reference for all components and hardware quantities.
- Step 1 diagram illustrates attaching the legs to the tabletop.
- Step 2 diagram illustrates attaching the fixed rings to the leg structure.
Model compatibility
- Intended for both indoor and outdoor use.

Manual page author
Michael Turner
Technical manual editor
Reviews PDF manuals for structure, safety notes, and practical product details so readers can find the right information quickly.