Furniture / Tables & Desks
Assembly Instructions for Wayfair Dining Table
Complete assembly guide for the Wayfair Dining Table. Includes parts list, hardware requirements, step-by-step installation instructions, and care tips.
Quick answers from the manual
Quick answer
- This document provides assembly instructions for the Wayfair Dining Table. It requires 2 people, takes about 30 minutes, and should be assembled on a soft surface without power tools. p. 1
Key actions
- Do not tighten bolts completely until the final step. p. 3, 4, 5
- Do not use power tools. p. 1
Maintenance and reset
- Wipe clean with a soft, dry cloth and periodically check that all connections are tight. p. 1
Where to find it in the PDF
- Assembly Requirements and Safety p. 1
- Parts and Hardware List p. 2
- Assembly Steps p. 3, 4, 5
Table of contents
Manual images
Click an image to enlargeQuick guide from the manual
This dining table requires a 2-person assembly and takes approximately 30 minutes to complete. Do not use power tools during assembly to avoid damaging the furniture. Ensure you have a soft surface, such as a carpet or rug, to protect the table parts during the process. Do not tighten bolts completely until the final step.
Assembly preparation
- Remove all packaging materials, staples, and packing straps from the carton.
- Verify all parts and hardware against the provided lists before starting.
- Assemble the product on a clean, flat, and soft surface to prevent scratches.
- Keep all hardware parts out of reach of children.
Parts and hardware
The package includes the following main components:
- Table Top (1)
- Leg Frame (2)
- Metal Top Rail (2)
- Metal Cross Bar (4)
Hardware includes bolts (M8x16mm, M6x65mm) and two Allen Keys (M4, M5).
Assembly steps
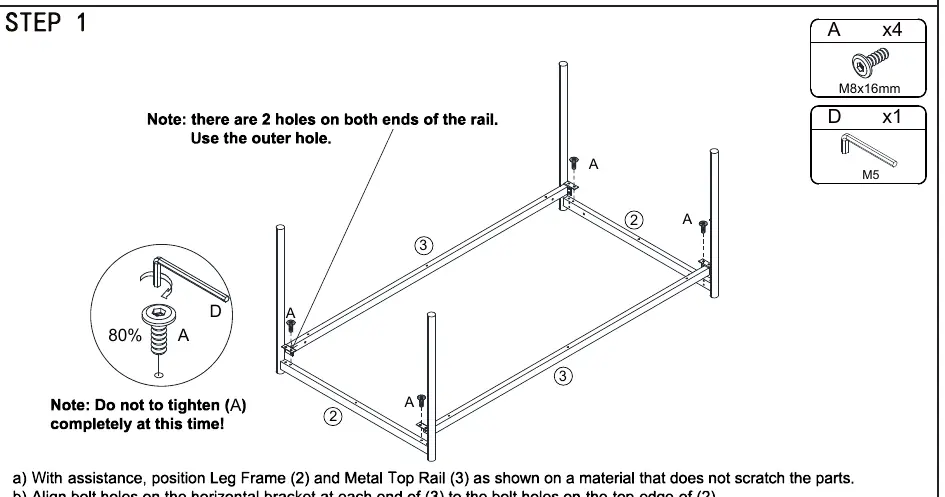
Step 1
Position the Leg Frame (2) and Metal Top Rail (3) on a soft surface. Align the bolt holes on the horizontal bracket at each end of the rail with the bolt holes on the top edge of the leg frame. Fasten using Bolt (A) and Allen Key (D). Do not tighten completely.
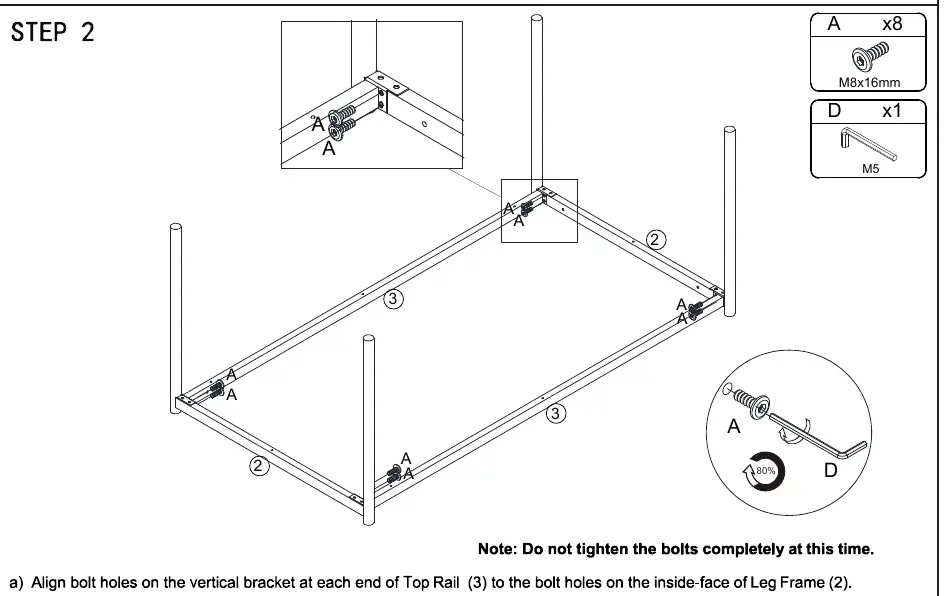
Step 2
Align the bolt holes on the vertical bracket at each end of the Top Rail (3) to the bolt holes on the inside-face of the Leg Frame (2). Fasten using Bolt (A) and Allen Key (D). Do not tighten completely.
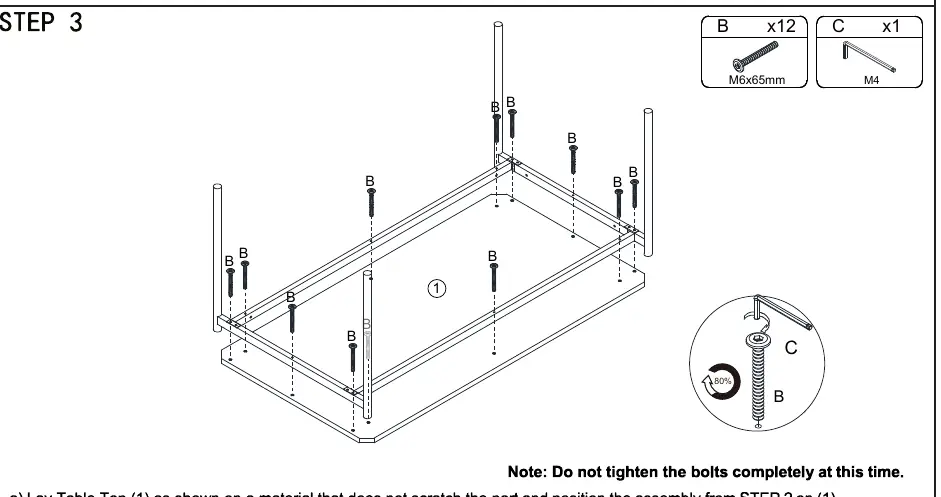
Step 3
Lay the Table Top (1) on a soft surface. Position the assembly from Step 2 onto the table top. Align the bolt holes on each part and fasten using Bolt (B) and Allen Key (C). Do not tighten completely.
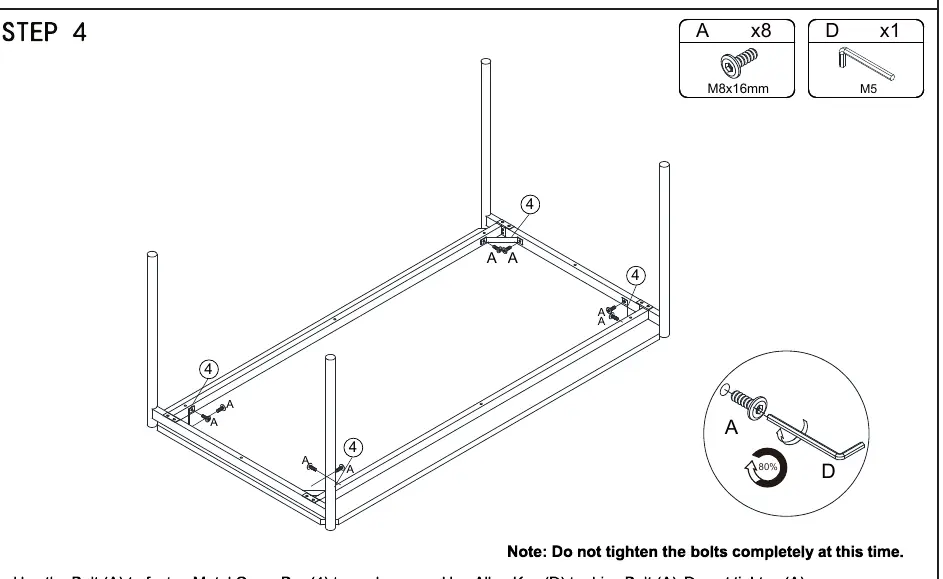
Step 4
Fasten the Metal Cross Bar (4) to each corner using Bolt (A) and Allen Key (D). Do not tighten completely.
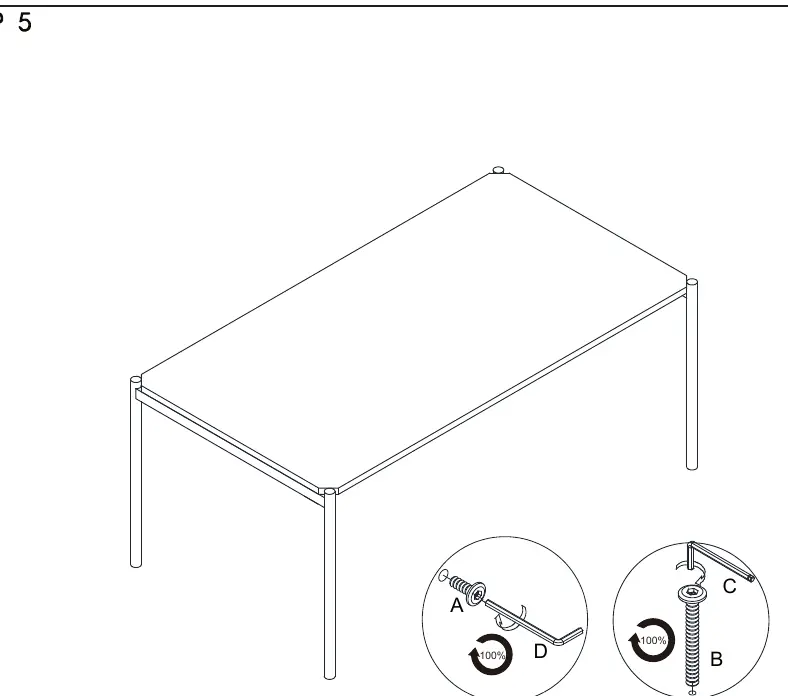
Step 5
With assistance, carefully set the table assembly right-side up. Tighten all bolts (A and B) completely using the provided Allen Keys.
Care and maintenance
- Wipe clean with a soft, dry cloth. Avoid harsh chemicals or household cleaners.
- Periodically check that all connections are tight; re-tighten if necessary.
- Protect the furniture from direct sunlight and air conditioning vents to prevent damage to the solid wood.
Manufacturer information
Wayfair LLC
Practical help
Common problems
Missing or damaged parts
Contact the customer service department for replacement parts.
Table surface scratched during assembly
Ensure assembly is performed on a soft surface like a carpet or rug.
Bolts are difficult to align
Do not tighten bolts completely until the final step to allow for adjustments.
Before use
- Clear a large area for assembly
- Use a soft surface (carpet or rug)
- Ensure 2 people are available for assembly
- Verify all parts and hardware are present
- Do not use power tools
Specs in practice
- Assembly Time
- Approximately 30 minutes
- Assembly Requirements
- 2-person assembly recommended
Images and diagrams
- The assembly overview shows the connection points between the table top, leg frames, top rails, and cross bars.
- Step-by-step diagrams indicate which bolts (A or B) and Allen keys (C or D) to use for each section.
Model compatibility
- For indoor and household use only.
- Not for commercial use.

Manual page author
Emily Carter
User documentation editor
Prepares concise manual descriptions and highlights the most useful setup, operation, and maintenance information for readers.