Furniture / Bathroom Furniture
allen + roth 1116WC-26-320 Wrightsville Wall Cabinet
Quick guide for the allen + roth 1116WC-26-320 Wrightsville Wall Cabinet. Includes assembly instructions, door adjustment steps, maintenance tips, and parts list.
Table of contents
Manual images
Click an image to enlargeQuick guide from the manual
This document provides essential instructions for the installation and maintenance of the allen + roth Wrightsville Wall Cabinet (Model 1116WC-26-320). The estimated assembly time is 20 minutes, though you should allow 24 hours for any silicone caulk to dry. It is recommended that two adults perform the installation.
Installation
Before beginning, ensure all parts are present and you have the necessary tools: Phillips screwdriver, utility knife or scissors, power drill with drill bit, measuring tape, and a level.
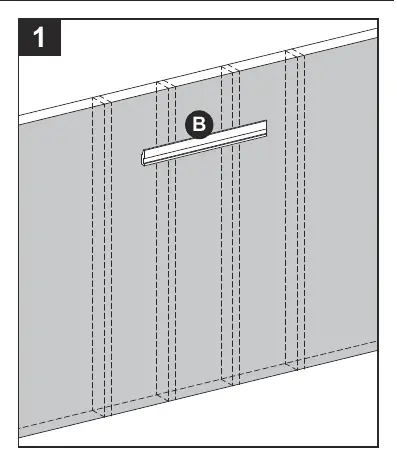
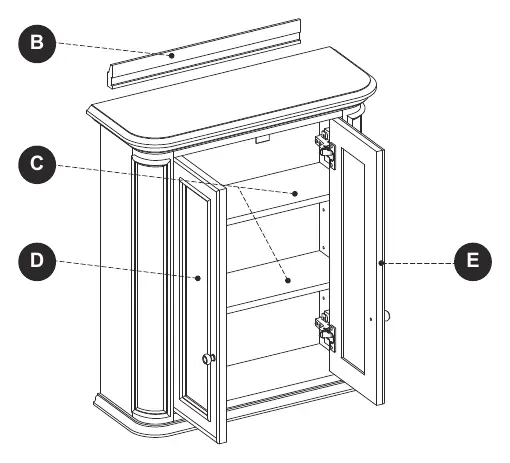
- Step 1: Locate and mark wall stud locations. Center the Wall Bracket (B) at the desired height and mark the locations where the bracket meets the wall studs.
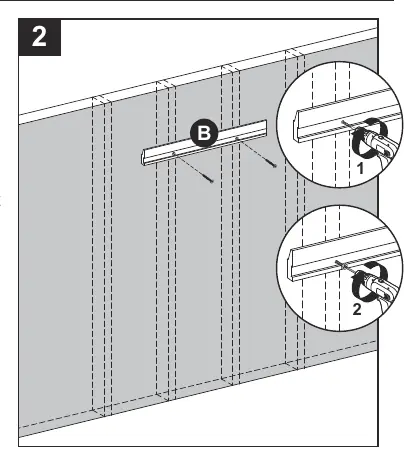
- Step 2: Secure the Wall Bracket (B) to the wall using appropriate hardware (not included) into at least 2 wall studs. Ensure the bracket is level and centered.
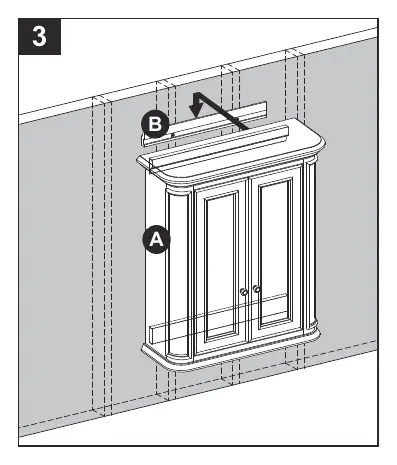
- Step 3: With the help of another adult, carefully lower the Cabinet (A) onto the Wall Bracket (B). Ensure the cabinet is secure before letting go.
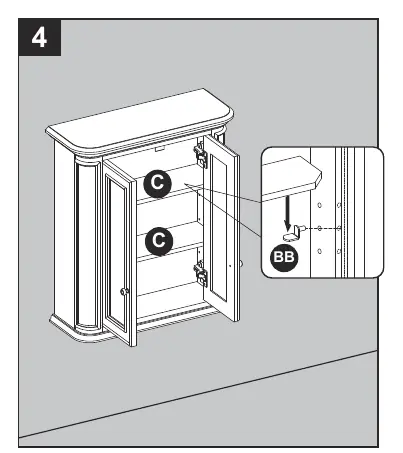
- Step 4: Insert shelf pins (BB) at the desired height and place the shelves (C) on top of the pins.
Door Adjustment
If the doors require alignment, use the screws on the hinges:

- Up or Down: Loosen screws (a) on both hinges, adjust the door, and retighten.
- Left or Right: Turn screws (b) on both hinges to move the door in or out.
- In or Out: Loosen screws (c) on both hinges, adjust the door, and retighten.
Care and Maintenance
- Dust the cabinet regularly with a soft, non-lint producing cloth.
- Clean with a gentle, non-abrasive household cleaner.
- Dry the wood immediately with a soft cloth or towel.
- For scratches, use the included touch-up pen (AA), stroking in the direction of the scratch and rubbing off excess colorant promptly.
Warranty
The manufacturer warrants this item against defects in materials and workmanship for a period of one (1) year from the date of original retail purchase. This warranty applies only to the original purchaser and does not cover damage from accident, misuse, or improper installation.
Practical help
Common problems
Cabinet is not level or secure
Ensure the Wall Bracket (B) is perfectly level and screwed into wall studs before hanging the cabinet.
Door is misaligned
Use the hinge adjustment screws: (a) for vertical, (b) for horizontal, and (c) for depth adjustment.
Missing parts
Call customer service at 1-866-439-9800, 8 a.m. - 8 p.m., EST, Monday - Sunday.
Before use
- Verify all parts (Cabinet, Wall Bracket, Shelves, Doors) are present.
- Ensure you have a Phillips screwdriver, drill, and level.
- Locate wall studs for secure mounting.
- Have a second adult available to assist with lifting the cabinet.
- Check for plumbing or electrical lines behind the wall before drilling.
Specs in practice
- Estimated Assembly Time
- 20 minutes (plus 24 hours for silicone caulk to dry).
Images and diagrams
- Hinge adjustment screws: (a) adjusts door up/down, (b) adjusts door left/right, (c) adjusts door in/out.
Model compatibility
- Requires wall studs for secure installation.
- Hardware for wall mounting is not included and must be appropriate for your wall type (e.g., cabinet screw or toggle bolt).

Manual page author
Michael Turner
Technical manual editor
Reviews PDF manuals for structure, safety notes, and practical product details so readers can find the right information quickly.