Electronics / Audio
Installation Manual for Teito SLR Roof Kit for Yamaha Tricity 125/155
Comprehensive installation and assembly guide for the Teito SLR roof kit designed for Yamaha Tricity 125 and 155 scooters. Includes safety warnings, torque specifications, step-by-step assembly instructions, and maintenance tips.
Table of contents
Manual images
Click an image to enlargeImportant Information from the Manual
This document provides assembly and installation instructions for the Teito SLR (Super Light Roof) kit designed for Yamaha Tricity 125 and 155 scooters. It is essential to follow these procedures carefully to ensure safety and product longevity. The manual includes specific torque settings for fasteners and detailed steps for mounting the roof, screen, and wiper system.
Safety Warnings
- Usage Restrictions: Do not use the product in strong winds, stormy weather, on highways, or on expressways.
- Installation: It is recommended to have the kit installed by a professional mechanic with state official approval.
- Weight Distribution: Be aware of changes in weight distribution after installation and perform a practice run.
- Visibility: Do not place objects between the front screen and the handle, as this may obstruct vision or interfere with steering.
- Maintenance: Regularly check that all bolts and nuts are securely tightened.
Torque Specifications
When assembling, refer to the following general tightening torques to prevent damage:
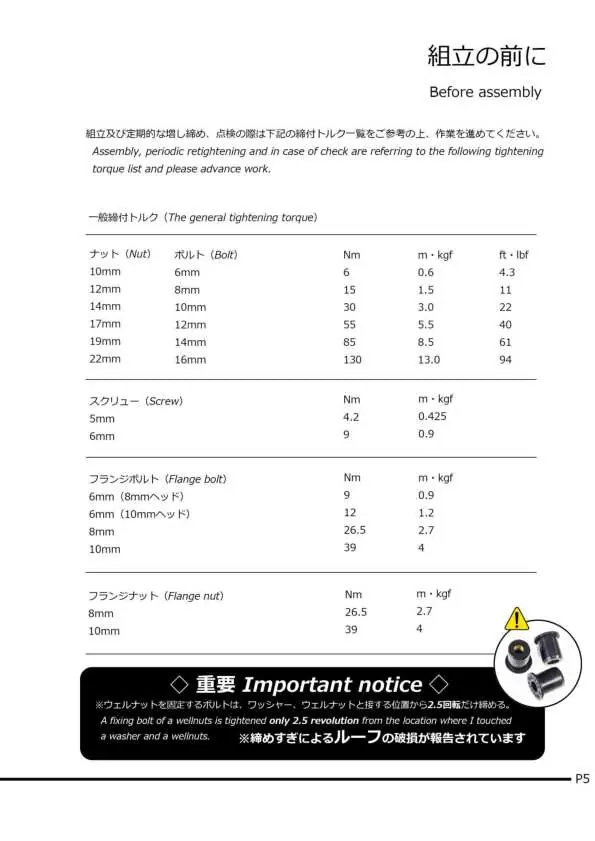
- Nuts: 10mm (6 Nm), 12mm (15 Nm), 14mm (30 Nm), 17mm (55 Nm), 19mm (85 Nm), 22mm (130 Nm).
- Screws: 5mm (4.2 Nm), 6mm (9 Nm).
- Flange Bolts: 6mm (9-12 Nm), 8mm (26.5 Nm), 10mm (39 Nm).
- Wellnuts: Tighten only 2.5 revolutions after the bolt touches the washer to avoid damaging the roof.
Assembly and Installation
The installation process involves several key phases:
1. Preparation and Removal
Remove the original windshield, mounting hardware, and rear-view mirrors. Remove the upper handle cover, rear cover, front upper panel, and upper leg shield as required for access.
2. Drilling and Frame Assembly
Use a hole saw to create necessary openings in the front upper panel (32mm) and rear cover (21mm). Assemble the front frame by installing mirror brackets, the main harness earth wire, and the motor.
3. Mounting the Roof and Screen
Install the rear frame and rear deck. Secure the roof outer and inner parts to the rear frame using wellnuts and washers. Attach the front screen to the roof and front frame, ensuring the wellnuts are tightened correctly.
4. Final Components
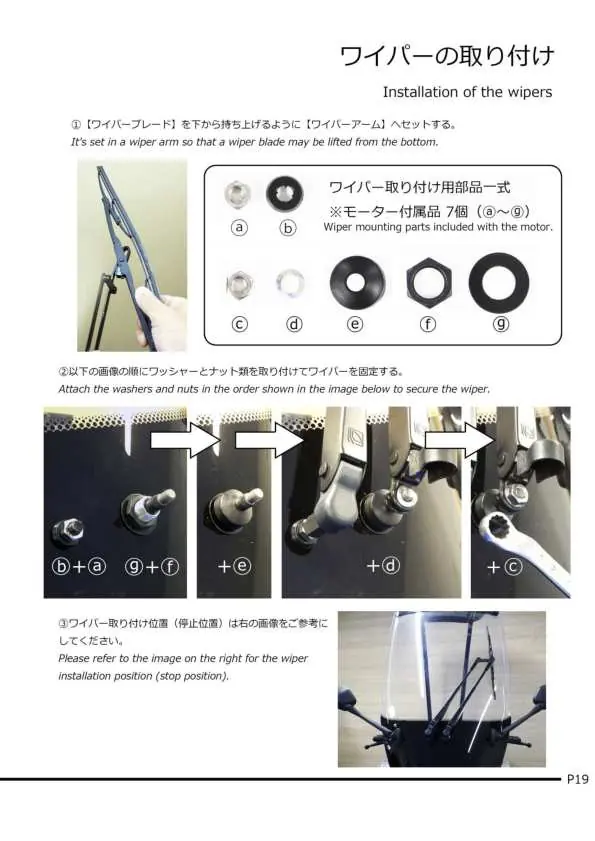
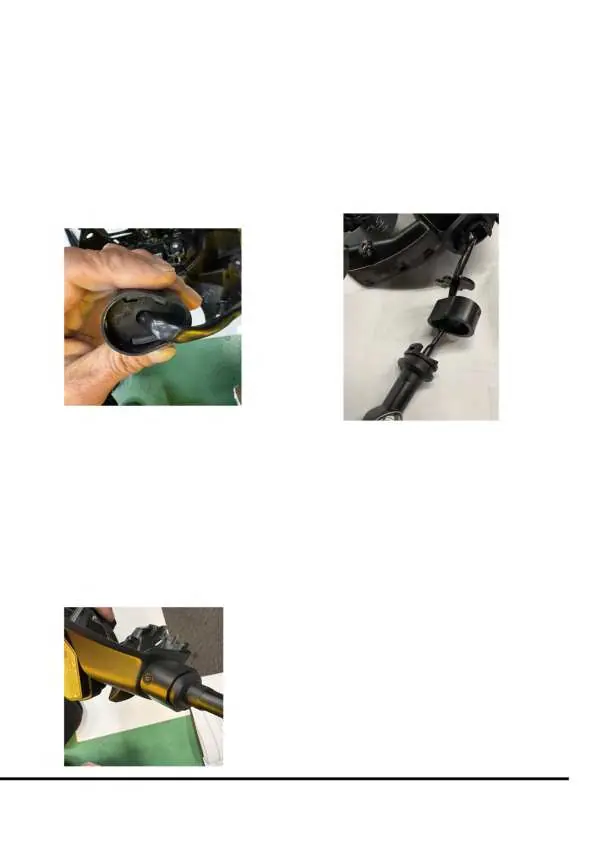
Install the mirrors, wiper system, and front inner cover. Connect the switch harness and main harness. Perform an operations check to ensure the wiper functions correctly and the accessory terminal is properly connected and waterproofed.
Maintenance and Cleaning
To maintain the front screen and roof:
- Keep the screen clean to ensure visibility.
- Use a soft cloth or sponge with diluted neutral detergent for cleaning.
- Avoid using organic solvents, strong detergents, or high-pressure washers, as these can damage the materials.
- Avoid parking in direct sunlight to prevent heat-related deformation.
Manufacturer information
Yamaha
Practical help
Common problems
Roof damage
Often caused by overtightening wellnuts. Tighten only 2.5 revolutions after the bolt touches the washer.
Visibility obstruction
Do not place items between the front screen and the handle.
Wiper malfunction
Ensure the main switch is on and the wiper switch is correctly operated.
Before use
- Verify all bolts and nuts are tightened to specified torque.
- Check wiper operation.
- Ensure accessory terminal is waterproofed and insulated.
- Check for any loose parts after installation.
- Verify the screen is clean and free of cracks.
Specs in practice
- Wellnut tightening
- Tighten 2.5 revolutions after the bolt touches the washer.
- Roof kit weight
- 9.9 kg total (8.9 kg excluding unnecessary parts).
- General torque (10mm nut)
- 6 Nm.
- General torque (12mm nut)
- 15 Nm.
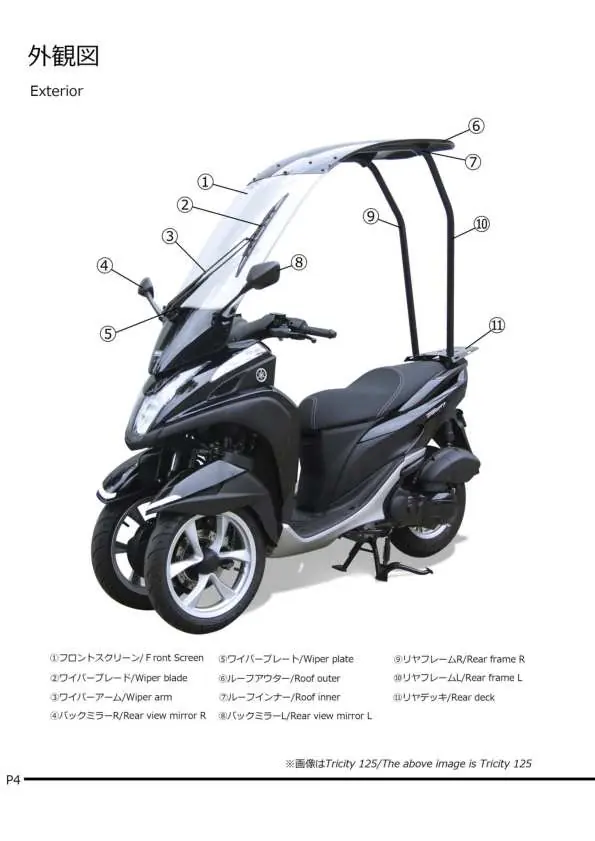
Images and diagrams
- Exterior view identifies parts 1-11 including screen, wiper, and frames.
- Torque table provides specific Nm values for various nut and bolt sizes.
- Wellnut diagram illustrates the 2.5 revolution tightening rule.
Model compatibility
- Designed for Yamaha Tricity 125 and 155.
- Not for use in strong wind, stormy weather, highway, or expressway.

Manual page author
Emily Carter
User documentation editor
Prepares concise manual descriptions and highlights the most useful setup, operation, and maintenance information for readers.