Lighting / Fixtures
Installation Guide for Z-Lite 1944F22 LED Flush Mount Ceiling Light
Step-by-step installation and assembly instructions for the Z-Lite 1944F22 LED Flush Mount Ceiling Light. Includes wiring diagrams, mounting plate setup, and shade attachment procedures.
Quick answers from the manual
Quick answer
- This document provides the assembly and installation instructions for the Z-Lite 1944F22 LED Flush Mount Ceiling Light, covering mounting plate installation, wiring, and shade attachment. p. 1
Key actions
- Shut off power at the circuit breaker box before starting. p. 1
- Ensure the side of the mounting plate marked 'GND' faces outward. p. 1
First start
- After installation, restore power at the circuit breaker and test the lamp. p. 1
Show 1 more answers Show less
Where to find it in the PDF
- Installation Instructions p. 1
Quick Guide for Installation
This document provides the necessary steps to install the Z-Lite 1944F22 LED Flush Mount Ceiling Light. Before beginning, ensure you have turned off the power at the circuit breaker box to avoid electrical shock. Always consult local electrical codes regarding wiring and grounding requirements.
Installation Steps
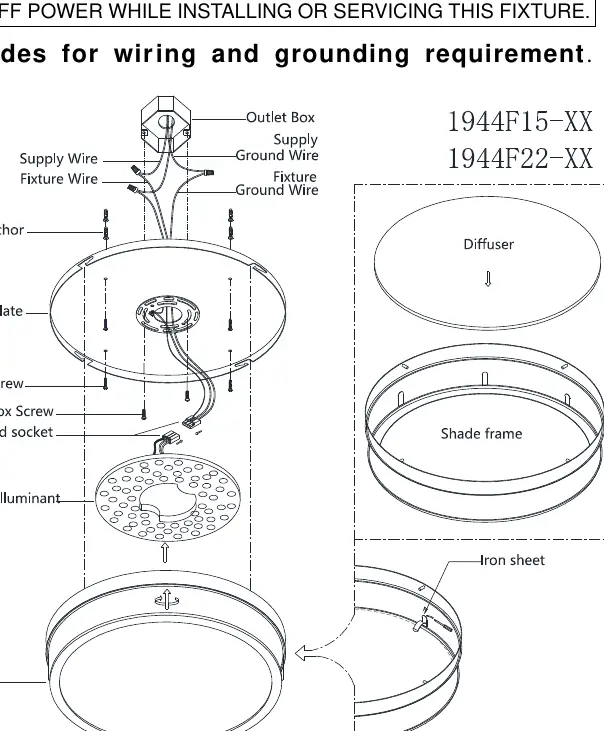
- Preparation: Shut off the power at the circuit breaker box and remove the old fixture and hardware from the outlet box. Unpack the new fixture and organize all parts.
- Mounting Plate: Hold the mounting plate against the ceiling outlet box. Align the two thread holes and mark the anchor screw holes with a pencil. Drill the holes and insert plastic anchors. Attach the mounting plate to the outlet box using the two outlet box screws and four anchor screws. Ensure the side marked "GND" faces outward.
- Wiring Connections:
- Connect the fixture ground wire to the supply ground wire using a wire nut or the green ground screw on the mounting plate.
- Connect the fixture white wire to the supply white wire (or ridge wire) using a wire nut.
- Connect the fixture black wire to the supply black wire (or smooth wire) using a wire nut.
- Ensure all connections are secure and tuck the wires carefully inside the outlet box.
- LED Illuminant Attachment: Attach the LED illuminant to the ceiling mounting plate; the magnet will hold it in place. Insert the power plug into the socket.
- Shade Assembly: Install the diffuser into the shade frame and secure it with the iron sheets.
- Final Mounting: Attach the assembled shade to the ceiling mounting plate by aligning the top studs of the shade with the slots on the mounting plate. Rotate the shade until the studs are seated in the slots.
- Testing: Restore power to the outlet box and test the lamp.
Practical help
Common problems
Fixture does not light up after installation
Verify that the power plug is securely inserted into the socket and that all wire connections are tight and correctly matched.
Before use
- Shut off power at the circuit breaker box
- Verify local electrical codes for wiring and grounding
- Ensure all parts are unpacked and accounted for
- Have a pencil and drill ready for mounting plate installation
Show more Show less
Images and diagrams
- The diagram illustrates the mounting plate orientation with the 'GND' side facing out.
- Wiring connections are shown using wire nuts for ground, white, and black wires.
- The shade attaches to the mounting plate via slots and a rotation mechanism.
Model compatibility
- Requires an existing outlet box (not included).

Manual page author
Michael Turner
Technical manual editor