Lighting / Fixtures
Z-Lite 2102F3 Flush Mount Installation Manual
Quick guide for installing the Z-Lite 2102F3 flush mount fixture. Includes wiring instructions, assembly steps, and safety precautions.
Quick answers from the manual
Quick answer
- This manual provides instructions for the safe installation and wiring of the Z-Lite 2102F3 flush mount fixture. p. 1
Key actions
- Turn off the main power at the circuit breaker before starting. p. 1
- Connect Ribbed wire to White wire and Smooth wire to Black wire. p. 1
First start
- Install bulbs (not included) after completing the fixture assembly. p. 1
Show 1 more answers Show less
Where to find it in the PDF
- Installation Instructions p. 1
Table of contents
Quick guide from the manual
This document provides instructions for the safe installation of the Z-Lite 2102F3 flush mount fixture. Before beginning, ensure the main power is turned off at the circuit breaker to prevent electric shock. All electrical connections must comply with local and National Electrical Code (N.E.C.) standards. If you are not familiar with proper wiring, consult a qualified electrician.
Assembly and Installation
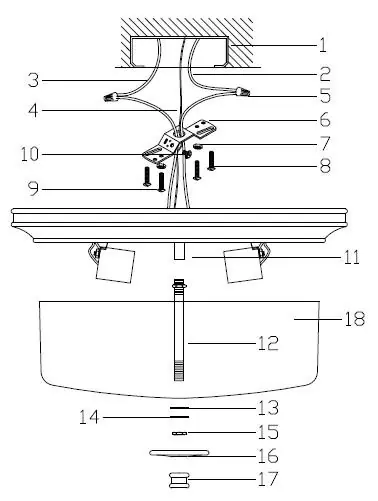
- Thread the Nipple (12) with Hex Nut to the Connector (11).
- Place the Glass (18), Rubber washer (13), and Flat washer (14) in position, then screw on the Hex nut (15).
- Attach the Cap (16) to the fixture and secure it with the Finial (17).
- Secure the Mounting bracket (6) to the Outlet box (1) using the Mounting screw (8).
- Pull out the outlet wire and ground wire from the Outlet box (1) to make connections.
- Attach the fixture pan against the Outlet box (1) and secure it with the Mounting screw (9). Ensure the Mounting bracket (6) fits correctly against the fixture KEY HOLE SLOTS.
Wiring Instructions
Make the following wire connections:
- Ribbed wire (w/o marking) from light: Connect to the White wire (2) from the power source.
- Smooth wire (w/o marking) from light: Connect to the Black wire (3) from the power source.
- Ground wire (4): Loop to the Mounting bracket (6) using the Green screw (10).
Bulb Installation
Install the bulbs (not included) into the sockets. Ensure that the bulbs do not exceed the maximum capacity recommended on the sockets.
Practical help
Common problems
Fixture does not fit properly against the outlet box
Check the Mounting bracket against the fixture KEY HOLE SLOTS to ensure proper fit.
Before use
- Turn off the main power at the circuit breaker
- Verify all parts are present using the provided illustration
- Ensure supply conductors are rated for at least 90ºC
- Consult a qualified electrician if unfamiliar with wiring
Show more Show less
Specs in practice
- Supply conductors
- Must be rated for at least 90ºC.
Images and diagrams
- The diagram illustrates the assembly order of the fixture, including the mounting bracket, nipple, glass, and finial.
Model compatibility
- Bulbs are not included.
- Do not exceed the maximum wattage capacity recommended on the sockets.

Manual page author
Emily Carter
User documentation editor