Computers / Printers
Zebra 105SL Industrial/Commercial Printer User Guide
Comprehensive user guide for the Zebra 105SL industrial printer. Includes setup, media loading, configuration, maintenance, and troubleshooting procedures.
Table of contents
Manual images
Click an image to enlargeQuick guide from the manual
This guide provides essential information for operating the Zebra 105SL industrial printer. Before beginning, ensure the printer is placed on a solid, level surface with adequate space for ventilation and access to the media compartment. Always use an approved three-conductor power cord.
Printer Setup
Before using the printer, complete the following steps:
- Unpack and Inspect: Check for shipping damage and save all packing materials.
- Site Selection: Choose a solid, level surface with proper operating conditions (temperature and humidity).
- Data Connection: Connect the printer to your computer or network using the appropriate interface (RS-232 Serial, IEEE 1284 Parallel, or optional Ethernet/Wireless print servers).
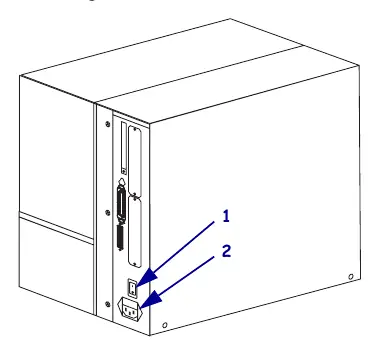
- Power Connection: Plug the power cord into the AC power connector on the rear of the printer and then into a grounded outlet.
Media and Ribbon Loading
The printer supports various media types, including roll and fanfold. The loading procedure depends on the print mode:

- Tear-Off Mode: The default mode where labels are torn off after printing.
- Peel-Off Mode: Requires the Peel or Rewind option; the liner is peeled away during printing.
- Rewind Mode: Requires the Rewind option; printed labels are rewound onto a core.
- Cutter Mode: Requires the Cutter option; labels are automatically cut after printing.
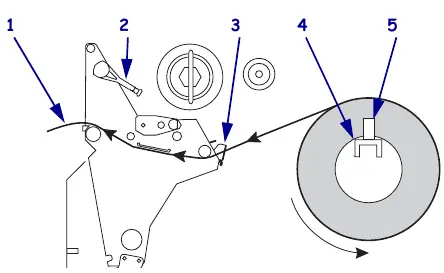
Loading Ribbon: Always use ribbon wider than the media. Ensure the ribbon is coated on the outside. Use the ribbon supply spindle and take-up spindle to load the ribbon, ensuring it is taut and properly aligned.
Configuration
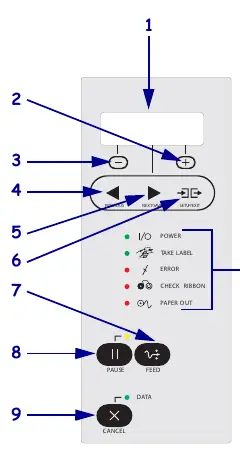
Use the control panel to set printer parameters. Press SETUP/EXIT to enter Setup mode. Use the NEXT/SAVE or PREVIOUS buttons to scroll through parameters. Changes can be saved as permanent or temporary. If necessary, you can restore factory defaults using the FEED and PAUSE self-test.
Routine Maintenance
Regular maintenance ensures optimal print quality and extends the life of the printer:
- Cleaning: Clean the printhead and platen roller after every roll of ribbon or when print quality degrades. Use the recommended solvent or a clean swab dipped in a solution of isopropyl alcohol (minimum 90%) and deionized water.
- Sensors: Regularly brush or vacuum dust and lint from the media compartment and sensors.
- Cutter: Clean the cutter blade if it jams or does not cut cleanly.
Troubleshooting
If you encounter issues, consult the following:
- LCD Error Messages: Check the display for specific error codes (e.g., RIBBON OUT, PAPER OUT, HEAD OPEN).
- Print Quality: Adjust print speed, darkness, or printhead pressure if print is too light, too dark, or missing.
- Self-Tests: Use the Power-On, CANCEL, PAUSE, or FEED self-tests to diagnose printer conditions and verify settings.
Manufacturer information
Zebra Technologies
Practical help
Common problems
Ribbon Out error
Ensure ribbon is loaded correctly and coated side is out. Calibrate sensors if the error persists.
Print quality issues (light/dark/voids)
Adjust print darkness, print speed, or printhead pressure. Clean the printhead and platen roller.
Misregistration or skipping labels
Recalibrate the printer and ensure media sensors are positioned correctly.
Communication errors
Verify communication parameters (baud, parity, data bits) match the host computer settings.
Before use
- Unpack and inspect the printer for shipping damage.
- Select a solid, level surface with proper operating conditions.
- Determine the data communication interface (Serial, Parallel, Ethernet).
- Ensure you have the correct power cord for your region.
- Select the appropriate media and ribbon for your application.
- Verify the ribbon is coated on the outside.
Images and diagrams
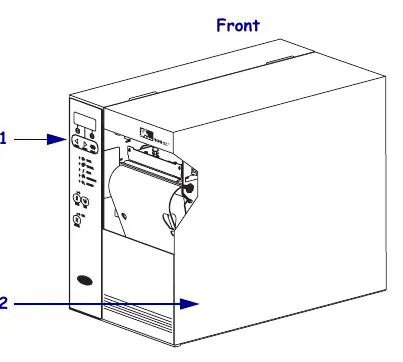
- Exterior view showing control panel, media door, and power switch.
- Control panel layout with LCD and navigation buttons.
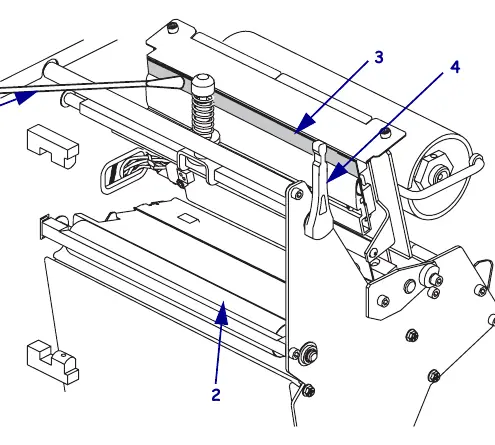
- Media compartment showing spindles, guides, and printhead lever.
- Ribbon path diagram for correct loading.
- Sensor profile diagram for troubleshooting media/ribbon detection.
Model compatibility
- Supports Type I and Type II PCMCIA cards.
- Compatible with ZPL and ZPL II programming languages.
- Optional Ethernet and Wireless print servers available.

Manual page author
Michael Turner
Technical manual editor
Reviews PDF manuals for structure, safety notes, and practical product details so readers can find the right information quickly.