Power / USB Chargers
User Manual for Sabrent DA-HDEX HDMI Extender
Quick guide for the Sabrent DA-HDEX HDMI Extender. Learn how to connect your transmitter and receiver, set up IR pass-through, and troubleshoot common connection issues.
Table of contents
Manual images
Click an image to enlargeQuick guide from the manual
The Sabrent DA-HDEX is an HDMI extender kit designed to transmit high-definition signals over a single CAT6 cable. It consists of a Transmitter (TX) and a Receiver (RX) unit. Key capabilities include support for 1080p resolution at 60Hz, uncompressed audio (LPCM), and IR pass-through for remote control functionality. The system is plug-and-play and supports transmission distances up to 164 feet (50 meters).
Package contents
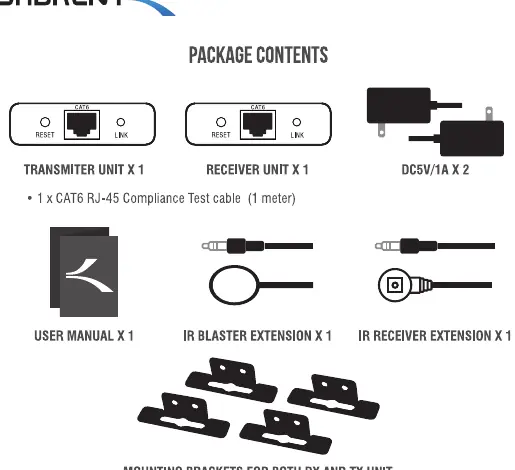
- 1 x Transmitter Unit (TX)
- 1 x Receiver Unit (RX)
- 2 x DC5V/1A Power Adapters
- 1 x CAT6 RJ-45 Compliance Test cable (1 meter)
- 1 x IR Blaster Extension
- 1 x IR Receiver Extension
- Mounting brackets for both units
Important safety instructions
- Do not remove or attach cables while the device is plugged in.
- Use only the included 5V DC power adapter; using other adapters is not recommended.
- Take ESD (electrostatic discharge) precautions to prevent damage to the device.
Installation requirements

- HDMI source device (e.g., cable box, computer, DVD/Blu-ray player, game console).
- HDMI display device (e.g., TV, monitor, projector).
- CAT6 or higher network cable (up to 50 meters).
How to connect
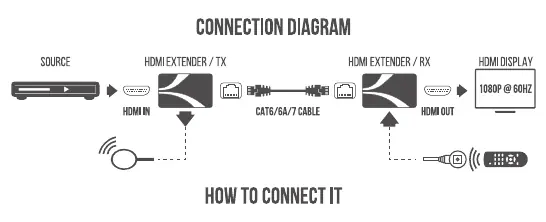
- Connect your HDMI source device to the Transmitter (TX) using an HDMI cable.
- Connect your display device to the Receiver (RX) using an HDMI cable.
- Connect the Transmitter (TX) and Receiver (RX) using a CAT6, CAT6A, or CAT7 network cable. Note: Use the included 1-meter test cable to verify connectivity before using longer cables.
- Connect both units to their respective 5V DC power adapters. Once powered, the units will sync, and the image should appear on the display.
Using the IR remote control pass-through
This feature allows you to use your device's original remote control even when the source and display are in different rooms.
- Connect the IR receiver extension cable to the IR IN port on the Receiver (RX).
- Connect the IR blaster extension cable to the IR OUT port on the Transmitter (TX).
- Ensure the IR blaster emitter is placed as close as possible to the HDMI source device's IR sensor.
Troubleshooting
- No output on screen: Test with the included 1-meter CAT6 cable to rule out cable quality issues. Ensure the network cable is fully inserted and the display supports the input resolution.
- Abnormal color/resolution or no audio: Press the reset button on the transmitter to force the units to resynchronize.
- Image flickers when touching casing: Avoid touching the metal casing during operation or ensure the unit is properly grounded.
- General connectivity issues: Ensure the network cable length is within the 50-meter limit and that the source device is outputting a supported resolution.
Technical specifications
- Supported Resolutions: 480i/p@60Hz, 576i/p@50Hz, 720p@50/60Hz, 1080i@50/60Hz, 1080p@50/60Hz.
- IR Frequency: 20-60kHz.
- Power Consumption: Less than 2W per unit.
- Compatibility: HDMI 1.4 and HDCP 1.4.
Manufacturer information
Sabrent
Practical help
Common problems
No output on screen
Test with the included 1-meter CAT6 cable to rule out cable quality issues. Ensure the network cable is fully inserted and the display supports the input resolution.
Abnormal color, resolution, or no audio
Reset the transmitter by pressing the reset button to force the units to resynchronize.
Image flickers when touching the metal casing
Avoid touching the units during operation or ensure the unit is properly grounded.
Before use
- Verify you have both TX and RX units.
- Ensure you have two 5V DC power adapters.
- Check that you have a CAT6 or higher cable (up to 50 meters).
- Confirm your source device (e.g., Blu-ray player) and display (e.g., TV) have HDMI ports.
Specs in practice
- Transmission Distance
- Up to 164 feet (50 meters) over a single CAT6 cable.
- IR Frequency
- Supports 20-60kHz for remote control pass-through.
Images and diagrams
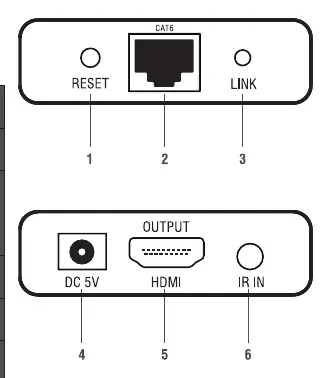
- Transmitter (TX) has HDMI Input, IR Output, and CAT6 Output.
- Receiver (RX) has HDMI Output, IR Input, and CAT6 Input.
Model compatibility
- Compatible with HDMI 1.4 and HDCP 1.4.
- Works with CAT6, CAT6A, or CAT7 cables.

Manual page author
Michael Turner
Technical manual editor
Reviews PDF manuals for structure, safety notes, and practical product details so readers can find the right information quickly.