Electronics / Video Transmission
Wireless 1080P HDMI Video Kit
Quick guide for the SIIG Wireless 1080P HDMI Video Kit. Includes installation steps, LED status indicators, IR extension setup, and troubleshooting for wireless signal issues.
Table of contents
Manual images
Click an image to enlargeQuick guide from the manual
The Wireless 1080P HDMI Video Kit is designed to transmit HDMI A/V signals wirelessly up to 165ft (50m) in line-of-sight conditions. It supports high-definition video up to 1080p at 60Hz and includes an IR extension feature for remote control of the source device. The system is plug-and-play, requiring no software installation.
Package Contents
- Wireless 1080P HDMI Video Kit (Transmitter and Receiver)
- IR blaster extension cable
- IR receiver extension cable
- Power adapters (x2)
- Power extension cables (x2)
- RP-SMA Wi-Fi antenna extension cable with stand (3m)
- User Reference Guide
Specifications
- Transport Protocol: HDbitT
- Transmission Distance: Up to 50m (165ft) line-of-sight
- Supported Resolutions: 1080p/1080i/720p/576p/576i/480p/480i
- Audio Format: R/L stereo audio (2-ch)
- Power Input: AC 100-240V, 50/60Hz
- Power Output: DC 5V/3A
- Operating Temperature: 32 to 104 degrees F
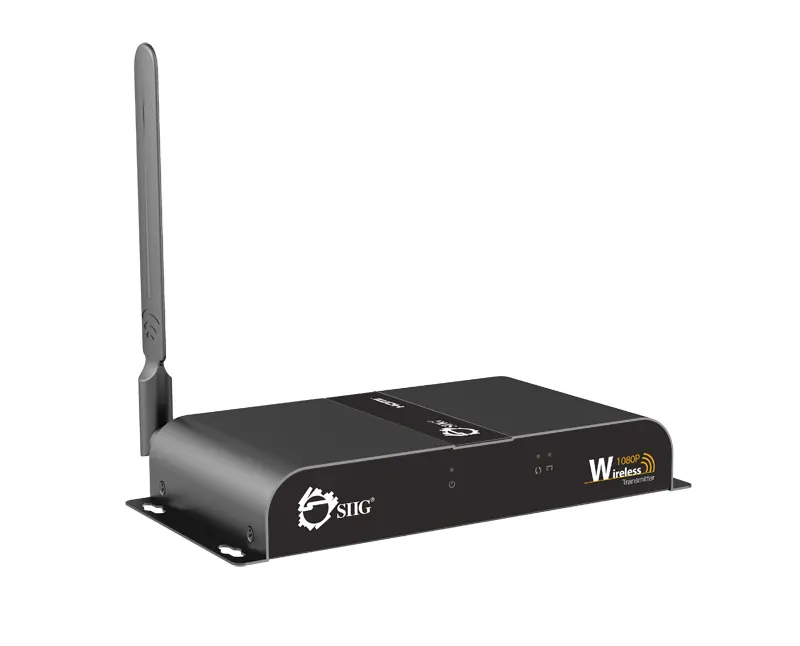
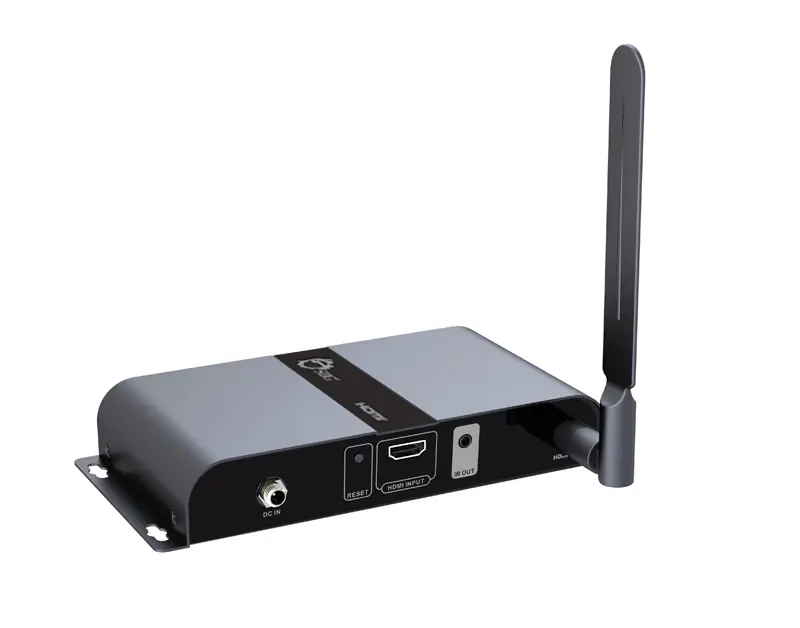
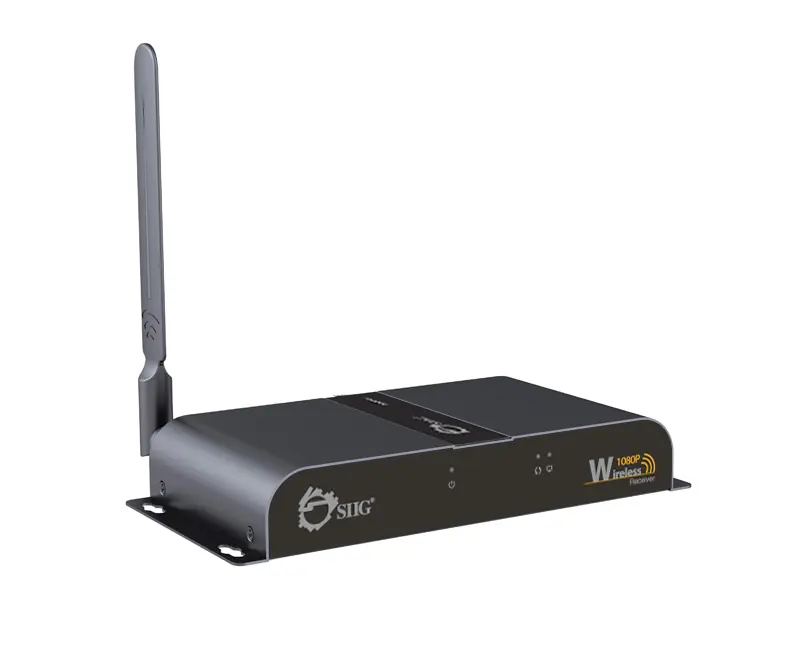
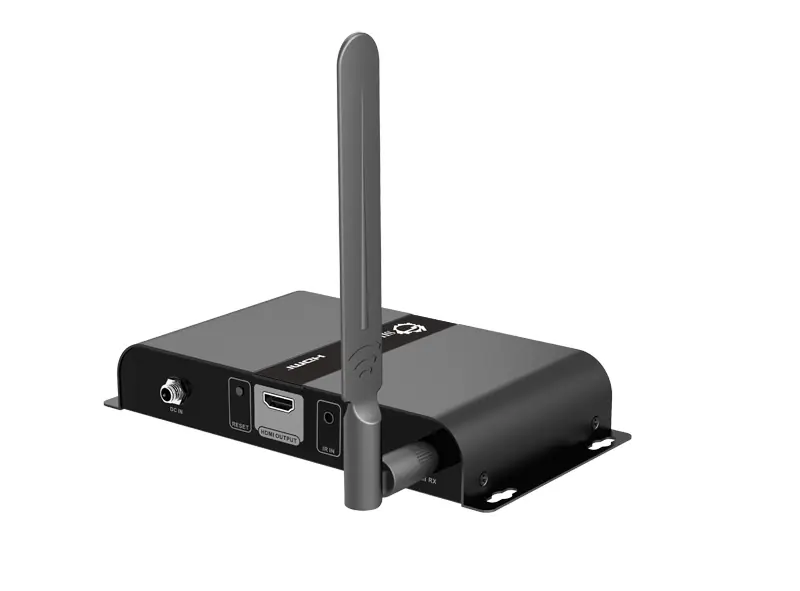
Product Layout
The system consists of a Transmitter (TX) and a Receiver (RX). Both units feature a Power LED, Data Transmission LED, and Connection LED on the front panel. The rear panels contain the Power Jack, Reset button, HDMI port, and IR port.
LED Indicators
- Power LED: Illuminated when the unit is powered on.
- Data Transmission LED: Slow blinking indicates establishing a connection; fast blinking indicates successful connection and data transmission.
- Connection LED: Illuminated when the wireless connection is linked properly.
IR Extension Setup
The IR extension feature allows you to control your HDMI source device from the location of the display.
- IR Blaster (IR OUT): Connects to the Transmitter's IR Out socket. Place the eye towards the HDMI source's IR receiver window.
- IR Receiver (IR IN): Connects to the Receiver's IR In socket. It receives signals from the remote control.
Note: Do not plug or unplug IR extension cables while the unit is powered on.
Hardware Installation
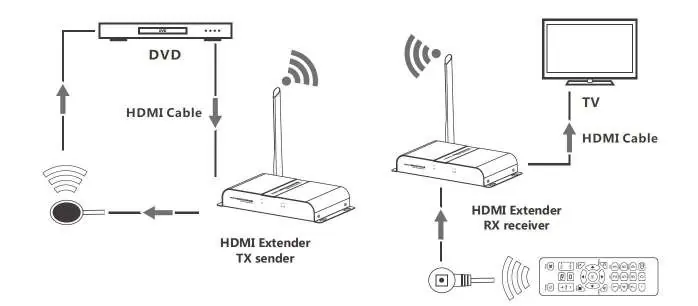
- Power off all devices, including the HDMI source and display.
- Install the included antennas on both the TX and RX units. Optionally, use the Wi-Fi antenna extension cable for better placement.
- Connect the HDMI source to the Transmitter's HDMI IN connector.
- Connect the IR Blaster extension cable to the Transmitter's IR Out (optional).
- Connect the HDMI display to the Receiver's HDMI OUT connector using an HDMI cable.
- Connect the IR Receiver extension cable to the Receiver's IR In (optional).
- Plug the power adapters into the Transmitter and Receiver, then connect to power outlets.
- Power on the HDMI device and the display.
Troubleshooting
If the TV displays "Waiting for connection...", check that both units are powered on and the LEDs are active. If the TV displays "Please check the TX input signal", ensure the HDMI source is connected to the Transmitter, try different HDMI cables, or test the source directly on the TV. If the unit is not working properly, ensure HDMI cables are under 2m, the distance is within 50m, and press the Reset button on both units.
Important Notices
- Wireless signals are affected by walls, glass, and brick, which may reduce transmission distance.
- External wireless signals (microwaves, wireless mice/keyboards) may cause interference.
- Keep the unit in a well-ventilated area to prevent overheating.
- Do not expose the unit to rain, moisture, or liquids.
- Do not open the housing, as this voids the warranty.
Manufacturer information
SIIG, Inc.
Practical help
Common problems
TV displays 'Waiting for connection...'
Check that power adapters for both Transmitter and Receiver are connected and the Power LED is ON.
TV displays 'Please check the TX input signal'
Verify the HDMI device is connected to the Transmitter, try different HDMI cables, or connect the source directly to the TV to verify the signal.
Unit not working properly
Ensure HDMI cables are within 2m, transmission distance is within 50m (line-of-sight), press the Reset button on both units, and remove obstacles or sources of wireless interference.
Before use
- Power off all devices before installation.
- Install antennas on both TX and RX units.
- Ensure HDMI cables used are within 2m length.
- Verify line-of-sight between units for optimal signal.
- Ensure the environment is well-ventilated.
Specs in practice
- Transmission Distance
- Up to 50m (165ft) in line-of-sight conditions; actual distance varies based on environment.
- Supported Resolutions
- Supports high-definition video up to 1080p @ 60Hz.
Images and diagrams
- Transmitter (TX) Front: Displays Power, Data Transmission, and Connection LEDs.
- Transmitter (TX) Rear: Features Power Jack, Reset button, HDMI In, and IR Out port.
- Receiver (RX) Rear: Features Power Jack, Reset button, HDMI Out, and IR In port.
Model compatibility
- Compatible with HDMI 1.3 and HDCP 1.2.
- Works with most HDMI-equipped devices including Blu-ray players, set-top boxes, AV receivers, cable/satellite boxes, and computers.

Manual page author
Emily Carter
User documentation editor
Prepares concise manual descriptions and highlights the most useful setup, operation, and maintenance information for readers.