Smart Home / Smart Switches
Zooz ZEN77 Dimmer Switch Installation Guide
Comprehensive installation and configuration guide for the Zooz ZEN77 700 Series Dimmer Switch. Includes detailed wiring diagrams for single-pole, 3-way, and 4-way setups, Z-Wave pairing instructions, advanced settings, and troubleshooting...
Quick answers from the manual
Quick answer
- The Zooz ZEN77 is a Z-Wave dimmer switch requiring a neutral wire. It supports single-pole, 3-way, and 4-way wiring configurations. Pairing is initiated by tapping the upper paddle 3 times while the hub is in inclusion mode. p. 1
Key actions
- Pairing (Inclusion) p. 1
- Factory Reset p. 1
First start
- Turn off power at the breaker, wire the switch according to the diagram (ensure neutral is connected), restore power, and initiate inclusion on your Z-Wave hub. p. 1
Problems and fixes
Device not pairing
Perform an exclusion: put hub in exclusion mode and tap lower paddle 3 times.
p. 1Maintenance and reset
- Factory Reset: Hold lower paddle for 10 seconds until LED blinks, then tap lower paddle 5 times. p. 1
Technical specifications
| Parameter | Value | Meaning | Pages |
|---|---|---|---|
| Voltage | 120 VAC | Operating voltage | p. 1 |
| Max LED Load | 100W | Maximum LED wattage | p. 1 |
| Max Incandescent Load | 300W | Maximum incandescent wattage | p. 1 |
Where to find it in the PDF
- Installation and Wiring p. 1, 2
- Advanced Settings and Troubleshooting p. 1
Table of contents
Manual images
Click an image to enlargeImportant Information
The Zooz ZEN77 is a 700 Series Z-Wave dimmer switch designed for lighting control. This document provides essential instructions for installation, wiring, and Z-Wave network integration. Important: This device requires a neutral wire for installation. It is intended for indoor use only and must be installed by a licensed electrician in accordance with the National Electrical Code and local regulations.
Safety Warnings
- Turn off power at the circuit breaker before starting any installation.
- Do not use this device to control electric heaters, fans, or tube lights.
- Ensure the wiring matches the diagrams exactly.
- Do not install in areas exposed to direct sunlight, high temperatures, or humidity.
Installation and Wiring
Before installing, ensure you have a neutral wire in the switch box. Use 14 AWG wire for all connections.

Single Pole Installation
- Turn off power at the breaker.
- Connect the ground wire to the Ground terminal.
- Connect the power line to the Line terminal.
- Connect the load wire to the Load terminal.
- Connect the neutral wire to the Neutral terminal.
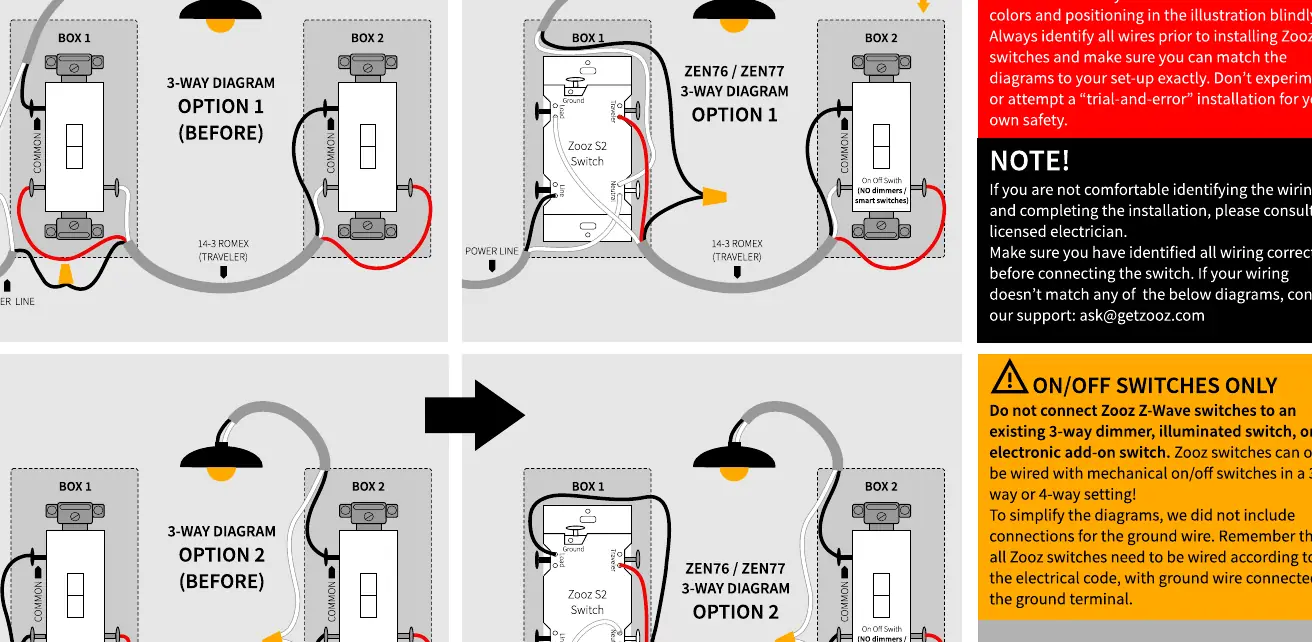
3-Way and 4-Way Installations
The ZEN77 supports multi-point control. Refer to the specific wiring diagrams provided in the manual for 3-way and 4-way configurations. Do not attempt "trial-and-error" wiring; if your setup does not match the provided diagrams, consult a professional.
Z-Wave Pairing
- Initiate inclusion on your Z-Wave hub (or web interface).
- Tap the upper paddle 3 times quickly to start the inclusion process.
- The LED indicator will blink to signal communication.
Advanced Settings
The ZEN77 includes several customizable features:
- Smart Bulb Mode: Disables the relay and allows the switch to control smart bulbs via Z-Wave. Hold the paddle down for 10 seconds, then tap the upper paddle 5 times.
- Scene Control: Allows triggering scenes on your hub using multi-tap actions (1-tap, 2-tap, 3-tap, 4-tap, 5-tap).
- Night Light Mode: Configurable to turn lights on to 20% brightness.
Troubleshooting
If the switch does not pair or respond:
- Exclusion: If the device fails to pair, perform an exclusion first. Put the hub in exclusion mode and tap the lower paddle 3 times.
- Factory Reset: If the primary controller is missing or unresponsive, perform a factory reset. Press and hold the lower paddle for 10 seconds until the LED indicator starts blinking. Release the paddle, then immediately tap the lower paddle 5 times.
Technical Specifications
- Model: ZEN77 VER. 1.0
- Power: 120 VAC, 60 Hz
- Load Capacity: 100W LED, 300W Incandescent
- Z-Wave Frequency: 908.42 MHz
Practical help
Common problems
Switch does not pair with hub
Perform an exclusion first: put hub in exclusion mode and tap lower paddle 3 times, then try inclusion again.
Switch does not control lights
Verify that the neutral wire is connected and that the load is not a fan or tube light.
Factory reset needed
Press and hold the lower paddle for 10 seconds until the LED blinks, then tap the lower paddle 5 times.
Before use
- Ensure a neutral wire is present in the switch box.
- Turn off power at the circuit breaker.
- Verify the load is compatible (LED or Incandescent only).
- Use 14 AWG wire for connections.
- Confirm the switch is for indoor use only.
Specs in practice
- 120 VAC, 60 Hz
- Standard North American residential power supply.
- 300W Incandescent
- Maximum load capacity for incandescent bulbs.
Images and diagrams
- Single Pole: Standard installation for one switch controlling one light.
- 3-Way: Installation for two switches controlling one light.
- 4-Way: Installation for three or more switches controlling one light.
Model compatibility
- Not compatible with fans or tube lights.
- Requires Z-Wave certified hub for advanced features.
- Compatible with 700 Series Z-Wave networks.

Manual page author
Emily Carter
User documentation editor
Prepares concise manual descriptions and highlights the most useful setup, operation, and maintenance information for readers.