Lighting / Controllers & Dimmers
User Manual for Idinio 140194 Smart 2-Way Wifi Dimmer
Quick guide for the Idinio 140194 Smart 2-Way Wifi Dimmer. Includes installation wiring instructions, app setup, reset procedures, and technical specifications.
Quick answers from the manual
Quick answer
- The Idinio 140194 is a smart 2-way WiFi dimmer. It requires a 2.4GHz WiFi connection and is installed by connecting to the existing electrical wiring. p. 1
Key actions
- Install the dimmer by connecting L and N wires. p. 1
- Pair the device using the Idinio Smart App. p. 2
First start
- Download the Idinio Smart App, ensure 2.4GHz WiFi is active, and hold the reset button for 5 seconds to enter pairing mode. p. 2
Problems and fixes
Device not connecting
Ensure 2.4GHz WiFi, check signal strength, reset device.
p. 2Maintenance and reset
- Hold the reset button for 5 seconds until the LED flashes. p. 2
Technical specifications
| Parameter | Value | Meaning | Pages |
|---|---|---|---|
| Voltage | 220-240V~ | Operating voltage | p. 1 |
| Max Load (LED) | 5-225W | Supported LED load | p. 1 |
| Max Load (AGL/HAL) | 10-250W | Supported incandescent/halogen load | p. 1 |
Where to find it in the PDF
- Installation and Wiring p. 1
- App Setup and Troubleshooting p. 2
Table of contents
Manual images
Click an image to enlargeQuick guide from the manual
The Idinio 140194 Smart 2-Way Wifi Dimmer allows you to control your lighting via the Idinio Smart App. This device requires a 2.4GHz WiFi network for setup and operation. Before installation, ensure the power is turned off at the fuse box.
Installation
Installation must be performed by a qualified person. Ensure the power is disconnected before starting.
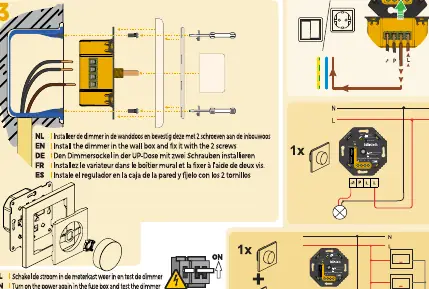
- Turn off the power at the fuse box.
- Connect the wires according to the wiring diagram provided in the manual.
- Ensure the dimmer is installed in the wall box and secured with the two screws.
- Turn the power back on at the fuse box.
App Setup
To connect the dimmer to your smartphone:
- Download the Idinio Smart App from the App Store or Google Play.
- Ensure your smartphone is connected to a 2.4GHz WiFi network (5GHz is not supported).
- Hold the reset button on the dimmer for 5 seconds until the LED indicator flashes.
- Open the app and select the device to add it.
Operation
Once connected, you can control the light via the app or the physical button on the dimmer. A short press turns the light on or off. Holding the button allows you to dim the light.
Troubleshooting
If the device fails to connect or the light flickers:
- Ensure your WiFi network is 2.4GHz.
- Check that the lamp wattage is within the supported range (10-250W for AGL/HAL, 5-225W for LED).
- If the light flickers, adjust the R.L, R.C, or R.L.C settings on the dimmer.
- Perform a reset by holding the reset button for 5 seconds.
Technical Specifications
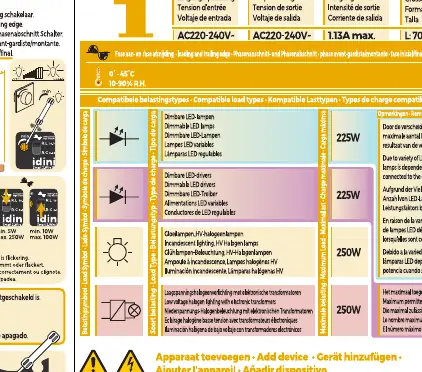
- Voltage: 220-240V~, 50/60Hz
- Max Load (AGL/HAL): 10-250W
- Max Load (LED): 5-225W
Manufacturer information
Idinio
Practical help
Common problems
Light flickers
Adjust the R.L, R.C, or R.L.C settings on the dimmer.
Device not connecting to WiFi
Ensure your phone is connected to a 2.4GHz WiFi network; 5GHz networks are not supported.
Need to re-pair the device
Hold the reset button for 5 seconds until the LED flashes.
Before use
- Turn off power at the fuse box.
- Verify your WiFi network is 2.4GHz.
- Check that the lamp wattage is within the supported range (10-250W AGL/HAL or 5-225W LED).
- Ensure you have the Idinio Smart App installed.
Specs in practice
- 10-250W AGL/HAL
- Supported load for incandescent or halogen bulbs.
Images and diagrams
- The wiring diagram illustrates the connection of Live (L) and Neutral (N) wires to the dimmer unit.
Model compatibility
- Requires 2.4GHz WiFi network.
- Not compatible with 5GHz WiFi.

Manual page author
David Miller
Documentation analyst
Organizes user manual content into clear summaries, with attention to model details, product context, and everyday usability.