Electronics / USB Hubs & Docking
User Manual for StarTech.com 10-Port Industrial USB 2.0 Hub
Quick-start guide for the StarTech.com 10-Port Industrial USB 2.0 Hub (USB210AIND-USB-A-HUB). Includes installation steps, power connection instructions for terminal blocks and adapters, and mounting procedures for wall or DIN rail.
Table of contents
Manual images
Click an image to enlargeQuick Guide from the Manual
This guide provides essential instructions for installing and powering the StarTech.com 10-Port Industrial USB 2.0 Hub. Before beginning, ensure you have a flat head screwdriver, Phillips head screwdriver, a level, and a DC power source (+5 - 24 V DC). The hub can be powered via an external DC power adapter or a terminal block power source.
Product Overview
The hub features a rugged design with the following key components:
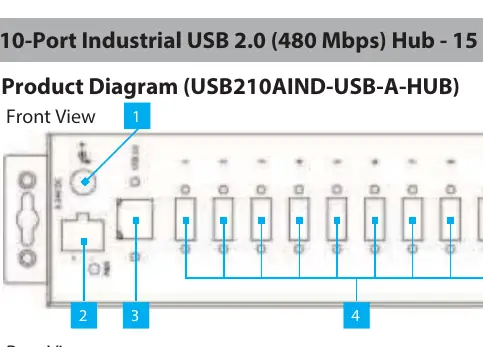
- DC Power Input: Port for external power adapter.
- DC 2-Wire Terminal Block: Alternative power input for industrial setups.
- USB Type-B Host Port: Connects the hub to the host computer.
- USB Type-A Ports (x 10): Connects up to 10 USB peripheral devices.
- Mounting Holes: For wall or desk mounting.
- DIN Rail Mounting Holes: For horizontal or vertical DIN rail installation.
Installation
Follow these steps to connect the hub to your computer:
- Connect the USB 2.0 Type-A to Type-B cable to the USB Type-B Host Port on the hub and to a USB-A port on your host computer.
- The host computer's operating system will automatically detect the USB hub.
- Connect up to 10 USB peripheral devices to the USB Type-A ports on the hub.
Powering the Hub
There are two methods to power the device:

Using the 2-Wire Terminal Block
- Remove the terminal block connector housing from the hub's casing.
- Loosen the screws for the terminals using a flat head screwdriver.
- Connect the positive and negative wires from your DC power source (+5 - 24 V DC) to the terminals. Ensure the polarity is correctly matched to prevent damage.
- Insert the terminal block connector housing back into the hub.
Using an External Power Adapter
Connect the power adapter to the power input port on the front of the hub and plug it into an AC electrical outlet.
Mounting
Surface Mounting
- If mounting on drywall, use a stud finder to locate wall studs.
- Hold the hub in the desired location and mark the mounting holes using a writing utensil. Use a level to ensure alignment.
- Drill pilot holes into the marks.
- Align the hub with the pilot holes and secure it using the mounting screws and a Phillips head screwdriver.
DIN Rail Mounting
Horizontal: Align the two DIN rail brackets with the horizontal mounting holes on the rear of the hub and secure with screws.
Vertical: Align the DIN rail bracket with the vertical mounting holes on the rear of the hub and secure with screws.
Safety
If the product has an exposed circuit board, do not touch the product while it is under power.
Official resources from the manual
Practical help
Common problems
Hub not detected by computer
Ensure the USB cable is securely connected to both the hub and the host computer, and verify that the hub is receiving power.
Power input failure
Check that the polarity of the positive and negative wires is correctly matched to the terminal block pins.
Before use
- Flat head screwdriver
- Phillips head screwdriver
- Writing utensil
- DC power source (+5 - 24 V DC)
- Stud finder (if mounting on drywall)
Specs in practice
- Voltage Input
- Accepts +5 to 24 V DC power via terminal block or adapter.
- ESD Protection
- Provides 15 kV Air / 8 kV Contact protection.
Images and diagrams
- Front view identifies power inputs, USB-B host port, and 10 USB-A ports.
- Rear view identifies mounting holes and DIN rail bracket locations.
Model compatibility
- Compatible with standard USB 2.0 devices.
- Requires external DC power source for terminal block operation.

Manual page author
David Miller
Documentation analyst
Organizes user manual content into clear summaries, with attention to model details, product context, and everyday usability.