Furniture / Bathroom Furniture
Installation Guide for 30-Inch Vanity with Top
Step-by-step installation and care guide for the 30-inch vanity with top. Includes instructions for drawer removal, wall mounting, stone surface maintenance, and a replacement parts list.
Table of contents
Manual images
Click an image to enlargeQuick Guide from the Manual
This vanity requires two adults for assembly and installation. Before beginning, ensure you have all parts and the necessary tools. The vanity must be secured to the wall for stability. Estimated installation time is 20-30 minutes, plus 24 hours for silicone caulk to dry.
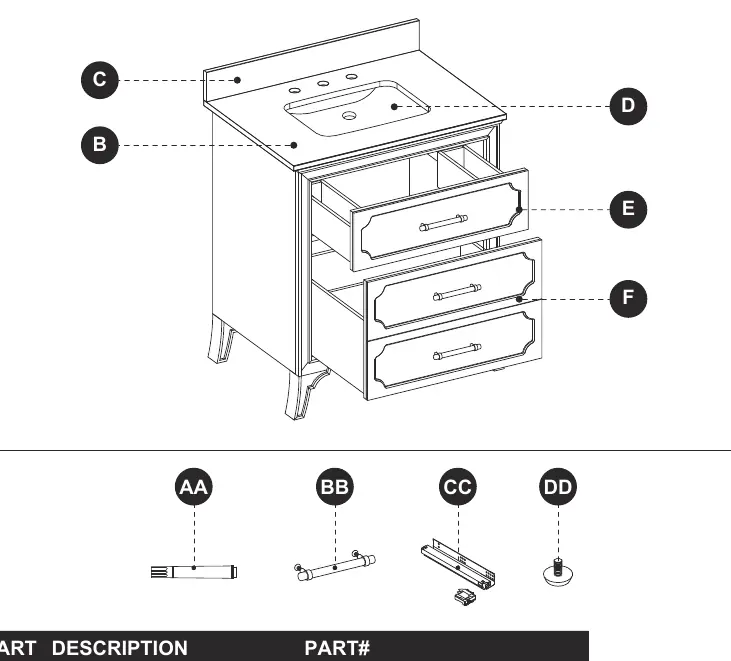
Package Contents
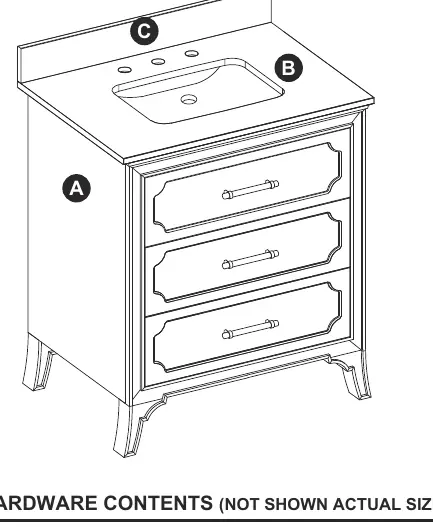
- A: Vanity
- B: Top (preassembled to vanity)
- C: Backsplash
- AA: Touch Up Pen
Installation Instructions
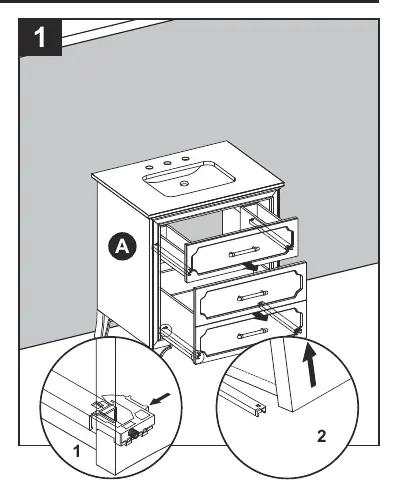
1. Removing Drawers: To remove the preassembled drawers, fully extend them. Locate the plastic levers on the metal glide tracks on both sides of the drawer box. Push the levers to disengage the drawer box from the glides, then gently lift the drawer up to remove it.
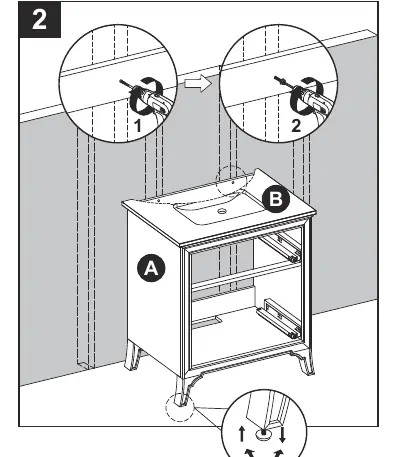
2. Leveling and Mounting: Place the vanity against the wall in its final location. Use the pre-assembled levelers on the bottom of each leg to level the unit. Twist counterclockwise to raise the vanity and clockwise to lower it. Once level, drill a hole through the vanity mounting area into the wall studs. Secure the vanity to the wall studs using appropriate mounting hardware (not included).
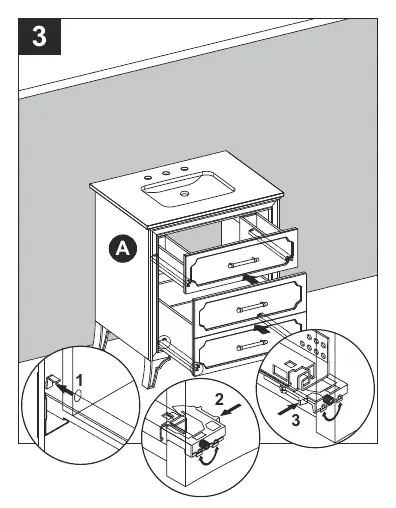
3. Reinstalling Drawers: Fully extend the metal glide tracks. Gently lower and slide the drawer box into the rear glide catch. Lower the drawer box to rest on the extended glides and push the plastic levers to lock it in place. If the drawer height needs adjustment, use the adjustment wheel on the glide to raise or lower the drawer box.
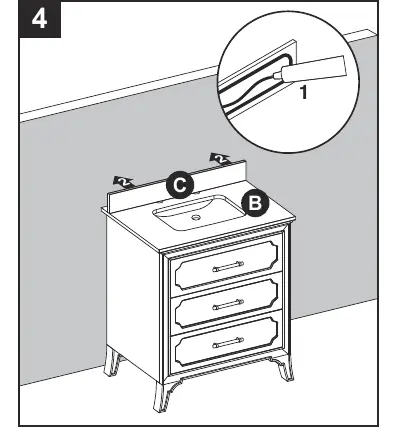
4. Backsplash Installation: Apply silicone caulk (not included) to the unpolished side and bottom of the backsplash (C). Position the backsplash on the top (B) and against the wall. Clean any excess caulk before it dries.
Care and Maintenance
Dust the vanity regularly with a soft, non-lint cloth. Clean the vanity with a gentle, non-abrasive household cleaner. For the stone top, use standard marble cleaning agents. Important: Do not use products containing acetone, lemon, vinegar, or other acids, as these can damage the stone surface. If soap or fragranced products contact the stone, rinse with water and dry immediately. Periodically reseal the stone top using an appropriate stone sealer.
Warranty
The manufacturer warrants this item against defects in materials and workmanship for one (1) year from the date of original retail purchase. This warranty applies only to the original purchaser and does not cover damage caused by accident, misuse, improper installation, or the use of improper cleaning agents.
Replacement Parts
For replacement parts, contact customer service at 1-866-439-9800, email [email protected], or visit www.lowespartsplus.com.
Official resources from the manual
Practical help
Common problems
Drawer does not slide in easily
Do not force the drawer, as damage to the glide may occur. Remove the drawer and try the installation process again from the start.
Stone surface damage
Avoid using cleaners containing acetone, lemon, vinegar, or other acids. Use only cleaning agents safe for stone.
Missing parts or questions
Contact customer service at 1-866-439-9800 or visit www.lowespartsplus.com.
Before use
- Verify all parts (Vanity, Top, Backsplash) are present.
- Ensure you have a Phillips screwdriver, utility knife or scissors, silicone caulk, and a power drill.
- Have a measuring tape and level available.
- Ensure a second person is available to assist with assembly.
- Clean the area where the vanity will be permanently located.
Specs in practice
- Estimated Installation Time
- 20-30 minutes, plus 24 hours for silicone caulk to dry.
- Wall Mounting
- The vanity must be secured to wall studs for stability.
Images and diagrams
- Drawer removal: Push plastic levers on the glide tracks to disengage the drawer box.
- Leveling: Twist leg levelers counterclockwise to raise the vanity, clockwise to lower it.
- Drawer adjustment: Use the adjustment wheel on the glide to change the drawer box height.
Model compatibility
- Faucet and drain assemblies are not included and must be installed per manufacturer instructions.

Manual page author
Emily Carter
User documentation editor
Prepares concise manual descriptions and highlights the most useful setup, operation, and maintenance information for readers.