Furniture / Bathroom Furniture
Installation and Care Guide for Allen + Roth 60-in Vanity 1605VA-60-279-926
Complete installation and maintenance guide for the Allen + Roth 60-in Vanity (Model 1605VA-60-279-926). Includes step-by-step assembly, leveling instructions, and stone top care tips.
Table of contents
Manual images
Click an image to enlargeImportant Information
This vanity requires assembly and installation. Please note the following critical requirements:
- Two adults are required for several assembly steps, including unpacking and positioning.
- Do not pry the top off the vanity, as this may cause damage.
- Secure to wall: The vanity must be secured to wall studs for stability.
- Installation time: Estimated 20-30 minutes, plus 24 hours for silicone caulk to dry.
Package Contents
The package includes the following main components:
- A: Vanity
- B: Top (preassembled to vanity)
- C: Backsplash
- AA: Touch-up pen
Preparation
Before beginning, ensure all parts are present and undamaged. Clear the installation area and ensure the vanity will not interfere with existing water supply and drain lines.
Tools Required (not included):
- Phillips screwdriver
- Utility knife or scissors
- Silicone caulk
- Power drill with drill bit
Helpful Tools (not included):
- Measuring tape
- Level
Installation Instructions
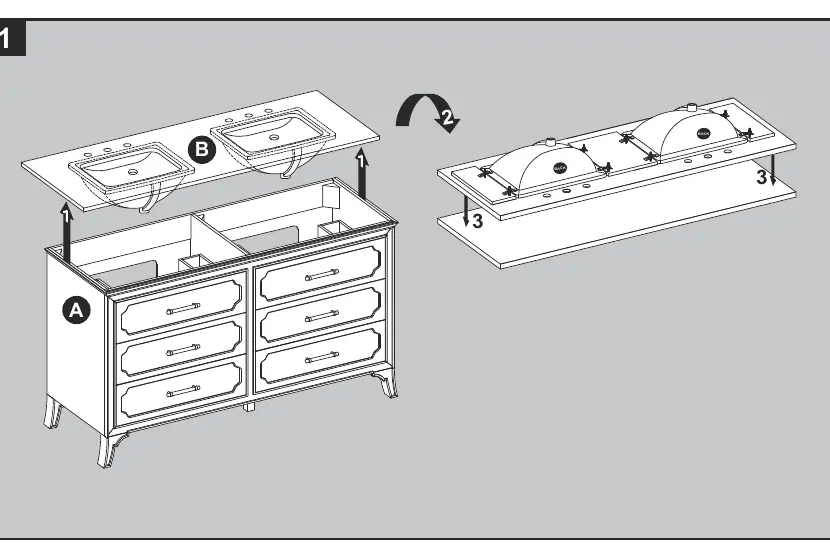

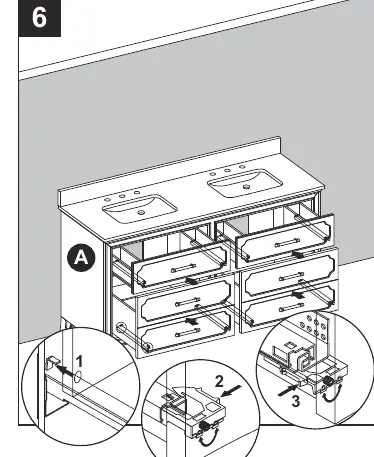
1. Removing the Top and Drawers
Remove the top (B) from the vanity (A) and place it face down on a scratch-free surface. To remove the drawers, fully extend them, locate the plastic levers on the metal glide tracks, push the levers, and gently lift the drawer out.
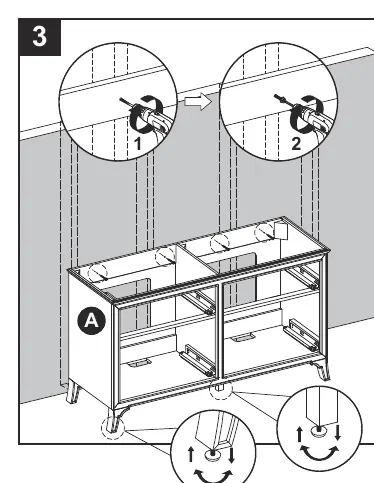
2. Positioning and Leveling
Place the vanity (A) against the wall in its final location. Use the pre-assembled levelers on the bottom of each leg to level the unit. Twist counterclockwise to raise the height and clockwise to lower it.
3. Securing to Wall
Once level, drill a hole through the vanity mounting area into the wall studs. Secure the vanity to the wall studs using appropriate mounting hardware (not included). Securing to two studs is recommended for increased stability.
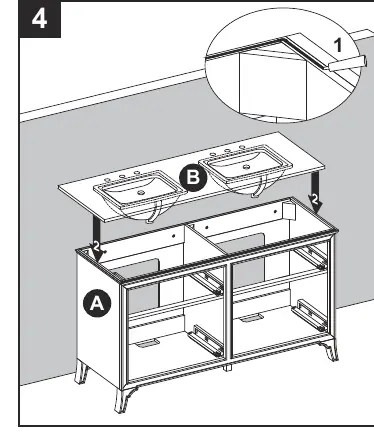
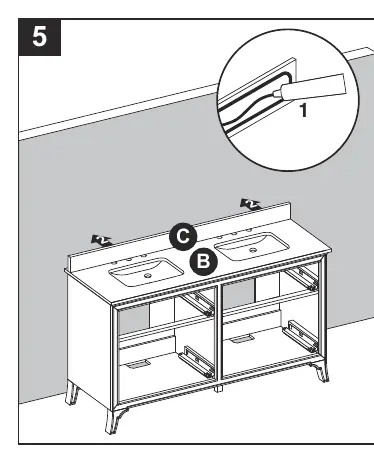
4. Attaching Top and Backsplash
Apply stain-free silicone caulk to the top edge of the vanity (A). With the help of another adult, lower the top (B) onto the vanity. Apply silicone caulk to the unpolished side and bottom of the backsplash (C) and position it on the top (B) against the wall. Wipe away excess caulk and allow 24 hours to dry.
5. Reinstalling Drawers
To reinstall, fully extend the glide tracks, slide the drawer box into the rear catch, lower it onto the glides, and push the plastic levers to lock it in place. If the drawer does not slide easily, remove and retry.
Care and Maintenance
- Dust regularly with a soft, non-lint cloth.
- Clean with a gentle, non-abrasive household cleaner.
- Stone Top Care: Use standard marble cleaning agents. Avoid products containing acetone, lemon, vinegar, or other acids, as these will damage the stone.
- If soap or fragranced products contact the stone, rinse with water and dry immediately.
- Periodically reseal the stone top using an appropriate stone sealer.
- Use the included touch-up pen (AA) for scratches by stroking in the direction of the scratch.
Warranty
The manufacturer warrants this item against defects in materials and workmanship for one (1) year from the date of original retail purchase. This warranty does not cover damage caused by improper installation, misuse, accidents, or the use of improper cleaning agents.
Practical help
Common problems
Drawer does not slide in easily
Do not force the drawer. Remove it and try the installation process again from the start.
Drawer height is uneven
Spin the adjustment wheel on the glide tracks to raise or lower the drawer box. Left and right sides can be adjusted independently.
Stone top is stained or etched
Avoid using cleaners with acetone, lemon, vinegar, or acids. Use only stone-safe cleaning agents.
Before use
- Ensure two adults are available for assembly.
- Verify all parts (Vanity, Top, Backsplash) are present.
- Gather required tools: Phillips screwdriver, utility knife, silicone caulk, power drill.
- Clear the installation area and check for water supply/drain interference.
- Ensure the installation surface is level.
Specs in practice
- Estimated Installation Time
- 20-30 minutes, plus 24 hours for silicone caulk to dry before use.
Images and diagrams
- Drawer removal: Locate plastic levers on the metal glide tracks at the sides of the drawer box and push them to disengage.
- Leveling: Twist the levelers on the bottom of the legs counterclockwise to raise the vanity or clockwise to lower it.
Model compatibility
- Vanity must be secured to wall studs for stability.
- Faucet and drain kit are not included and should be installed per manufacturer instructions.

Manual page author
David Miller
Documentation analyst
Organizes user manual content into clear summaries, with attention to model details, product context, and everyday usability.