Furniture / Bathroom Furniture
Installation Guide for OVE Churchill 30 Bathroom Vanity
Comprehensive installation and maintenance guide for the OVE Churchill 30 bathroom vanity. Includes dimension diagrams, parts list, step-by-step installation instructions, and care tips for stone countertops.
Table of contents
Manual images
Click an image to enlargeQuick guide from the manual
Before beginning the installation, inspect the vanity thoroughly for any visual defects. If any defects are found, return the product to the retailer in its original packaging before installation, as the warranty will be void if installed with obvious visual defects. Ensure you have all required parts and tools. After installing the countertop and backsplash, allow 24 hours for the sealant to cure.
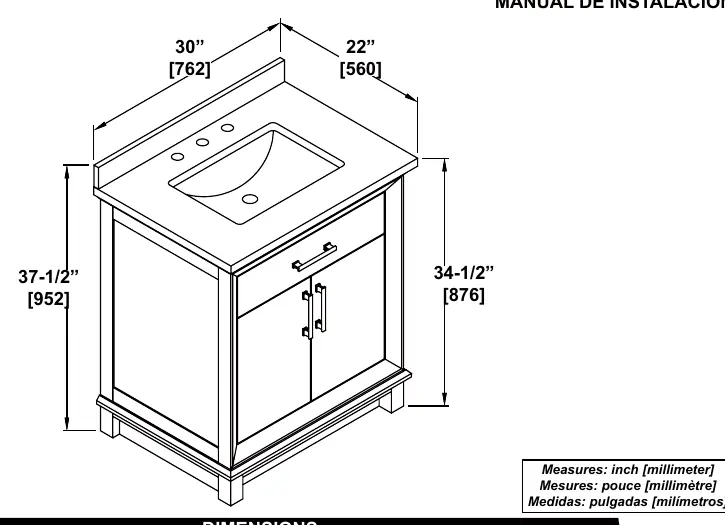
Dimensions
The OVE Churchill 30 vanity measures 30 inches in width, 22 inches in depth, and 37-1/2 inches in height. Detailed plumbing rough-in dimensions are provided on page 1 of the manual to assist with installation.
Parts List
The package includes the following components:
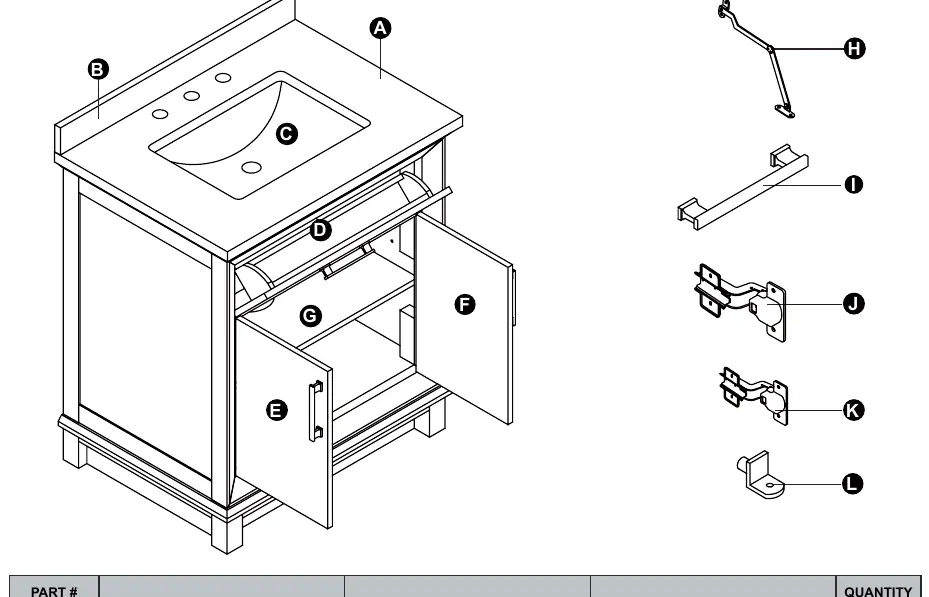
- A: Countertop
- B: Backsplash
- C: Basin
- D: Tilt-down drawer
- E: Door (left)
- F: Door (right)
- G: Adjustable shelf
- H: Butterfly hinge (right)
- I: Handle (3)
- J: Hinge (4)
- K: Hinge (2)
- L: Shelf holder (4)
Installation
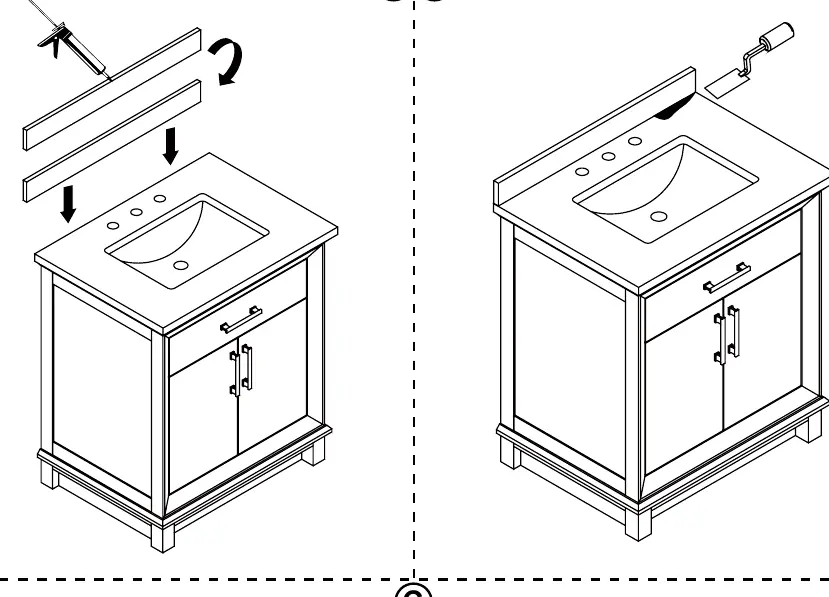
Countertop and Backsplash: Apply sealant to the back of the backsplash and press it firmly against the wall and the countertop. Ensure the surface is clean and dry before application.
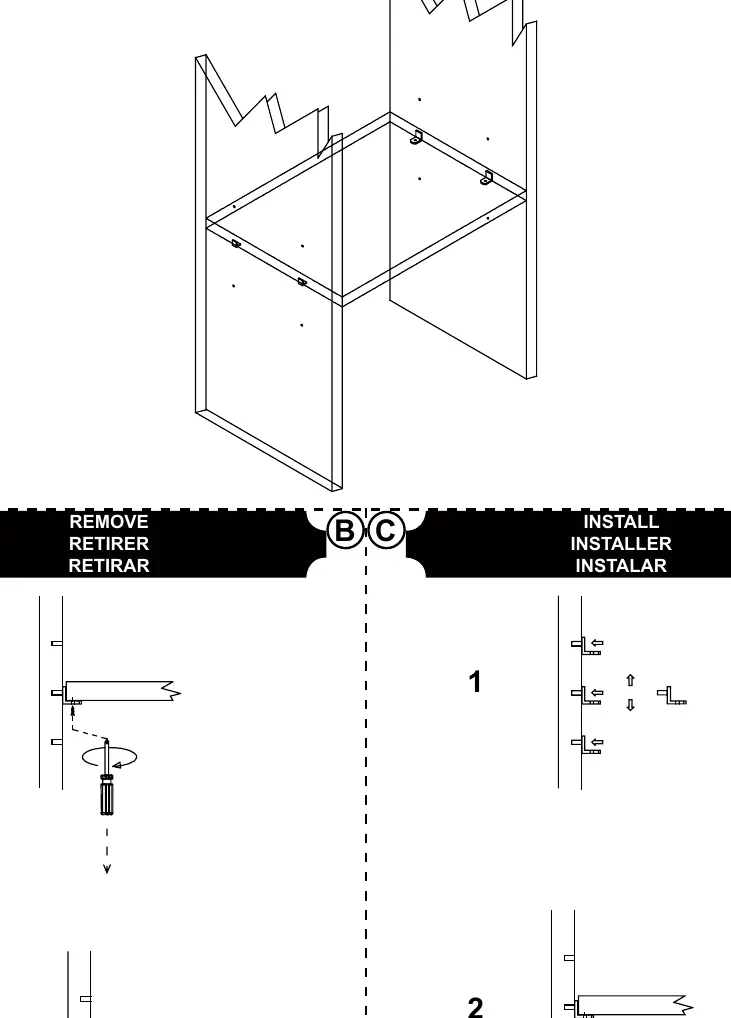
Shelf Adjustment
To remove or install the adjustable shelf (G), use the shelf holders (L). Insert or remove the holders from the pre-drilled holes on the interior side panels of the vanity cabinet to adjust the shelf height as needed.
Maintenance & Consumer Responsibilities
Stone countertops require specific care to maintain their appearance:
- Cleaning: Wipe up spills immediately. Use a mild, non-abrasive soap and water for regular cleaning.
- Sealing: The stone is sealed at the factory, but reapplication is necessary over time depending on usage. Use a penetrating non-toxic sealer.
- Stain Removal: Use acetone, mineral spirits, or ammonia for oil-based stains. Use hydrogen peroxide mixed with ammonia for organic stains like coffee or tea.
- Water Spots: Gently buff spots or rings with 00 gauge steel wool.
- Avoid: Do not use harsh bathroom cleaners or grout cleaners on natural stone.
Warranty
The product includes a 1-year limited warranty for residential and commercial use. The warranty covers manufacturing defects but does not cover damages caused by improper installation, accidents, or flooding. The warranty is not valid in Mexico.
Practical help
Common problems
Oil-based stains on stone
Clean with acetone, mineral spirits, or ammonia.
Organic stains (coffee, tea, juice)
Clean with hydrogen peroxide mixed with a few drops of ammonia.
Water spots or rings
Buff the spots gently with 00 gauge steel wool.
Visual defects found upon opening
Return the vanity to the retailer in original packaging before installation; do not install.
Before use
- Inspect the vanity for visual defects before installation.
- Verify all parts (A-L) are present.
- Gather required tools: pencil, screwdriver, level, utility knife, and caulk gun.
- Ensure the installation area is prepared and plumbing is aligned with the dimensions provided.
- Confirm the vanity is suitable for your residential or commercial space.
Images and diagrams
- Page 1 provides detailed dimensions for plumbing rough-in and overall vanity size.
- Page 2 illustrates the parts list with corresponding labels for assembly.
- Page 3 shows the installation process for the countertop and backsplash.
- Page 4 details the removal and installation steps for the adjustable shelf.
Model compatibility
- Warranty is not valid in Mexico.
- Suitable for both residential and commercial use.
- Stone sealer should be non-toxic and penetrating; food-safe sealer is typically not required.

Manual page author
Emily Carter
User documentation editor
Prepares concise manual descriptions and highlights the most useful setup, operation, and maintenance information for readers.