Electronics / Monitors
Acurite 06100M Iris 5-in-1 Direct-to-Wi-Fi Display Quick Setup Guide
Quick setup guide for the Acurite 06100M Iris 5-in-1 Direct-to-Wi-Fi Display. Includes sensor installation, display configuration, and Wi-Fi connectivity steps.
Table of contents
Manual images
Jump to the sectionQuick guide from the manual
This guide provides essential steps to set up your AcuRite Iris 5-in-1 Direct-to-Wi-Fi Display. Ensure you have the display, power adapter, and the AcuRite Iris sensor ready before beginning.
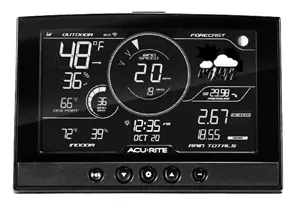
Plug in display and configure settings
Connect the power adapter to the display. Configuration starts automatically upon power-up. Use the Up and Down arrows to navigate options and the Gear button to confirm your selections. You can adjust these settings at any time by pressing the Gear button.
- RF Channel (A-B-C; A recommended)
- Auto DST (ON / OFF)
- 12 or 24 Hour Clock Display
- Clock Hour and Minute
- Calendar Month, Date, and Year
- Temperature Units (F / C)
- Wind Speed Units (mph, km/h, knots)
- Rainfall Units (inches / mm)
- Pressure Units (inHg / hPa)
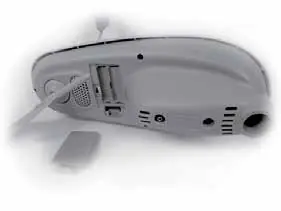
Install sensor batteries
Install four AA alkaline or lithium batteries into the outdoor sensor. The display should sync with the sensor automatically within one minute. Ensure the A-B-C switch in the sensor battery compartment matches the setting on the display (default is A).
Mount sensor
For accurate readings, mount the sensor at least 5 feet (1.5 meters) off the ground. Ensure the front solar cell faces south, keep it away from heat and humidity sources, and use the built-in bubble level to ensure it is level. Remove the rain gauge stabilizer after mounting.
Connect to My AcuRite with Wi-Fi
The Wi-Fi setup page is available for 30 minutes after powering on the display. If needed, press the gear button to re-activate it.
- Connect your phone or computer to the Wi-Fi signal broadcast by the display.
- Open a web browser and navigate to 192.168.4.1.
- Enter your Wi-Fi network credentials and press Save.
- Reconnect your device to your normal Wi-Fi network.
- Download the My AcuRite mobile app or visit www.myacurite.com to complete the account setup.
Additional notes
Backup batteries (3 AAA) are strongly recommended for the display to retain Wi-Fi configuration details. You can power cycle the display at any time to clear stored Wi-Fi credentials.
Official resources from the manual
Manufacturer information
AcuRite
Practical help
Common problems
Display not syncing with sensor
Ensure the A-B-C switch in the sensor battery compartment matches the setting on the display.
Wi-Fi setup page not accessible
The page is only active for 30 minutes after power-up. Press the gear button on the display to re-activate the setup mode.
Wi-Fi configuration lost
Install 3 AAA backup batteries in the display to retain settings during power interruptions.
Before use
- Ensure you have 4 AA batteries for the sensor.
- Recommended: Install 3 AAA backup batteries in the display.
- Verify you have a 2.4 GHz wireless network available.
- Ensure the sensor is mounted at least 5 feet off the ground.
- Check that the sensor is level using the built-in bubble level.
- Remove the rain gauge stabilizer from the sensor after mounting.
Specs in practice
- A-B-C Switch
- Must match between sensor and display to ensure proper wireless communication.
- 2.4 GHz Network
- Required frequency for the display to connect to your home Wi-Fi.
Images and diagrams
- The A-B-C switch is located inside the sensor battery compartment.
- The rain gauge stabilizer is a physical piece that must be removed for the rain gauge to function.
- The display features a gear button used for both initial configuration and re-activating Wi-Fi setup.
Model compatibility
- Requires 2.4 GHz Wi-Fi network.
- Compatible with AcuRite Iris (5-in-1) sensors.

Manual page author
Emily Carter
User documentation editor
Prepares concise manual descriptions and highlights the most useful setup, operation, and maintenance information for readers.