Lighting / Fixtures
User Manual for ADJ Ultra Beam Bar 12CW
Quick guide for the ADJ Ultra Beam Bar 12CW. Learn about installation, DMX setup, safety guidelines, and maintenance for this professional stage lighting fixture.
Table of contents
Manual images
Click an image to enlargeQuick guide from the manual
The ADJ Ultra Beam Bar 12CW is a professional lighting fixture intended for use by trained personnel only. Before operation, ensure the unit is properly grounded and that the ambient temperature is between -4°F and 113°F (-20°C to 45°C). Always maintain a minimum distance of 6.6 feet (2 meters) from objects and 1.6 feet (0.5 meters) from flammable materials. Never look directly into the light source.
Overview
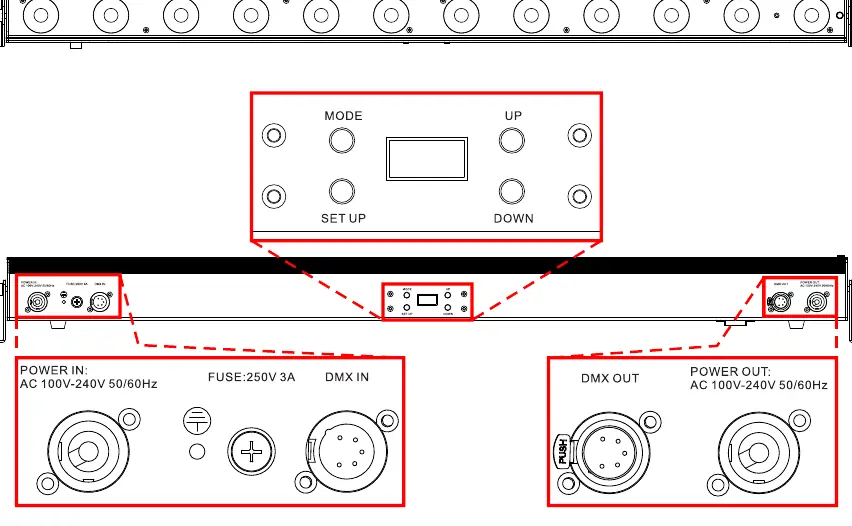
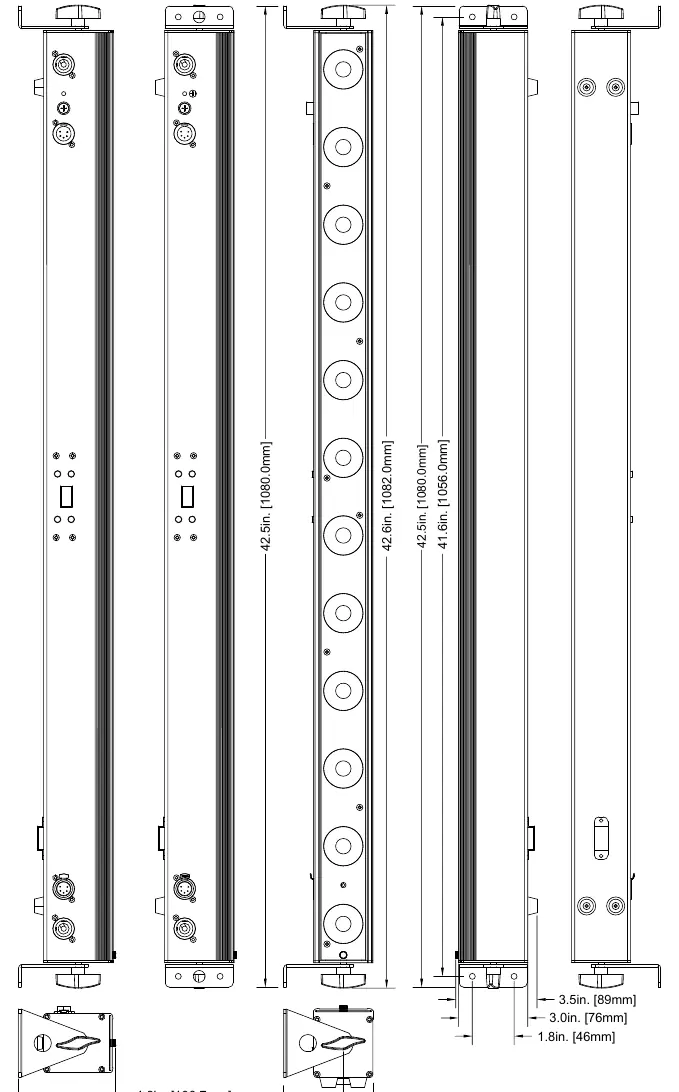
This fixture features 12 high-performance 20-Watt cool white LEDs with a 5-degree beam angle per pixel. It includes 13 built-in programs, individual pixel control via DMX, and RDM compatibility. The unit is equipped with an OLED display and a 4-button control pad for easy navigation.
Installation
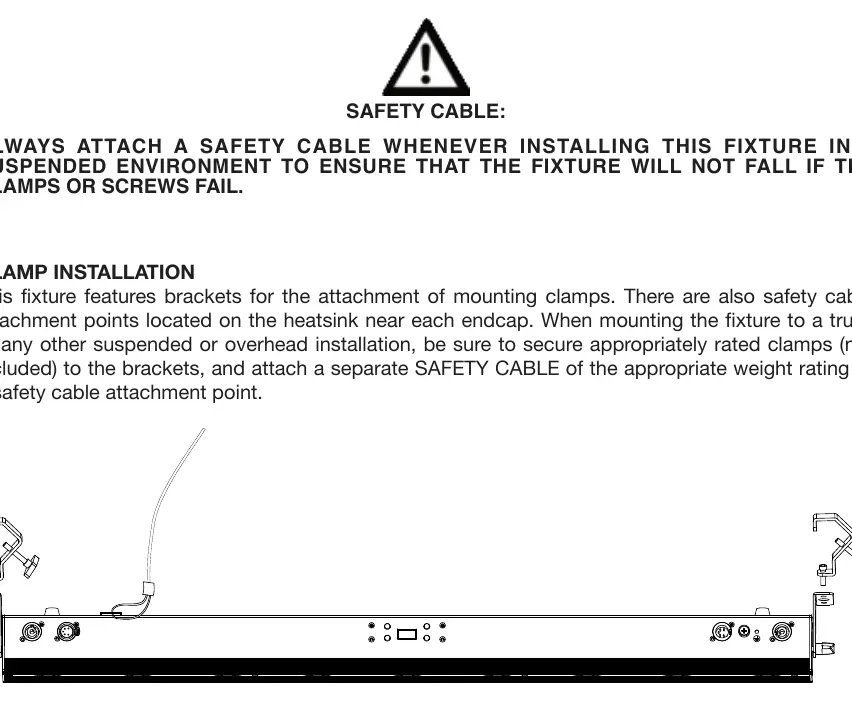
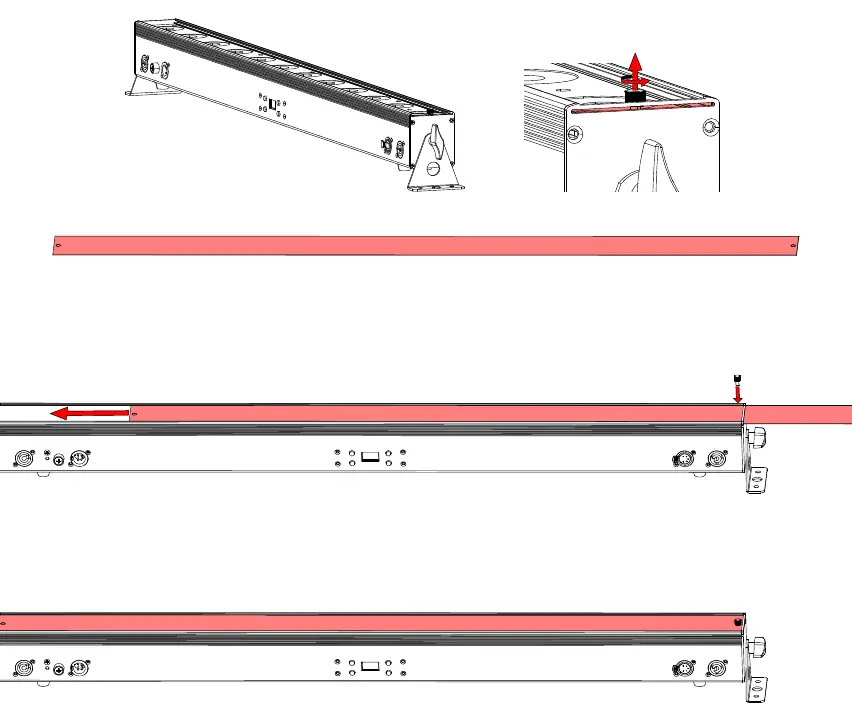
The fixture can be mounted on the ground or suspended from a truss. When installing in a suspended environment, you must use a safety cable of the appropriate weight rating to ensure the fixture does not fall if the primary mounting hardware fails. Ensure the mounting surface is certified to hold the weight of the fixture. Always allow approximately 6 inches (15cm) of space around the unit for proper ventilation.
System Menu
Use the 4-button control pad to adjust settings. Press the MODE button to cycle through main menu options, SET UP to enter sub-menus, and UP/DOWN to change values. The display includes a lock feature that can be configured to turn off the screen after a period of inactivity.
DMX Setup
The fixture supports DMX-512 protocol. Use standard 110-120 Ohm shielded DMX cables. For long cable runs, use a terminator (110-120 ohm resistor) on the last unit in the chain to prevent erratic behavior. You can set the DMX starting address for each unit to control them individually or in groups.
Maintenance
There are no user-serviceable parts inside this unit. Do not attempt repairs yourself, as this will void the warranty. Perform regular inspections, including checking that all screws and fasteners are tight, rigging points are secure, and power cables are free of damage. Clean the external lens surface periodically with a soft cloth; never use alcohol, solvents, or ammonia-based cleaners.
Specifications
The fixture operates on 100V-240V 50/60Hz power. It features 5 DMX channel modes (1, 3, 12, 14, 19 channels). You can daisy-chain power for up to 17 units at 120V or 32 units at 230V.
Manufacturer information
ADJ Products, LLC
Practical help
Common problems
Fixture not responding to DMX controller
Check the DMX address settings, ensure cables are connected properly, and verify that a terminator is used on the last fixture in the chain.
Display screen turns off
This is the display lock feature. It can be configured in the System Menu to turn off after 1 to 10 minutes of inactivity.
Overheating or performance issues
Ensure the ventilation slots are not blocked and there is at least 6 inches (15cm) of clearance around the fixture.
Before use
- Verify the power supply matches the 100V-240V 50/60Hz requirement.
- Ensure the mounting surface can support the fixture's weight.
- Attach a safety cable for all suspended or overhead installations.
- Check that all screws and fasteners are securely tightened.
- Confirm DMX cables are standard 110-120 Ohm shielded cables.
Specs in practice
- 12 x 20W LEDs
- High-performance cool white light source with 6200k color temperature.
- 5° beam angle
- Provides a narrow, precise beam of light per pixel.
- Daisy-chaining
- Allows linking multiple units; up to 17 units at 120V or 32 units at 230V.
Images and diagrams
- Overview: Identifies the control panel, power/DMX ports, and mounting points.
- Installation: Shows how to attach the safety cable and mount the fixture to a truss.
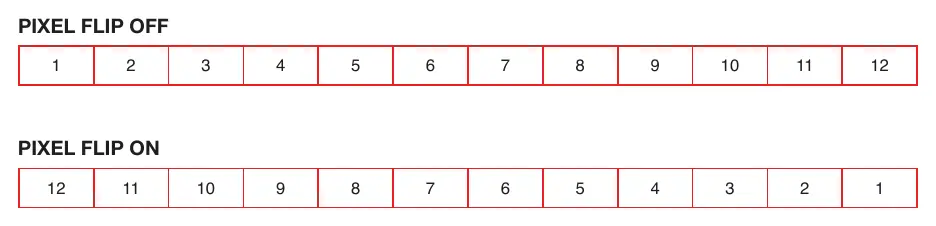
- Pixel Flip: Illustrates how the pixel order changes when the Pixel Flip mode is enabled.
Model compatibility
- Compatible with ADJ UC-IR remote.
- RDM and RDM Net compliant for remote monitoring and control.
- Supports 5 DMX channel modes: 1, 3, 12, 14, and 19 channels.

Manual page author
Emily Carter
User documentation editor
Prepares concise manual descriptions and highlights the most useful setup, operation, and maintenance information for readers.