Home Appliances / Small Kitchen Appliances
Adler AD 7059 12V Car Vacuum Cleaner User Manual
Quick guide for the Adler AD 7059 12V car vacuum cleaner. Includes instructions for battery operation, car power adapter use, filter cleaning, and accessory installation.
Table of contents
Manual images
Click an image to enlargeQuick guide from the manual
The Adler AD 7059 is a versatile car vacuum cleaner that can be powered by its built-in battery or a 12V car cigarette lighter socket. Before first use, ensure all packaging is removed and the clamp securing the on/off button is taken off. To use the battery, slide the switch forward toward the LED. To use the car adapter, start the car, connect the adapter, and slide the switch backward away from the LED. Always ensure the filter is completely dry before use to prevent damage.
Device description
The vacuum cleaner includes the following components: USB C cable, car charging cable, power switch, LED light, tank release button, filter, dust container inlet, filter cleaning brush, upholstery brush, coupling, flexible hose, and crevice nozzle.

Before first use
- Remove all packaging materials.
- Wipe down all parts of the unit with a dry, clean cloth to remove any post-production contamination.
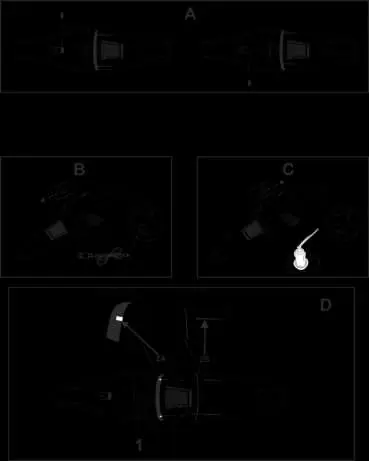
- Remove the clamp securing the on/off button as shown in Figure A on page 3.
Using the device
Battery power
To use the device with the built-in battery, slide the on/off switch forward toward the LED. The device will operate until the battery is depleted. To turn it off, slide the switch to the middle position.
Charging
Insert the USB C cable into the charging port located on the back of the holder under the silicone cover. Connect the other end to a charger. The device takes approximately 4-5 hours to charge.
Car power adapter
Note: The device should NOT be used while driving.
- Start the car.
- Insert the small plug of the car charging cable into the round charging port near the handle under the silicone cover.
- Turn on the device by sliding the on/off switch backward, away from the LED.
- The device will operate until the switch is returned to the center position.
Emptying and cleaning the filter
- Grip the unit firmly to ensure it does not separate.
- Press the button marked 1 (Figure D, page 3) to open the dust container.
- Pull the inside of the rubber seal to remove the HEPA filter and steel filter.
- Empty the dust container.
- Remove the metal filter from the HEPA filter by gently pulling them apart.
- Use the supplied filter cleaning brush (8) to clean both filters.
- Filters can be washed under running water. Do not leave them submerged for too long. Dry parts thoroughly in a well-ventilated area away from direct sunlight before reassembly.
Note: Using a filter that is not completely dry will damage the unit. Replace the filter regularly if suction power decreases.
Installing accessories
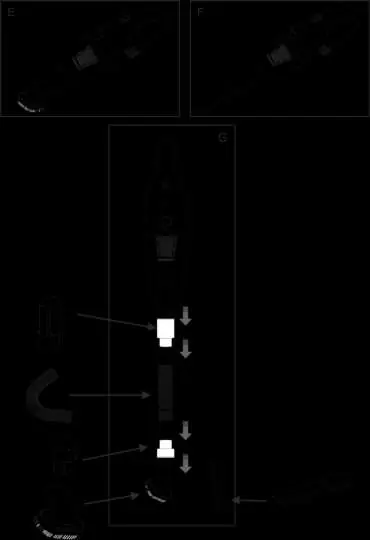
Accessories can be inserted directly into the dust container inlet or via the provided connectors. You can use a connector, a hose, and another connector to extend the reach, as shown in Figures E, F, and G on page 4.
Technical details
- Input voltage: 12V (car cigarette lighter) or 5V DC 1A (USB)
- Motor power: 60W (battery) / 72W (car power)
- Battery capacity: 2x1800 mAh
- Charging time: 4-5 hours
Manufacturer information
Adler Europe Group
Practical help
Common problems
Decreased suction power
Clean the filter or replace it with a new one.
Unit damage
Never use the vacuum cleaner if the filter is not completely dry.
Before use
- Remove all packaging materials.
- Wipe down all parts with a dry, clean cloth.
- Remove the clamp securing the on/off button.
Specs in practice
- Input voltage
- 12V via car cigarette lighter or 5V DC 1A via USB.
- Battery capacity
- 2x1800 mAh.
- Charging time
- 4-5 hours.
Images and diagrams
- Figure A: Removing the on/off button clamp.
- Figure B: Battery operation.
- Figure C: Car power adapter connection.
- Figure D: Filter cleaning and assembly.
- Figures E, F, G: Accessory installation.
Model compatibility
- Use only accessories designed for this device.
- Use indoors or inside the car.

Manual page author
Michael Turner
Technical manual editor
Reviews PDF manuals for structure, safety notes, and practical product details so readers can find the right information quickly.