Home / Window Treatments
Installation Guide for Allen + Roth Double Fixed Brackets
Step-by-step installation guide for Allen + Roth Double Fixed Brackets. Includes mounting instructions, tool requirements, and rod size compatibility for models FSI 1504 BNIC and FSI 1504 ORBZ.
Quick answers from the manual
Quick answer
- This guide provides instructions for installing Allen + Roth Double Fixed Brackets (FSI 1504). It covers mounting, tool requirements, and rod size compatibility. p. 1, 2
Key actions
- Mark mounting location using the bracket as a guide p. 2
- Drill pilot hole using 3/16 in. bit p. 2
- Attach bracket to wall and tighten screws p. 2
Problems and fixes
Rod size mismatch
Use inserts for 3/4-in, 5/8-in, and 1/2-in rods; 1-in rods do not need inserts.
p. 2Maintenance and reset
- Clean with a soft cloth. Do not use abrasive cleaning agents, solvents, or polishes. p. 1
Technical specifications
| Parameter | Value | Meaning | Pages |
|---|---|---|---|
| Rod Sizes | 1-in, 3/4-in, 5/8-in, 1/2-in | Supported curtain rod diameters | p. 2 |
Where to find it in the PDF
- Preparation and Maintenance p. 1
- Installation and Contents p. 2
Table of contents
Manual images
Click an image to enlargeQuick Guide
This document provides instructions for installing the Allen + Roth Double Fixed Brackets. The installation process involves marking the wall, drilling pilot holes, inserting anchors, and securing the brackets. The brackets are compatible with 1-inch, 3/4-inch, 5/8-inch, and 1/2-inch curtain rods, with specific inserts required for smaller sizes.
Tools Required
- Drill
- 3/16-inch drill bit
- Screwdriver
Package Contents
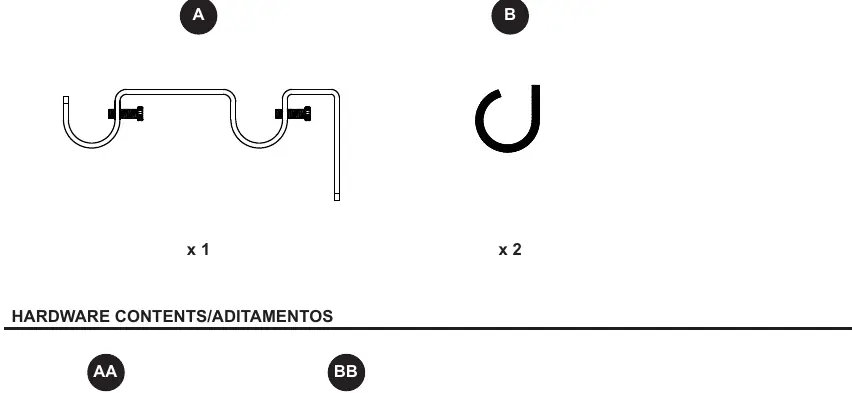
- A: Bracket (x1)
- B: Insert (x2)
- AA: Screw (x2)
- BB: Wall Anchor (x2)
Installation
- Mark Location: Use the bracket as a guide to determine the desired height and mark the mounting screw locations on the wall.
- Drill and Anchor: Remove the bracket from the wall. Drill a pilot hole using a 3/16-inch bit (not included) and insert the wall anchors (BB) if necessary.
- Mount: Attach the bracket to the wall using the provided screws (AA). Adjust the bracket distance from the wall as desired and tighten the screws.
Rod Compatibility
The brackets support various rod sizes using the provided inserts:
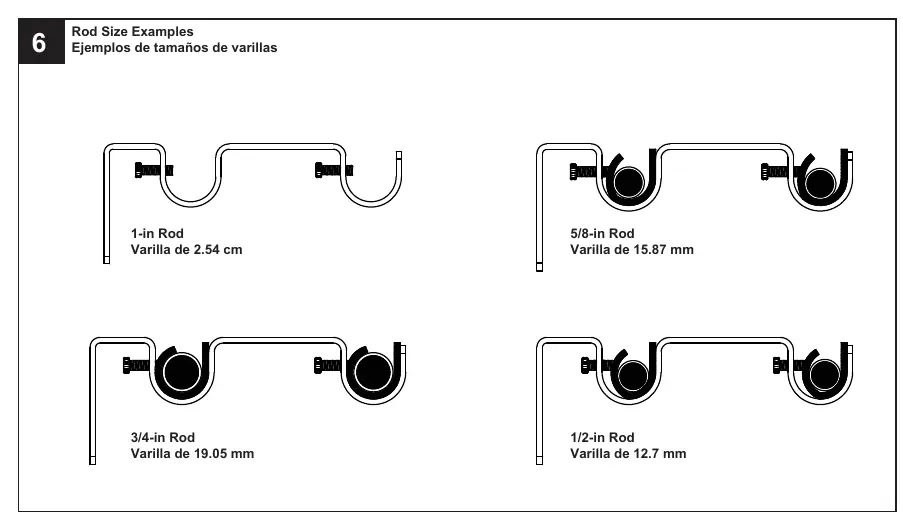
- 1-inch rod: No adapter/insert needed.
- 3/4-inch, 5/8-inch, and 1/2-inch rods: Use the provided inserts (B) for the front and back rod channels.
Care and Maintenance
Clean the product with a soft cloth. Do not use abrasive cleaning agents, solvents, or polishes, as they may damage the finish.
Practical help
Common problems
Rod does not fit securely
Ensure you are using the correct inserts (B) for your rod size (3/4-in, 5/8-in, or 1/2-in). 1-in rods do not require inserts.
Bracket is loose on the wall
Ensure the wall anchors (BB) are properly seated and the mounting screws (AA) are fully tightened.
Before use
- Verify all parts are present (Bracket A, Inserts B, Screws AA, Anchors BB).
- Ensure you have a drill and a 3/16-inch drill bit.
- Check if wall anchors are necessary for your specific wall type.
- Confirm the diameter of your curtain rod to determine if inserts are needed.
Specs in practice
- Rod Compatibility
- Supports 1-in, 3/4-in, 5/8-in, and 1/2-in diameter rods.
- Estimated Assembly Time
- Approximately 10 minutes.
Images and diagrams
- The installation overview illustrates the step-by-step process of marking, drilling, and mounting the bracket.
- The rod size examples diagram shows how to correctly place inserts for different rod diameters.
Model compatibility
- Anchors are not needed for all installation types.
- 1-inch rods do not require adapters.

Manual page author
Emily Carter
User documentation editor
Prepares concise manual descriptions and highlights the most useful setup, operation, and maintenance information for readers.