Electronics / PA Systems
Quickstart Guide for Alto Professional TS112C Portable Columnar Array Loudspeaker
Get started with your Alto Professional TS112C portable columnar array loudspeaker. This guide covers assembly, rear panel features, Bluetooth pairing, and audio input settings.
Table of contents
Manual images
Click an image to enlargeQuick guide from the manual
This document provides essential setup and operation instructions for the Alto Professional TS112C portable columnar array loudspeaker. Before using the unit, ensure the voltage selector is set to match your local power grid to prevent damage.
Package Contents
- Subwoofer base
- 2x Columnar loudspeaker array
- Carrying bag
- Power cable
Assembly and Setup
The TS112C is designed to be assembled in a modular fashion. Follow these steps to set up the unit:
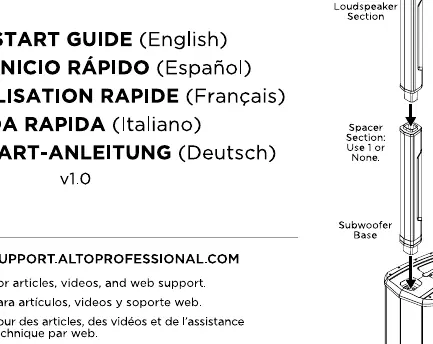
- Place the subwoofer base on a level surface.
- Attach the spacer section(s) to the subwoofer base.
- Attach the loudspeaker section to the top of the spacer section.
- Ensure all sections are securely connected and aligned.
The speakers should be positioned so that they are relative to your audience's ears for best results. If you are at ear-height, you may choose to use the middle section or omit the spacer section entirely.
Rear Panel Features
The rear panel contains all controls for the speaker:
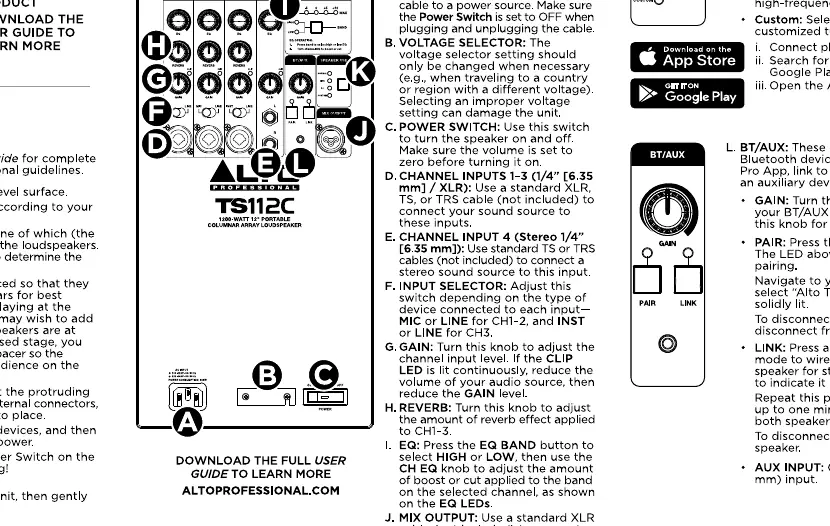
- Power Switch: Turns the unit on and off.
- Voltage Selector: Must be set to the correct voltage for your region before powering on.
- Inputs (CH1/CH2): Combo XLR/TRS inputs for microphones or line-level sources. Use the Line/Mic switch to select the appropriate input level.
- Gain Knob: Adjusts the input volume for the respective channel.
- EQ Button: Cycles through preset modes: Normal, Live, DJ, and Custom (configured via the Alto Pro App).
- Bluetooth/Link: Used for pairing mobile devices and linking to a second TS112C speaker for stereo sound.
- Aux Input: 1/8 inch (3.5 mm) input for external audio devices.
Bluetooth and Stereo Link
To connect a Bluetooth device:
- Press the Pair button on the rear panel.
- Navigate to your device's Bluetooth settings and select "Alto TS112C".
- Once connected, the LED will be solid.
To use Stereo Link with a second TS112C:
- Connect the first speaker to your Bluetooth device.
- Press the Link button on the first speaker.
- Press the Link button on the second speaker.
- The speakers will automatically link, and the LEDs will indicate the connection status.
Manufacturer information
Alto Professional
Practical help
Common problems
Voltage mismatch
Ensure the voltage selector on the rear panel is set to the correct voltage for your region before plugging in the power cable.
Bluetooth pairing failure
Ensure the speaker is in pairing mode (LED flashing) and that your device is within range and not connected to another Bluetooth speaker.
No sound from input
Check that the Gain knob is turned up and the Line/Mic switch is set correctly for the connected source.
Before use
- Verify local voltage matches the voltage selector setting.
- Place the subwoofer on a level, stable surface.
- Ensure all speaker sections are securely connected.
- Download the Alto Pro App for custom EQ settings.
- Check that the power switch is in the OFF position before connecting power.
Specs in practice
- CH1/CH2 Inputs
- Combo XLR/TRS inputs that accept both microphone and line-level signals.
Images and diagrams
- The assembly diagram illustrates the stacking order: Subwoofer base at the bottom, spacer sections in the middle, and the loudspeaker section at the top.
- The rear panel diagram identifies the location of the power switch, voltage selector, input gain knobs, and Bluetooth/Link controls.
Model compatibility
- Compatible with the Alto Pro App for advanced EQ customization.
- Supports stereo linking only between two TS112C units.

Manual page author
Michael Turner
Technical manual editor
Reviews PDF manuals for structure, safety notes, and practical product details so readers can find the right information quickly.