Electronics / Media Players
User Manual for SAL PAS 12W243S Professional Stereo Speaker System
Quick guide and user manual for the SAL PAS 12W243S professional stereo speaker system. Includes setup instructions, menu navigation, connection diagrams, and troubleshooting tips.
Table of contents
Manual images
Click an image to enlargeQuick guide from the manual
The SAL PAS 12W243S is a professional 2-way active bass-reflex sound system. Before first use, ensure all volume controls are set to the minimum position to prevent damage to the speakers. The system can be switched on/off using the rocker switch on the back panel. Use the multifunction control knob to navigate the menu and adjust settings. Always ensure the system is disconnected from power before making any cable connections.
Product description
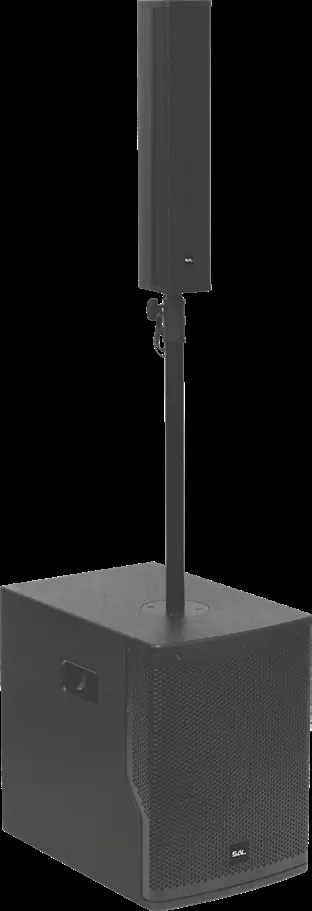
This system features a 12-inch woofer and two satellite boxes containing 8x3-inch wideband neodymium drivers. It includes a high-efficiency Class-D amplifier, DSP digital sound processor, and supports BT TWS wireless connectivity. The system is designed for stage, orchestral, and large room applications.
Assembly
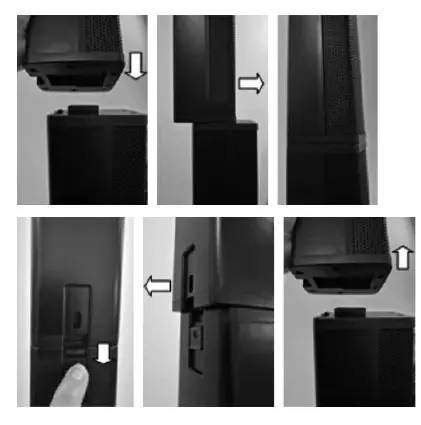
Stand Assembly: Insert the smaller diameter tube into the larger tube until it hits. Screw the outer tube into the threaded socket on top of the subwoofer. Lift the inner tube to the desired height, insert the latch shaft into the hole, ensure the rod fits into the grooves, and tighten the wing nut by hand. Do not use tools. Slide the satellite box onto the rod. Ensure the second stand (with folding legs) is set up on level ground with screws firmly tightened.
Connections
All connections must be made while the system is powered off. Keep microphone and audio cables away from mains power cables. For 2.1 stereo operation, connect both wideband speakers with separate cables and select 2.1 mode in the menu. For 1.1 mono operation, connect one cable to the left speaker channel.
Menu functions
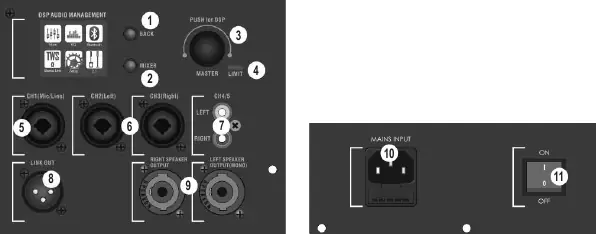
Navigate the menu by turning and pressing the multifunction control knob. Use the BACK button to return to the previous screen.
- MIXER: Adjust volume for CH1 (MIC/LINE), CH2/CH3 (Stereo), CH4, BT, and MASTER.
- EQ: Select sound modes (MUSIC, LIVE, SPEECH) or use HPF80Hz filter.
- BLUETOOTH: Enter pairing mode to connect external devices.
- TWS BLUETOOTH: Pair two identical sound systems wirelessly for stereo surround sound.
- SETUP: Adjust display contrast and reset to factory settings.
- 2.1/1.1 Mode: Select between stereo (2.1) or mono (1.1) operation.
Maximum volume and safety
For the first 30-50 hours, operate at 50% volume to run-in the speakers. If the LIMIT LED lights up continuously, reduce the subwoofer volume and check the input signal level. Avoid high volume levels that cause distortion, as this can damage the speakers. If using a microphone, place it behind the speakers to avoid feedback.
Troubleshooting
If the device does not work, check the rocker switch on the back, ensure the power cable is connected properly, and check if the fuse in the mains socket has blown. If the device is on but produces no sound, verify that the input and master volume controls are not set to minimum and check that audio cables are connected correctly.
Practical help
Common problems
Device does not work, display is not lit
Check the position of the rocker switch on the back and ensure the power cable is correctly plugged into the appliance and the mains socket. The fuse in the mains socket may have blown and requires replacement by a specialist.
Device seems to work, but makes no sound
Ensure input volume and master volume are not set to minimum in the menu. Check the volume setting of the external signal source and verify that audio cables are connected correctly.
Distortion at high volume
Reduce the subwoofer volume if the LIMIT LED is continuously lit. Check the signal level of the input channel on the external source device and reduce the input control settings.
Before use
- Ensure all volume controls are at the minimum position before switching on.
- Check that the stand is stable and screws are tightened.
- Verify all cable connections are secure and polarity is correct.
- Ensure the device is connected to a standard socket with protective contact.
- Check the integrity of the power cord and housing.
Images and diagrams
- Figure 1: Control panel layout showing inputs, outputs, and menu navigation knob.
- Figure 2: Assembly steps for the speaker stand and satellite box mounting.
Model compatibility
- Designed for residential use, not industrial-commercial use.
- Requires 100-240V AC power supply.
- Do not place sensitive products (e.g., credit cards, compasses) near speakers due to magnets.

Manual page author
Michael Turner
Technical manual editor
Reviews PDF manuals for structure, safety notes, and practical product details so readers can find the right information quickly.