Smart Home / Smart Doorbells
User Manual for eufy Video Doorbell Slim (1080p, Battery-Powered)
Quick start guide for the eufy Video Doorbell Slim (1080p, Battery-Powered). Includes setup instructions, mounting guide, charging details, and system operation.
Table of contents
Manual images
Click an image to enlargeQuick guide from the manual
This guide covers the setup and installation of the eufy Video Doorbell Slim (T8220) and the Wi-Fi Doorbell Chime (T8020). Before mounting, ensure the doorbell is fully charged using a 5V 1A USB charger. The system requires the eufy Security app for setup and a 2.4GHz Wi-Fi connection. The doorbell is battery-powered, and battery life depends on usage (up to 4 months based on 15 events per day).
What's included
- Video Doorbell Slim (1080p, Battery-Powered)
- Wi-Fi Doorbell Chime
- Mounting Bracket and 15° Mounting Wedge
- Screw Hole Positioning Card
- USB Charging Cable
- Doorbell Detaching Pin
- Screw Packs
Product Overview
Front View: Includes motion sensor, microphone, camera lens, ambient light sensor, status LED, doorbell button, and speaker.
Rear View: Includes Micro USB charging port, SYNC/RESET button, and detaching mechanism.
SYNC Button Operations:
- Power on: Press and release the SYNC button.
- Add to Wi-Fi Chime: Press and hold until you hear a beep.
- Power off: Quick-press 5 times in 3 seconds.
- Reset: Press and hold for 10 seconds.
Powering on the Wi-Fi Doorbell Chime
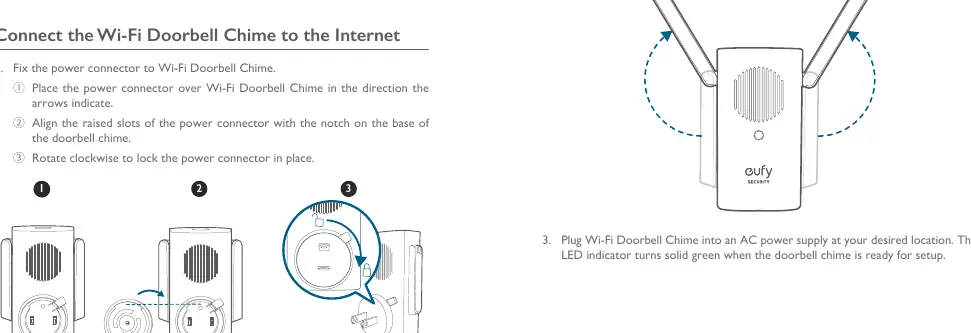
- Attach the power connector to the Wi-Fi Doorbell Chime by aligning the slots and rotating clockwise to lock.
- Extend the antennas.
- Plug the chime into an AC power supply. The LED indicator will turn solid green when ready for setup.
Setting up the System
- Download the eufy Security app from the App Store or Google Play.
- Sign up for an account and follow the on-screen instructions.
- Tap Add Device to add the Wi-Fi Doorbell Chime first, then the doorbell.
Mounting the Doorbell
Finding a Mounting Spot: Use the live view in the app to check the field of view. Recommended mounting height is 48 inches (1.2m) from the ground. Avoid placing the doorbell too close to a side wall to prevent IR reflection, which can cause blurry night vision.
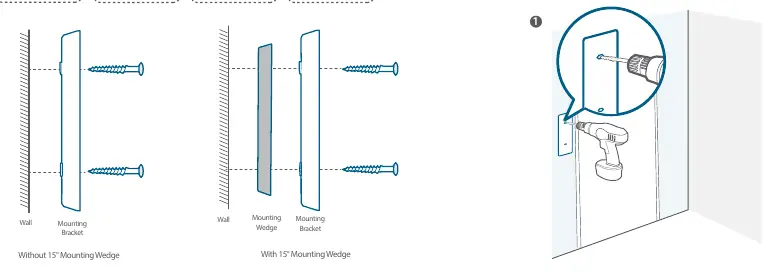
Installation:
- Wooden Surface: Use the provided screws to secure the mounting bracket directly.
- Hard Materials (Brick/Concrete/Stucco): Drill 2 holes using a 15/64 inch (6mm) drill bit, insert anchors, and secure the bracket with the provided long screws.
- Angle Adjustment: Use the 15° mounting wedge if you need to adjust the viewing angle.
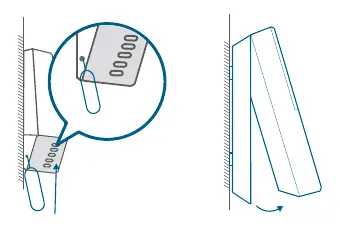
Once the bracket is mounted, align the doorbell with the top of the mount and snap the bottom into place.
Detaching the Doorbell
To remove the doorbell for charging or maintenance, insert the provided doorbell detaching pin into the hole on the bottom of the device, press, and lift the bottom of the doorbell to release it.
Charging the Doorbell
Charge the doorbell using a universal USB charger that delivers 5V 1A output. A full charge from 0% to 100% takes approximately 6 hours. The LED will be solid orange while charging and solid blue when fully charged.
Customer Service
For support, contact eufy via the support email: [email protected] or call the regional support numbers provided in the manual. The product comes with a 12-month limited warranty.
Manufacturer information
eufy
Practical help
Common problems
Night vision is blurry
Ensure the doorbell is not placed too close to a side wall, as this causes IR light reflection.
Battery life is short
Battery life varies by usage. Average life is 4 months based on 15 events per day and 20-second recordings.
Cannot charge the doorbell
Ensure you are using a USB charger that delivers 5V 1A output.
Before use
- Charge the doorbell fully before mounting (takes 6 hours).
- Download the eufy Security app.
- Ensure you have a 2.4GHz Wi-Fi network available.
- Check the mounting surface type (wood vs. hard material) to determine if drilling is required.
- Have a Phillips-head screwdriver ready.
Specs in practice
- Charging Input
- 5V 1A output required for charging.
- Charging Time
- 6 hours for a full 0% to 100% charge.
- Operating Temperature
- 0°C to 40°C (32°F to 104°F).
Images and diagrams
- The 15° mounting wedge is used to angle the camera view if the doorbell is mounted on a side wall.
- The SYNC button is located on the rear of the doorbell and is used for power, pairing, and resetting.
Model compatibility
- Requires 2.4GHz Wi-Fi network.
- MicroSD card required for local storage (user provides).

Manual page author
Emily Carter
User documentation editor
Prepares concise manual descriptions and highlights the most useful setup, operation, and maintenance information for readers.