Industrial / Electrical
User Manual for Botex 1 Channel Dimmer CT 110R
Quick guide for the Botex 1 Channel Dimmer CT 110R. Includes installation instructions, wiring diagrams for master/slave configurations, safety warnings, and technical specifications.
Table of contents
Manual images
Click an image to enlargeQuick guide from the manual
This document provides essential instructions for the safe operation and installation of the Botex 1 Channel Dimmer CT 110R. The device is designed for controlling inductive loads. Important: Electrical wiring must only be performed by a qualified electrician to prevent electric shock.
Safety instructions
- Intended use: Only for inductive loads. Any other use is considered improper.
- Danger for children: Keep packaging and small parts away from children to prevent choking.
- Environment: Do not use in extreme temperatures, humidity, or dusty areas. Keep the unit dry.
- Handling: Do not use force. Clean only with a dry cloth; do not use liquid cleaners.
Operating elements
The device features the following controls:
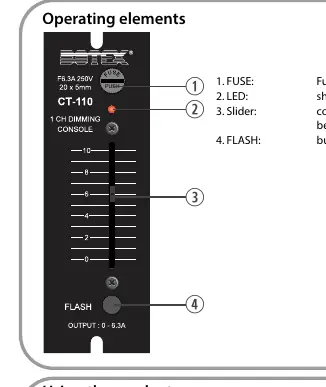
- FUSE: Fuse holder for the device.
- LED: Indicates the current channel intensity.
- Slider: Manually controls intensity between 0 and full.
- FLASH: Button for full output signal.
Connections and installation
Follow these steps to install the device:
- Screw open the housing.
- Use the pre-punched holes on the back to feed cables through.
- Connect the load to the 'LOAD' terminals.
- Connect an external control (0–10 V) to the 'LINK UP' terminals if required.
- Ensure the power cord is disconnected from the mains, then connect wires to the 'AC IN' terminals.
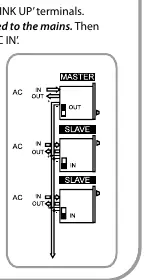
- Interconnecting devices: You can connect up to 5 devices. Use the graphic provided in the manual for wiring.
- Master/Slave setup: Set the switch behind the 'LINK UP' terminals to 'LINK' for Slave mode or 'SEL' for Master mode.
- Close the housing and tighten the screws.
- Connect the power cord to the mains.
Using the product
Operate the dimmer using the slider to adjust intensity, which is reflected by the LED. Press the FLASH button to instantly trigger full output. Always unplug the power cord from the mains after use.
Technical specifications
- Control principle: Leading edge phase control
- Dimmer output: 0–6.3 A
- Operating voltage: 230 V ~ 50 Hz
- External control: 0–10 V
- Fuse: 5 mm × 20 mm, 6.3 A, 250 V, fast acting
- Max. ambient temperature: 35 °C
- Dimensions: 44 × 133 × 135 mm
- Weight: 0.55 kg
Manufacturer information
Botex
Practical help
Common problems
Device does not power on or function
Check the fuse (5x20mm, 6.3A, 250V, fast acting) and ensure the power cord is properly connected to the mains.
Dimmer not controlling the load
Verify that the load is an inductive load and is correctly connected to the 'LOAD' terminals.
Master/Slave configuration not working
Ensure the switch behind the 'LINK UP' terminals is set to 'LINK' for Slave units and 'SEL' for the Master unit.
Before use
- Ensure the power cord is disconnected from the mains before opening the housing.
- Verify that the load is an inductive load.
- Ensure installation is performed by a qualified electrician.
- Check that the fuse is intact.
- Confirm the ambient temperature is below 35 °C.
Specs in practice
- Control principle
- Leading edge phase control.
- Dimmer output
- Maximum current capacity of 6.3 A.
- External control
- Supports 0–10 V control signals.
Images and diagrams
- The wiring diagram illustrates the connection of the Master unit to Slave units using the 'LINK UP' terminals.
Model compatibility
- Up to 5 devices can be interconnected.
- Designed for inductive loads only.

Manual page author
Michael Turner
Technical manual editor
Reviews PDF manuals for structure, safety notes, and practical product details so readers can find the right information quickly.