Lighting / Fixtures
User Manual for GM Lighting SHWD Smart Home Dimmer
Quick guide for the GM Lighting SHWD Smart Home Dimmer. Includes installation steps, wiring diagrams, app setup, and troubleshooting for your Wi-Fi smart switch.
Table of contents
Manual images
Click an image to enlargeQuick Guide
The GM Lighting SHWD Smart Home Dimmer allows you to control your lighting via the LUXcontrol app or voice assistants. Before starting, ensure you have a 2.4GHz Wi-Fi network and a neutral wire in your wall box. Installation requires turning off the power at the circuit breaker. Once installed, use the LUXcontrol app to pair the device by cycling the power three times during the Auto Scan process.
Product Overview
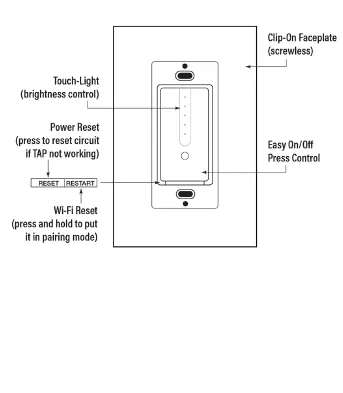
The dimmer features a touch-sensitive interface for brightness control and an easy On/Off press control. It includes a Power Reset button to reset the circuit if the touch control is unresponsive, and a Wi-Fi Reset button to enter pairing mode.
System Requirements
- Existing 2.4GHz Wi-Fi network.
- Single pole circuit and outlet box with a neutral wire.
- Mobile device running iOS 10.0 or higher, or Android 8.0 or higher.
- GM Lighting LUXcontrol app.
Installation and Wiring
Warning: Turn off the power at the circuit breaker before beginning installation. We recommend using a qualified electrician.

- Remove the existing wall switch.
- Mount the SHWD dimmer ensuring the RE-SET switch is at the bottom.
- Connect the 120V power wire to the BLACK wire on the dimmer.
- Connect the neutral wire (WHITE) to the WHITE wire on the dimmer.
- Connect the brown wire to the load wire (light).
- Connect the GREEN wire on the dimmer to the ground.
- Push the dimmer into the outlet box and secure it with screws.
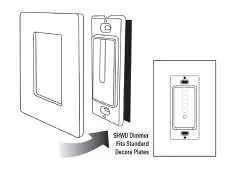
- Attach the wall plate; the device is compatible with standard Decora plates.
App Setup and Pairing
- Download and install the LUX Control app.
- Open the app and press Add Device.
- Press Auto Scan at the top of the screen.
- During the scan, cycle the dimmer On/Off 3 times.
- Once the dimmer is found, press Next.
- Press Done to complete the setup.
Voice Control
Once the dimmer is recognized by the LUXcontrol app, you can integrate it with Alexa or Google Home. Follow the instructions within your voice assistant's app to link the LUXcontrol lighting system.
Troubleshooting
If you experience difficulty, check your Wi-Fi connection and ensure the dimmer is installed correctly. Verify that the device is manually able to dim your lighting before attempting to pair it with the app. Use the Power Reset button if the touch interface is not responding.
Specifications
- Electrical Rating: 100-240V AC
- Rated Current: 3A
- Working Temperature: -4°F to 120°F (-20°C to 50°C)
- Wi-Fi Frequency: 2.4GHz only
- Max. Output: 300W Incandescent / 150W LED
Practical help
Common problems
Dimmer not pairing with app
Ensure your phone is connected to a 2.4GHz Wi-Fi network. During the Auto Scan process, cycle the dimmer switch On/Off 3 times to trigger pairing mode.
Touch control not working
Press the Power Reset button on the dimmer to reset the circuit.
Dimmer not powering on
Check the circuit breaker to ensure power is on and verify that the neutral wire is correctly connected.
Before use
- Turn off power at the circuit breaker.
- Verify the presence of a neutral wire in the wall box.
- Confirm your Wi-Fi network is 2.4GHz.
- Download the LUXcontrol app.
- Ensure the circuit is a single pole configuration.
Specs in practice
- Max. Output (Incandescent)
- Supports up to 300W for incandescent bulbs.
- Max. Output (LED)
- Supports up to 150W for LED bulbs.
- Wi-Fi Frequency
- Requires 2.4GHz network; 5GHz networks are not supported.
Images and diagrams
- Wiring Diagram: Shows the connection of Ground (Green), Neutral (White), Load (Brown), and 120V Power (Black) wires.
- Controls: Identifies the Touch-Light area, Power Reset, and Wi-Fi Reset buttons.
Model compatibility
- Requires a neutral wire for installation.
- Compatible with standard Decora wall plates.
- Works with Amazon Alexa and Google Home voice systems.

Manual page author
Michael Turner
Technical manual editor
Reviews PDF manuals for structure, safety notes, and practical product details so readers can find the right information quickly.