Lighting / Fixtures
User Manual for anko ND-16D2P Flame Effect Fireplace Heater
Quick guide for the anko ND-16D2P Flame Effect Fireplace Heater. Learn how to assemble the feet, operate the heating settings, adjust the flame effect, and follow essential safety precautions for household use.
Table of contents
Manual images
Click an image to enlargeQuick guide from the manual
This manual provides instructions for the anko Flame Effect Fireplace Heater (Model ND-16D2P). The device is intended for indoor household use only. Key safety requirements include maintaining a 1-metre clearance from all objects, plugging directly into a fixed wall outlet (no extension cords or power boards), and ensuring the unit is placed on a level, heat-resistant surface. The heater features a thermal safety cut-out and a tip-over safety switch.
Assembly
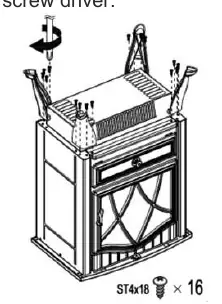
Before use, the four feet must be attached to the base of the heater:
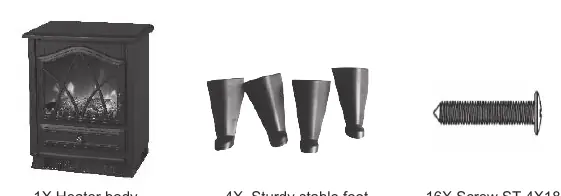
- Place the heater upside down on a soft cloth or carpet to prevent damage.
- Align the feet with the pilot holes on the base.
- Secure each foot using the provided screws (16 screws total) with a Phillips head screwdriver.
Controls and Features
The control panel is located on the unit and includes:
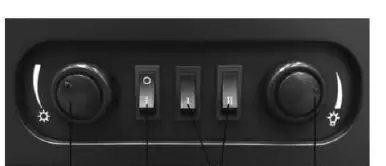
- Adjustable thermostat knob: Rotate clockwise or anti-clockwise to set the desired room temperature.
- ON/OFF switch: Activates the unit and the fire illumination effect.
- Heating setting switch: Controls heat output.
- Flame adjustment knob: Adjusts the intensity of the flame effect.
Operation
When using the heater for the first time, you may notice a slight burning smell; this is normal and will dissipate quickly. To operate:
- Place the heater on a level, hard, heat-resistant surface.
- Plug the power cord into a 240V~50Hz wall outlet.
- Turn on the ON/OFF switch.
- Select the heating level: Heating I for half power (900W) or Heating I & II for full power (1800W).
- Adjust the thermostat and flame intensity as desired.
Safety Warnings
- Fire Risk: Do not cover the heater. Keep textiles, curtains, and flammable materials at least 1 metre away from the air outlet.
- Placement: Do not place on long-pile carpet or flokati rugs. Use a heat board if necessary. Do not place in wardrobes or enclosed spaces.
- Electrical: Do not use with extension cords, power boards, or double adaptors. Do not operate if the cord or plug is damaged.
- Thermal Cut-out: If the heater overheats, it will shut off. Unplug the unit, let it cool down, and then restart.
Care and Cleaning
Always unplug the heater and allow it to cool before cleaning. Use a dry, soft cloth to clean exterior surfaces. Do not use detergents, solvents, or abrasive cleaners. Never submerge the unit in water or spray it with liquids. Keep air vents free of dust and fluff by vacuuming them regularly.
Manufacturer information
Anko
Practical help
Common problems
Unpleasant burning smell on first use
This is normal and will disappear after a short period of use.
Heater stops working
The thermal cut-out may have activated. Unplug the unit, let it cool down, and then reconnect to the power outlet.
Heater does not turn on
Ensure the unit is plugged directly into a wall outlet and the ON/OFF switch is engaged. Check if the tip-over switch has been triggered by accidental knocking.
Before use
- Remove all packaging from the unit.
- Assemble the feet using the 16 provided screws.
- Ensure the heater is on a level, hard, heat-resistant surface.
- Verify the power outlet is a standard 240V domestic outlet.
- Ensure 1 metre clearance from the front, sides, and rear of the heater.
- Check the supply cord for any visible damage.
Specs in practice
- Power Supply
- AC 220-240V ~ 50Hz
- Power Consumption
- 1800W total
- Heating I & II
- Full power setting (1800W)
Images and diagrams
- The control panel diagram shows the thermostat knob, ON/OFF switch, heating switches, and flame adjustment knob.
- The assembly diagram illustrates the orientation of the feet and the placement of the 16 screws into the base.
Model compatibility
- Do not use with extension cords, power boards, or double adaptors.
- Do not place on long-pile carpet or flokati rugs; use a heat board if necessary.

Manual page author
Emily Carter
User documentation editor
Prepares concise manual descriptions and highlights the most useful setup, operation, and maintenance information for readers.