Garden / Seasonal Decorations
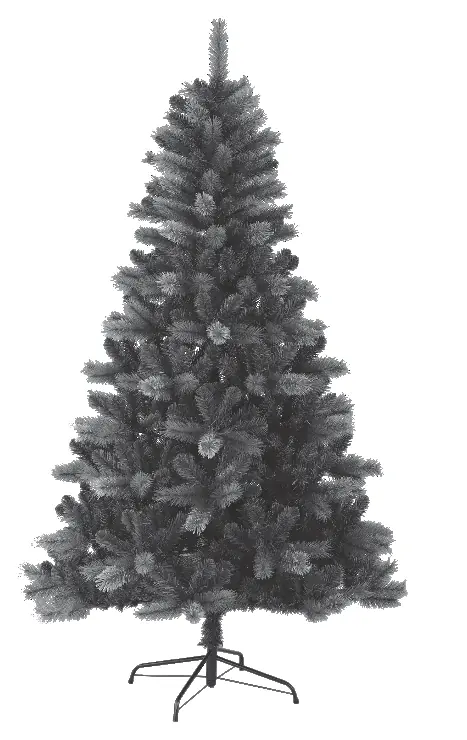
User Manual for Anko 2.13m Cashmere Pine Tree
Quick guide for assembling and shaping your Anko 2.13m Cashmere Pine Tree. Includes step-by-step instructions for stand setup, branch arrangement, and storage.
Quick answers from the manual
Quick answer
- This manual provides assembly and storage instructions for the Anko 2.13m Cashmere Pine Tree (Model 43072286). p. 1, 2
Key actions
- Assemble the stand on a level surface and secure the pole with 3 eye bolts. p. 2
- Shape branches starting from the bottom, fanning them out to cover the wire. p. 2
First start
- Sort all branches by their letter or color codes before beginning assembly. p. 2
Maintenance and reset
- To store: remove ornaments, disassemble panels, and store in a cool, dry place. p. 2
Technical specifications
| Parameter | Value | Meaning | Pages |
|---|---|---|---|
| Height | 2.13m (7ft) | Total height of the tree | p. 1 |
Where to find it in the PDF
- Assembly Instructions p. 2
Table of contents
Manual images
Click an image to enlargeQuick guide from the manual
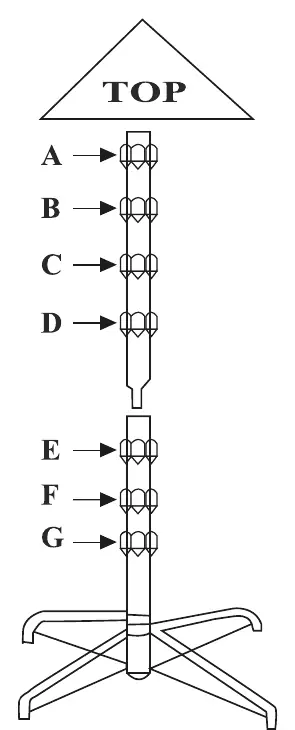
This manual provides instructions for the assembly, shaping, and storage of the Anko 2.13m (7ft) Cashmere Pine Tree. Before beginning, ensure you have all components: the tree top, upper body (layers A, B, C, D), lower body (layers E, F, G), and the metal stand.
Assembly instructions
Follow these steps to assemble your tree:
- Prepare the stand: Place the metal stand on a level surface. Open the stand to a 90-degree angle until the hole on the tube is aligned.
- Secure the stand: Insert the 3 eye bolts into the holes and tighten them to secure the tree pole.
- Assemble the tree: Insert the bottom pole into the stand, ensuring it is straight and balanced.
- Sort branches: Before assembly, sort all branches according to the letter or color codes marked on the end of each branch. Refer to the construction diagram for the correct stacking order (G, F, E, D, C, B, A, Top).
Shaping and adding panels
Proper shaping is essential for a full look:
- Start with the panels at the bottom of the tree and work towards the top.
- Fan out the branches: place one to the right, one to the left, and one in the center.
- Ensure tips at the center are alternately placed so they do not line up behind each other.
- Each set of panels should have a slight upward curve when viewed from the side.
- Twist the last tip at the end of the stem to cover the wire.
- Once all panels are shaped, insert the top section into the pole and curve the tips upward for a natural look.
Storage instructions
To store your tree after the season:
- Remove all ornaments and decorations.
- Work from the top down to remove each panel, pressing the branches against the stem.
- Place the branches into the carton, ensuring the longest branches are at the bottom.
- Store the tree in its box in a cool, dry place.
- Do not store the tree in direct sunlight, in a damp area, or in an area where the temperature exceeds 40 degrees Celsius.
Manufacturer information
Anko
Practical help
Common problems
Tree is unstable or leaning
Ensure the stand is placed on a level surface and all 3 eye bolts are tightened securely to hold the pole.
Tree looks sparse or uneven
Fan out branches in a circular pattern (right, left, center) and ensure tips are alternately placed to cover the wire.
Before use
- Sort all branches by their letter or color codes.
- Verify all parts are present: Tree Top, Upper body (A-D), Lower body (E-G), and metal stand.
- Ensure you have a level surface for assembly.
- Read the instruction manual carefully.
Images and diagrams
- The construction diagram illustrates the stacking order of the tree sections from the base up: Stand -> G -> F -> E -> D -> C -> B -> A -> Top.
Model compatibility
- For indoor use only (implied by storage and temperature requirements).

Manual page author
Emily Carter
User documentation editor
Prepares concise manual descriptions and highlights the most useful setup, operation, and maintenance information for readers.