Computers / Laptops
Repair Manual for MacBook Pro 13-inch
A comprehensive repair guide for the MacBook Pro 13-inch. This manual provides step-by-step instructions for removing the lower case, antenna cable assembly, display cable assembly, and hinge bolts, along with essential safety precautions...
Table of contents
Manual images
Click an image to enlargeImportant Information
This manual provides repair instructions for various MacBook Pro 13-inch models. Before beginning any repair, ensure you have the correct tools and a clean, organized workspace. Keep track of every screw removed, as they must be returned to their exact original locations to prevent damage to the device.
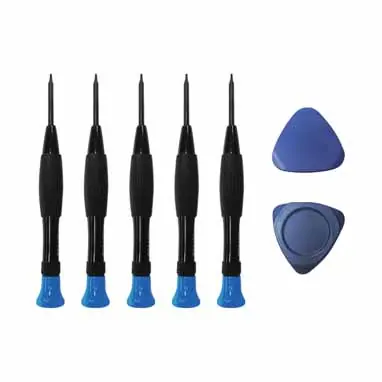
Included Tools: The package typically includes a set of screwdrivers (T8, T5, T3, 1.2, 0.8) and opening picks.
Preparation
Before performing any internal repairs, you must prepare the device to prevent electrical damage:

- Power down the MacBook completely.
- Disconnect the charger cable.
- Crucial: Disconnect the battery connector from the motherboard using a spudger to flip up the locking tab. Failure to do this may damage the motherboard or cause the camera/True Tone functions to fail.
Removing the Lower Case
- Place the MacBook on a soft surface, top-side down.
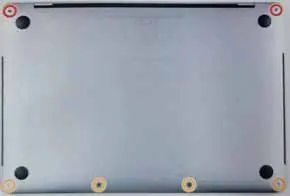
- Use a P5 Pentalobe driver to remove the screws securing the lower case (the number of screws varies by model, typically 6 or 10).
- Insert an opening pick under the front edge of the lower case near the outermost screw holes.
- Twist the pick to pop the clips securing the lower case to the chassis.
- Repeat this process for the other side.
- Pull the lower case firmly towards the front of the MacBook to separate the remaining clips.
Antenna Cable Assembly
- Remove the four 1.9 mm T3 Torx screws securing the plastic covers on top of the display hinges.
- Remove both plastic hinge covers.
- Remove the two 1.5 mm T3 Torx screws securing the aluminum cover on top of the main display cable.
- Remove the cover.
- Remove the two 1.5 mm T3 Torx screws securing the aluminum cover on top of the display cable flex connector.
- Remove the cover.
- Carefully remove the antenna assembly while feeding the antenna cable bundle out from underneath the heat pipe.
Display Cable Assembly
- Remove the four 3.9 mm T3 Torx screws securing the two display cable cover springs.
- Grab the left side of the display cable assembly and pull it towards the bottom end of the MacBook, away from the cover spring.
- Use tweezers to pull the cover spring of the display cable out of its recess.
- Repeat this step for the right cover spring.
- Open the computer and place it facedown on a clean surface with the display hanging over the edge of the table.
Hinge Bolts
- Fully open the screen and stand the MacBook Pro up on one side.
- While steadying the MacBook, remove the three T8 Torx screws from the lower display bracket.
- Remove the remaining three T8 Torx screws from the upper display bracket.
- Pull the display toward you about 15 degrees.
- Lift the display up to ensure the hinges clear the edge of the top case.
- Push both halves of the MacBook Pro together so the hinge brackets can be lifted clear of their recesses.
- Push the main body of the MacBook Pro away from you while pulling the screen toward you to separate it.
Troubleshooting
If you encounter issues after reassembly:
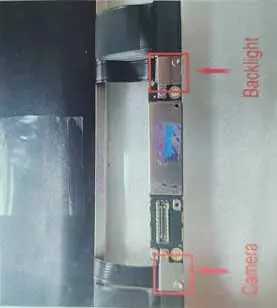
- Black screen or camera malfunction: Ensure the display flex cable is connected securely and that the connector is not damaged.
- Screen does not start: Verify that the battery connector is properly seated and that all internal connectors are perfectly matched.
- Loose cable shield: Check if the copper shield of the cable interface has fallen off and reconnect it securely.
Manufacturer information
Apple Inc.
Practical help
Common problems
Black screen or camera malfunction
Check if the display flex cable is properly seated and the connector is not damaged.
Screen does not start
Ensure the battery connector is properly connected and that all internal connectors are perfectly matched.
Loose cable shield
Check if the copper shield of the cable interface has fallen off and reconnect it securely.
Before use
- Power down the MacBook completely.
- Disconnect the charger cable.
- Disconnect the battery connector to avoid shorting the motherboard.
- Keep track of each screw and its original location.
- Use a soft surface to prevent scratching the top case.
Specs in practice
- P5 Pentalobe
- Specialized screwdriver required for removing the lower case screws.
Images and diagrams
- The manual includes diagrams showing the specific screw locations for the lower case.
- Visual guides illustrate the use of a spudger to disconnect the battery connector.
- Step-by-step photos show the correct angle and method for removing the display assembly.
Model compatibility
- This manual covers multiple MacBook Pro 13-inch models: A1706, A1708, A1989, A2159, A2251, A2289, A2338, A1932, A2179, A2237.

Manual page author
Emily Carter
User documentation editor
Prepares concise manual descriptions and highlights the most useful setup, operation, and maintenance information for readers.