Lighting / Controllers & Dimmers
User Manual for Armacost 511120 2-in-1 LED Dimmer
Comprehensive user guide for the Armacost 511120 2-in-1 LED Dimmer. Includes installation instructions for surface and in-wall mounting, wiring diagrams, compatibility requirements, and technical specifications.
Quick answers from the manual
Quick answer
- The Armacost 511120 is a 2-in-1 LED dimmer for 12V or 24V DC lighting. It supports surface mounting or in-wall installation in a standard switch box. p. 1
Key actions
- Maintain polarity (+ to +, - to -) during wiring to avoid damaging the dimmer. p. 1
- Convert for in-wall installation by removing the rotary knob and installing the insert plate. p. 1
First start
- Test your lighting prior to final installation to ensure brightness is consistent. p. 1
Problems and fixes
LED lights flicker
Do not connect more than one dimmer to a power supply in the same circuit.
p. 1Technical specifications
| Parameter | Value | Meaning | Pages |
|---|---|---|---|
| Input voltage | 12- or 24-volt DC | Required power supply voltage | p. 1 |
| Max load (12V) | 96 watts | Maximum lighting capacity for 12V system | p. 1 |
| Max load (24V) | 192 watts | Maximum lighting capacity for 24V system | p. 1 |
Where to find it in the PDF
- Installation and Specifications p. 1
Table of contents
Manual images
Click an image to enlargeQuick Guide
The Armacost 511120 2-in-1 LED Dimmer is designed to control low-voltage white LED lighting. It is compatible with 12-volt or 24-volt DC constant voltage power supplies. The device features a convertible design, allowing for either surface mounting or installation into a standard wall switch box. It can be used alone or paired with the optional Armacost Wireless Touchpad (Item 523120) for remote control.
Installation Guidelines
Before installing, ensure your power supply is a 12V or 24V DC constant voltage electronic power supply. Do not connect this device to 120-volt AC current or magnetic power supplies. The device is intended for dry locations only.
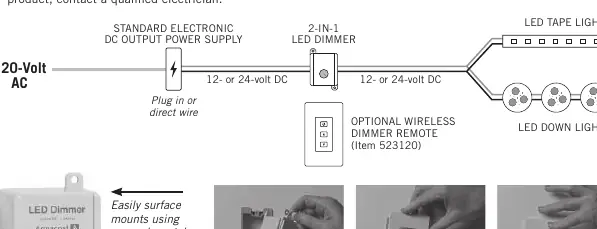
- Polarity: Always maintain correct polarity (+ to +, - to -). Incorrect wiring or shorting may damage the dimmer.
- Wiring: Use insulated staples or plastic ties to secure wires. For in-wall runs, use certified CL2 or better cabling. Keep low-voltage wiring separate from AC main power lines; if they must cross, do so at 90-degree angles.
- Capacity: Do not exceed 96 watts of lighting for 12-volt LEDs or 192 watts for 24-volt LEDs.
- Circuit Limits: Do not connect more than one dimmer to a single power supply, as this will cause flickering.
Mounting Options
The dimmer is versatile and can be mounted in two ways:

- Surface Mount: Use the screw-down tabs to mount the dimmer directly to any wall or flat surface. No hole is required.
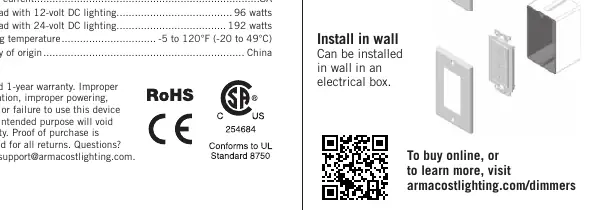
- In-Wall Installation: Remove the rotary knob and install the provided insert plate on top of the dimmer. Secure it with the washer and hex nut. The unit can then be mounted into a standard electrical switch box. You can finish the installation with a designer-style switch cover plate (sold separately).
- Installation Tip: If installing in a smaller electrical box, you can remove the top mounting tab to create more space for wires. You may also remove the quick-connect terminal block to route wires more easily, then snap it back into place.
Optional Wireless Touchpad
The Armacost Wireless Touchpad (Item 523120) is an optional accessory that provides 2-way lighting control. It works through walls and doors up to 100 feet away. It uses RF pairing technology, allowing you to control multiple dimmers with a single touchpad or pair multiple touchpads to control lighting zones.
Technical Specifications
- Input Voltage: 12- or 24-volt DC
- Output Current: 8A
- Max Load (12V DC): 96 watts
- Max Load (24V DC): 192 watts
- Working Temperature: -5 to 120°F (-20 to 49°C)
Practical help
Common problems
LED lights flicker
Ensure you have not connected more than one dimmer to a single power supply.
Brightness varies across lighting zones (Voltage Drop)
Use shorter lengths of DC power feed wires or switch to a thicker gauge wire (lower AWG number).
Before use
- Verify power supply is 12V or 24V DC constant voltage.
- Ensure power supply is not magnetic or 12V AC.
- Check that total lighting wattage does not exceed 96W (12V) or 192W (24V).
- Confirm installation location is dry.
- Ensure you have insulated staples or plastic ties for wire management.
Specs in practice
- Input Voltage
- Must be 12V or 24V DC from a constant voltage electronic power supply.
- Output Current
- The maximum current capacity of the dimmer is 8A.
Images and diagrams
- The wiring diagram illustrates the flow from 120V AC to the DC power supply, then to the dimmer, and finally to the LED lights.
- The diagram emphasizes maintaining polarity (+/-) between the power supply, dimmer, and LED lights.
Model compatibility
- Compatible with 12V or 24V DC constant voltage electronic power supplies.
- Not compatible with magnetic power supplies or 12V AC output power supplies.
- Compatible with Armacost Wireless Touchpad (Item 523120).

Manual page author
David Miller
Documentation analyst
Organizes user manual content into clear summaries, with attention to model details, product context, and everyday usability.