Lighting / Controllers & Dimmers
User Manual for RFM Single 1CH 30A LED Controller
Quick guide for the RFM Single 1CH 30A LED controller. Learn how to wire, pair the remote, and operate your PWM dimmer for single-color LED strips.
Quick answers from the manual
Quick answer
- To pair the remote, turn on the controller and hold the power button on the remote for 5 seconds until the LED strip blinks slowly. p. 1
Key actions
- Pairing the remote p. 1
- Unpairing the remote p. 1
Problems and fixes
Loss of communication
Re-pair the remote by holding the power button for 5 seconds.
p. 1Technical specifications
| Parameter | Value | Meaning | Pages |
|---|---|---|---|
| Voltage | 5-24V DC | Input and output voltage range | p. 1 |
| Max Load | 30A | Maximum current capacity | p. 1 |
Where to find it in the PDF
- Specifications and Operation p. 1
Table of contents
Manual images
Click an image to enlargeQuick Guide
This manual provides instructions for the RFM Single 1CH 30A LED controller. The device is designed for PWM dimming of single-color LED strips. Key operations include pairing the remote control and proper wiring to ensure safe operation.
Technical Specifications
- Input/Output Voltage: 5-24V DC
- Max Load: 30A (12V: 360W, 24V: 720W)
- Frequency: 433MHz
- Range: Up to 15m
- Operating Temperature: -20°C to 60°C
- Remote Battery: CR2025
- Standby Consumption: <1W
Wiring and Installation
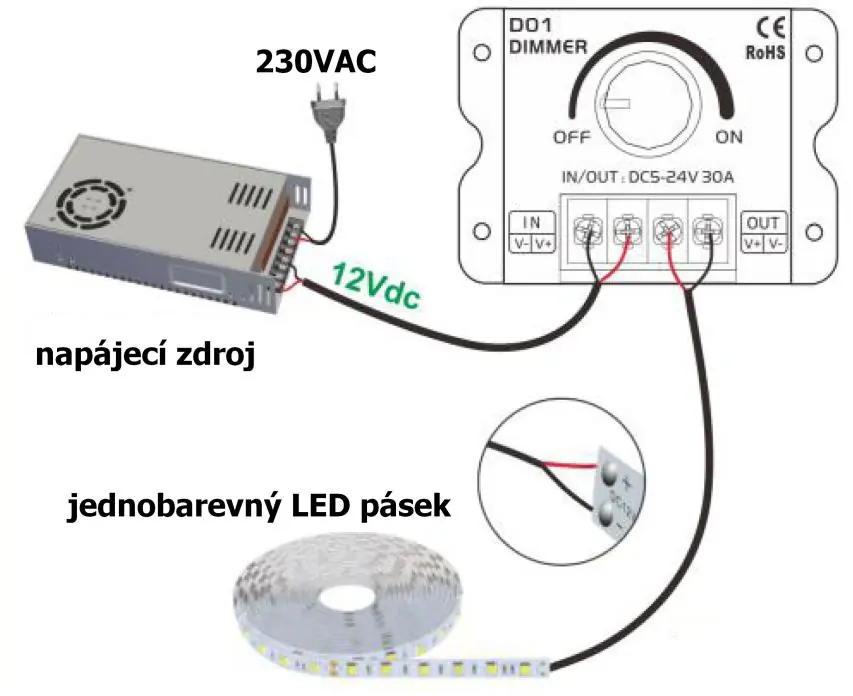
Installation should be performed by a qualified professional. Ensure correct wiring of conductors, voltage, and load values to prevent device damage. The controller features input terminals for the power supply and output terminals for the LED strip.
Remote Control Operation
The remote control allows for:
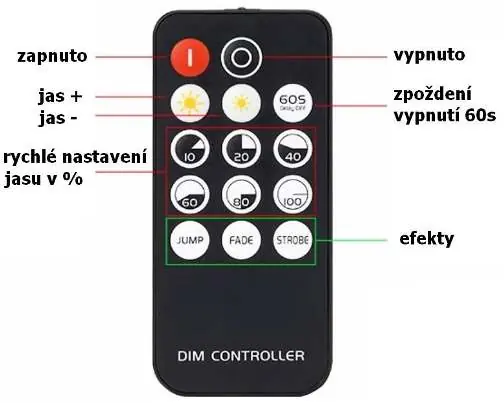
- Power: On/Off control.
- Brightness: Adjustable brightness (+/-) and quick brightness presets (10%, 20%, 40%, 60%, 80%, 100%).
- Effects: Jump, Fade, Strobe modes.
- Timer: 60s delayed shutdown.
Pairing and Unpairing
If communication is lost, follow these steps to re-pair the remote:
- Turn on the controller.
- Press and hold the power button on the remote for approximately 5 seconds.
- The LED strip will blink slowly to confirm successful pairing.
To unpair/delete the remote:
- Press and hold the off button on the remote for approximately 5 seconds.
- The LED strip will blink quickly to confirm the remote has been deleted from the receiver.
Safety Information
Always adhere to the specified voltage and load limits. Improper installation or overloading may cause damage to the device. The system supports up to 2 remotes per receiver.
Practical help
Common problems
Remote not controlling the LED strip
Perform the pairing procedure by holding the power button for 5 seconds until the strip blinks slowly.
Device not working or damaged
Verify that the input voltage is within 5-24V DC and the total load does not exceed 30A.
Before use
- Verify power supply voltage is between 5V and 24V DC.
- Ensure total LED strip load does not exceed 30A.
- Check that the remote control has a working CR2025 battery.
- Ensure wiring connections are secure and polarity is correct.
Specs in practice
- 30A Max Load
- The maximum current the controller can handle. Do not exceed 360W at 12V or 720W at 24V.
Images and diagrams
- The wiring diagram illustrates connecting a 230VAC power supply to a 12V DC transformer, which then connects to the controller's input terminals (IN V+/V-).
- The LED strip is connected to the controller's output terminals (OUT V+/V-).
Model compatibility
- Compatible with single-color LED strips.
- Supports up to 2 remotes per receiver.

Manual page author
Emily Carter
User documentation editor
Prepares concise manual descriptions and highlights the most useful setup, operation, and maintenance information for readers.