Lighting / Fixtures
Artika Europa 18 LED Flush Mount Light Instruction Manual
Quick guide for the Artika Europa 18 LED Flush Mount Light (18FM-ESR-MG). Includes installation steps, wiring instructions, remote control functions, and battery replacement procedures.
Quick answers from the manual
Quick answer
- The Artika Europa 18 is an LED flush mount light. Installation involves mounting the bracket to the ceiling, connecting the wires (Black to L, White to N, Ground to GND), and securing the base and diffuser. It is operated via an included remote control. p. 3, 7, 10
Key actions
- Turn off power at the circuit breaker before installation. p. 4
- Connect wires: Black (L) to Black, White (N) to White, and Ground to Ground. p. 7
Maintenance and reset
- Replace remote batteries by sliding the cover off. Ensure correct polarity. p. 9
Where to find it in the PDF
- Included Hardware p. 2
- Installation p. 3, 5, 6, 8
- Remote Control p. 10, 11
Table of contents
Manual images
Click an image to enlargeQuick Guide
The Artika Europa 18 is an LED flush mount light designed for indoor residential use. Installation requires basic tools including a screwdriver, pencil, and drill. The fixture is controlled via an included remote control for dimming, color temperature adjustment, and timer settings.
Safety Warnings
- Risk of electrical shock: Always turn off the main power at the circuit breaker before starting installation or maintenance.
- This product should be installed by a certified electrician in accordance with local building and electrical codes.
- Do not use this product outdoors.
- Ensure all batteries are installed with correct polarity (+ and -).
Included Hardware

- Wall anchors (x4)
- Mounting bracket (x1)
- Junction box screws (x2)
- Wire connectors (x3)
- Base (x1)
- Decorative nuts (x2)
- Retaining screws (x4)
- Diffuser (x1)
- Remote control (x1)
Installation Steps

- Turn off the main electrical supply at the circuit breaker.
- Disassemble the light fixture by removing the diffuser and base from the mounting bracket.
- Use the mounting bracket as a template to mark the ceiling for the wall anchors.
- Drill holes and insert the wall anchors.
- Secure the mounting bracket to the junction box using the junction box screws.
- Connect the wires: Black (L) to Black, White (N) to White, and Ground (GND) to Ground. Use the provided wire connectors.
- Secure the base to the mounting bracket using the retaining screws and decorative nuts.
- Attach the diffuser to the base.
Wiring Connection
Ensure the following connections are made securely using the provided wire connectors:
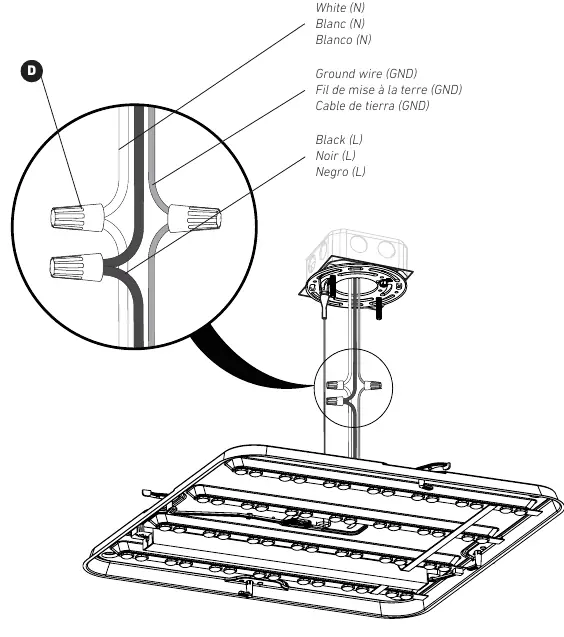
- Black (L): Connect to the live wire from the junction box.
- White (N): Connect to the neutral wire from the junction box.
- Ground (GND): Connect to the ground wire from the junction box.
Remote Control Functions
The remote control allows for the following adjustments:
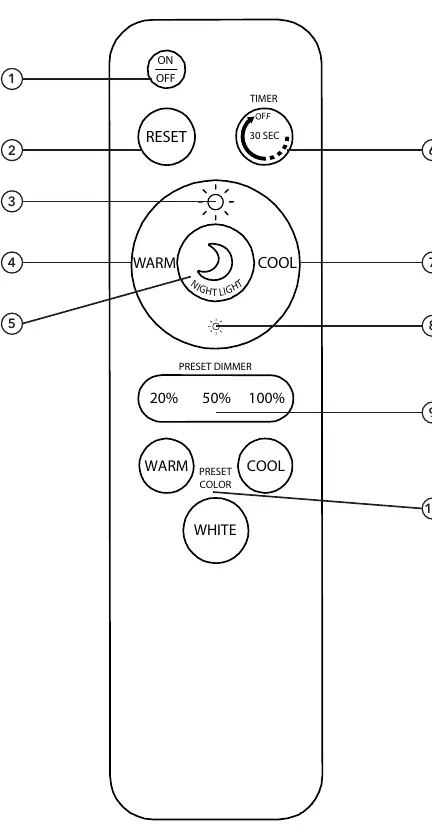
- On/Off: Toggle the light power.
- Reset: Resets light to 4000 K and maximum intensity.
- Intensity: Increase or decrease light brightness.
- Color Temperature: Adjust between warm and cool white.
- Timer: 30-second delay off function.
Battery Replacement
To replace the remote control batteries:
- Slide the battery cover off the back of the remote.
- Remove old batteries and replace with new ones, ensuring correct polarity (+ and -).
- Do not mix old and new batteries or different types of batteries.
- Slide the cover back into place.
Warranty
Artika For Living Inc. offers a five-year limited warranty on manufacturing defects for residential use. The warranty is non-transferable and requires the original sales receipt. It does not cover improper installation, misuse, or normal wear and tear.
Manufacturer information
Artika
Practical help
Common problems
Light does not turn on
Check if the circuit breaker is on and verify that all wire connections are secure.
Remote control not responding
Check battery polarity and replace batteries if necessary.
Before use
- Turn off main power at the circuit breaker
- Verify all hardware is present (anchors, screws, connectors)
- Ensure you have a screwdriver, pencil, and drill
- Confirm installation location is indoors
Images and diagrams
- Page 3: Step-by-step installation overview
- Page 7: Wiring connection diagram
- Page 10: Remote control button layout
Model compatibility
- Residential use only
- Indoor use only

Manual page author
Emily Carter
User documentation editor
Prepares concise manual descriptions and highlights the most useful setup, operation, and maintenance information for readers.