Lighting / Fixtures
User Manual for Artika Valor Square LED Wall Light
Quick guide for installing and maintaining the Artika Valor Square LED Wall Light. Includes step-by-step wiring instructions, safety warnings, and warranty information.
Quick answers from the manual
Quick answer
- The Artika Valor Square LED Wall Light is designed for indoor or outdoor residential use. Installation involves turning off the main power, mounting the bracket, connecting the wires (Ground, Neutral, Live), and securing the fixture. Keep the bottom unsealed for drainage. p. 1, 3, 7, 9
Key actions
- Turn off power at the breaker p. 4
- Connect wires p. 7
First start
- Ensure the main power is off before installation. p. 4
Problems and fixes
Water infiltration
Keep the bottom unsealed to maintain a drainage area.
p. 9Technical specifications
| Parameter | Value | Meaning | Pages |
|---|---|---|---|
| Minimum Height | 120 cm (48 in) | Minimum clearance from the ground | p. 5 |
Where to find it in the PDF
- Included Hardware p. 2
- Installation Steps p. 3, 6, 7, 8
- Warranty p. 11
Table of contents
Manual images
Click an image to enlargeQuick guide from the manual
The Artika Valor Square LED Wall Light is designed for indoor or outdoor residential use. Before beginning installation, ensure the main power is turned off at the circuit breaker. The installation requires basic tools, including a screwdriver and sealant. A minimum clearance height of 120 cm (48 in) from the ground is required.
Safety Warnings
- Risk of electrical shock: Always turn off the main electrical supply from the fuse box or circuit breaker before installing the unit or performing any maintenance.
- We recommend that this product be installed by a certified electrician. In some regions, this is a legal requirement.
- Failure to follow installation and operating instructions may void the warranty.
Included Hardware
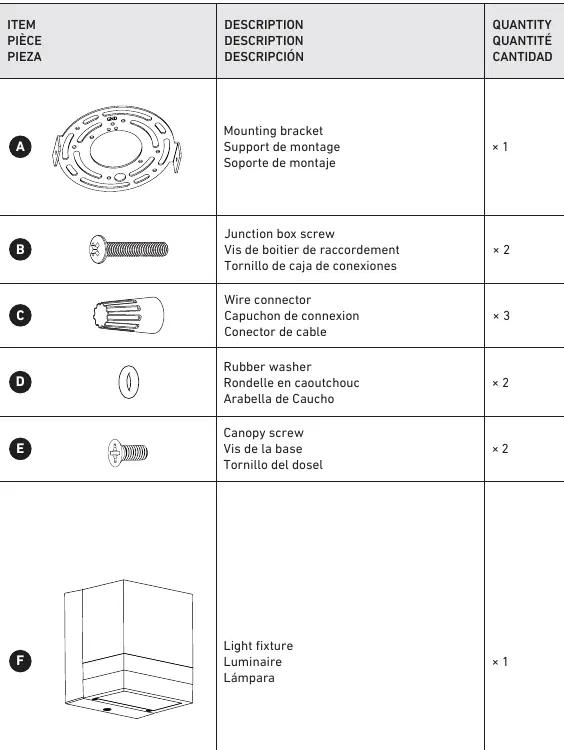
- Mounting bracket
- Junction box screws
- Wire connectors
- Rubber washers
- Canopy screws
Installation Steps
1. Minimum Clearance
Plan the desired height for the fixture. Ensure a minimum height of 120 cm (48 in) from the ground.
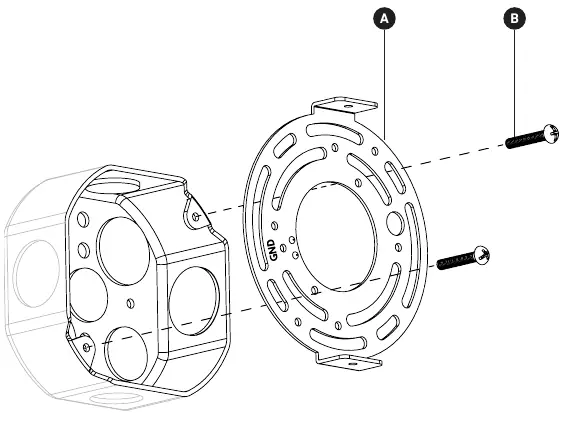
2. Mounting Bracket Installation
Attach the mounting bracket to the junction box using the provided junction box screws.
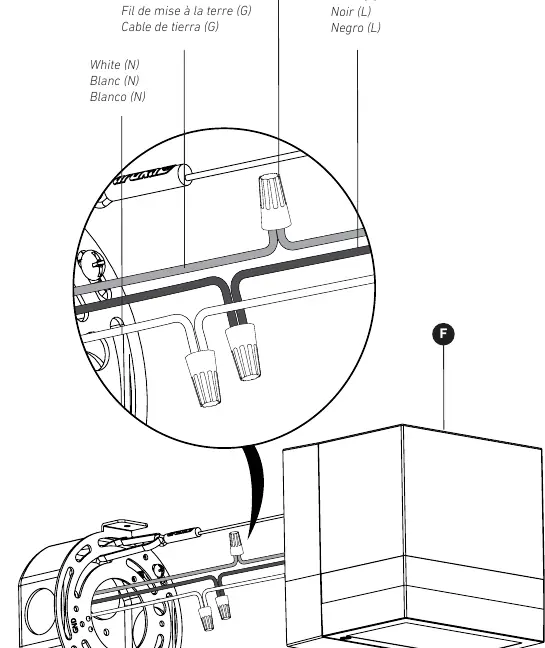
3. Connecting the Wires
Connect the fixture wires to the house supply wires using the provided wire connectors:
- Ground wire (G): Connect to the ground wire.
- White (N): Connect to the neutral wire.
- Black (L): Connect to the live wire.
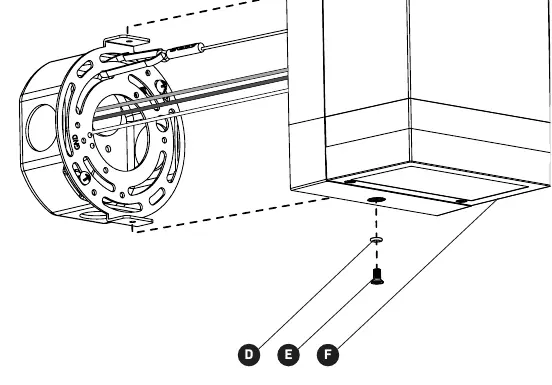
4. Fixture Installation
Secure the light fixture to the mounting bracket using the canopy screws and rubber washers.
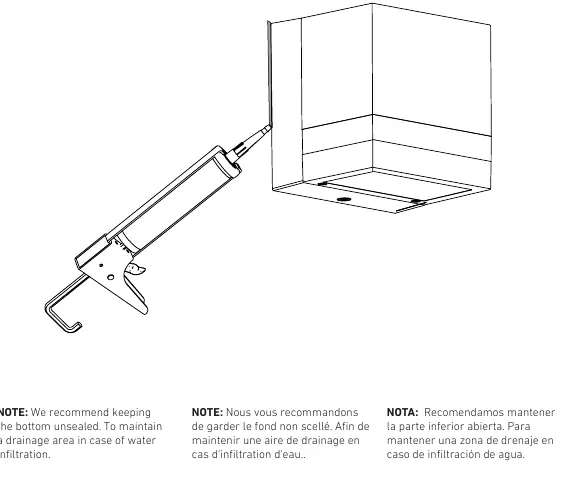
5. Apply Sealant
Apply sealant around the fixture. Note: We recommend keeping the bottom unsealed to maintain a drainage area in case of water infiltration.
Warranty
Artika For Living Inc. offers a five-year (5) limited warranty on manufacturing defects for residential use. The warranty is non-transferable and requires the original sales receipt. It does not cover improper installation, misuse, or normal wear and tear.
Customer Service
For assistance, contact Artika For Living Inc. at 1-866-661-9606 or [email protected]. Customer service is available Monday to Friday, 9 am - 5 pm EST.
Manufacturer information
Artika
Practical help
Common problems
Light not working after installation
Check that the circuit breaker is on and that all wire connections are secure and correctly matched (Black to Black, White to White, Ground to Ground).
Water infiltration
Ensure the bottom of the fixture is left unsealed to allow for proper drainage.
Before use
- Turn off the main power at the circuit breaker.
- Verify you have a screwdriver and sealant.
- Ensure the installation location allows for a minimum height of 120 cm (48 in).
- Confirm the mounting surface is suitable for the bracket.
Specs in practice
- Minimum Height
- 120 cm (48 in) clearance required from the ground.
Images and diagrams
- The wiring diagram illustrates the connection of the Ground (G), White (N), and Black (L) wires using the provided wire connectors.
Model compatibility
- Residential use only.
- Indoor or outdoor use.

Manual page author
Emily Carter
User documentation editor
Prepares concise manual descriptions and highlights the most useful setup, operation, and maintenance information for readers.