Lighting / Fixtures
User Manual for Artika Rayker 15 LED Flush Mount Light
Quick guide for the Artika Rayker 15 LED Flush Mount Light. Includes installation steps, wiring instructions, Selectable White Technology settings, and maintenance tips.
Table of contents
Manual images
Click an image to enlargeImportant Information
Before installing your Artika Rayker 15 LED Flush Mount Light, ensure the main power is turned off at the circuit breaker. This product is intended for indoor and residential use only. If you are using a dimmer switch, it must be LED compatible. We recommend installation by a certified electrician to ensure compliance with local building and electrical codes.
Installation
- Preparation: Ensure you have a screwdriver and that the power is disconnected at the panel.
- Mounting: Secure the fixture base to the junction box using the provided junction box screws and lock washers.
- Wiring: Connect the fixture wires to the house supply wires using the provided wire connectors.
- Final Assembly: Secure the fixture to the ceiling.
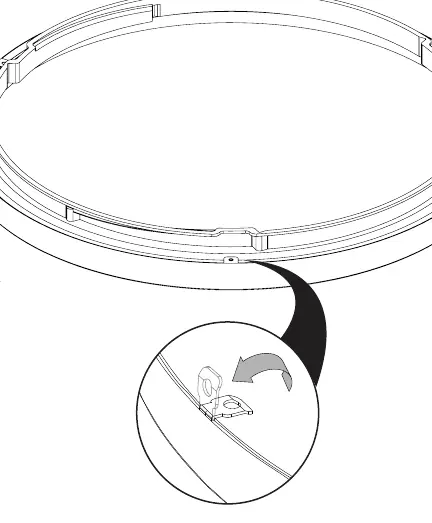
- Trim Installation: Attach the interchangeable color trim to the fixture.
Wiring
Follow these standard wiring connections:
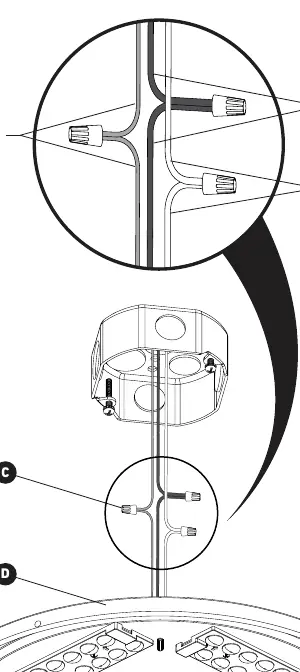
- Black (L): Connect the black fixture wire to the black (live) supply wire.
- White (N): Connect the white fixture wire to the white (neutral) supply wire.
- Ground (G): Connect the ground wire to the green or bare copper supply wire.
Selectable White Technology
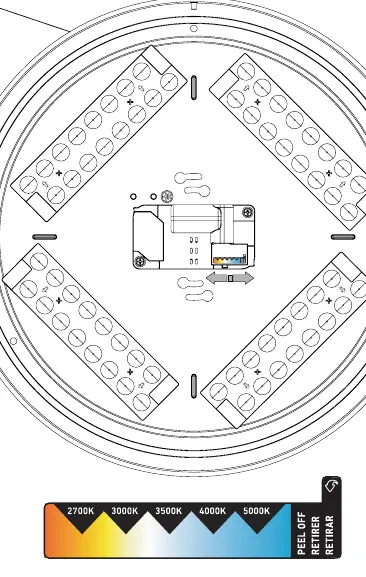
The fixture features Selectable White Technology, allowing you to choose the color temperature of the light. Locate the switch on the back of the unit (D) to select your preferred setting between 2700K (warm) and 5000K (cool).
Maintenance & Warranty
The product comes with a 5-year limited warranty covering manufacturing defects for residential use. Do not use abrasive cleaners, alcohol, or organic solvents on the fixture surface. For support, contact Artika For Living Inc. at 1-866-661-9606 or [email protected]. Service is available Monday to Friday, 9 am - 5 pm EST.
Manufacturer information
Artika
Practical help
Common problems
Light does not turn on
Verify that the circuit breaker is on and that all wire connections are secure and correctly matched.
Light flickers
Ensure that the dimmer switch being used is compatible with LED lighting.
Before use
- Turn off the main electrical supply at the circuit breaker.
- Verify the junction box is properly installed.
- Ensure you have a screwdriver available.
- Confirm your dimmer switch is LED compatible.
Specs in practice
- Selectable White Technology
- Allows adjustment of the light color temperature between 2700K (warm) and 5000K (cool).
Images and diagrams
- The wiring diagram illustrates connecting the Black (Live) wire, White (Neutral) wire, and Ground wire using the provided wire connectors.
- The trim installation diagram shows how to align and secure the interchangeable color trim to the main fixture body.
Model compatibility
- Indoor use only.
- Residential use only.
- Must be used with LED-compatible dimmers.

Manual page author
David Miller
Documentation analyst
Organizes user manual content into clear summaries, with attention to model details, product context, and everyday usability.