Industrial / Testing Equipment
Installation and Maintenance Manual for Ashcroft 1305D Deadweight Tester and 1327D Portable Pump
Quick guide for the Ashcroft 1305D Deadweight Tester and 1327D Portable Pump. Includes installation, operation, maintenance, troubleshooting, and parts diagrams.
Table of contents
Manual images
Click an image to enlargeQuick guide from the manual
This manual provides installation, operation, and maintenance instructions for the Ashcroft 1305D Deadweight Tester and 1327D Portable Pump. These devices are precision instruments used for testing, setting, and calibrating pressure measuring devices up to 10,000 psi (70,000 kPa).
Safety Precautions
- Pressure: Ensure the selected range never exceeds the upper limit.
- Vibration: Excessive vibration can cause component loosening and loss of accuracy.
- Temperature: Operate within design ratings to prevent failure.
- Process Compatibility: Ensure materials are resistant to the process media.
- Oxygen Service: Standard oil-service testers must not be used with water for oxygen service.
Installation
Setup Procedure:
- Remove the tester from the carrying case by releasing the spring clip and lifting the pump reservoir.
- Remove plastic shipping plugs from outlet connections.
- Connect the appropriate offset pipe (lower or back connection) to the inner pump body outlet.
- For 1327D, assemble the straight pipe extension to the outer vertical pump body outlet.
- Remove the reservoir filler plug and fill with the appropriate operating fluid.
Operation
Priming the Pump:
- Close the release valve (clockwise) and open the air vent (loosen filler plug).
- Pull the shuttle valve outward to select high-volume displacement mode.
- Operate the pump handle until fluid appears at the outlet.
- Connect the device to be tested.
- Bleed air from the system by loosening the bleed screw while operating the handle until fluid flows steadily without bubbles.
- Push the shuttle valve inward to continue pumping to the desired pressure.
Making the Test:
- Add weights to the piston plate to achieve the desired pressure.
- Rotate the weights slowly while taking readings to minimize cylinder wall friction.
- Ensure the piston is floating in mid-position (approx. 3/8 inch lift).
- To release pressure, turn the release valve counter-clockwise slowly.
Maintenance
General Maintenance:
- Keep the piston and cylinder clean.
- Flush the tester with solvent every six months to ensure clean operating fluid.
- Replace O-rings during overhaul; coat with suitable lubricant before assembly.
- If the unit is not used for long periods, remove the piston and coat it with hydraulic fluid to prevent dry operation.
Troubleshooting
If pressure does not build, check for insufficient fluid, worn O-rings, or air trapped in the pump piston. If the piston plate drops rapidly, the piston/cylinder assembly may be worn. If the plate will not spin, the oil grade may be too heavy.
Contact Information
For technical support or service, contact Ashcroft Inc. at 250 East Main Street, Stratford, CT 06614. Phone: (203) 378-8281, Fax: (203) 385-0402, Email: [email protected], Website: www.ashcroft.com.
Official resources from the manual
Practical help
Common problems
Pressure does not build when pumping
Check fluid level, inspect O-rings, ensure shuttle valve is pulled outward, or reprime the pump to remove trapped air.
Piston plate drops rapidly
Indicates a worn piston and cylinder assembly; replace the assembly.
Piston plate will not spin
Oil grade may be too heavy; flush the unit and refill with proper grade (SAE 10 or 20).
Pressure decreases when pumping stops
Check for leaks at outlet or gauge connections, or inspect the release valve seating.
Before use
- Check fluid level in the reservoir.
- Ensure the system is leak-tight.
- Level the unit using a bubble level on the piston plate.
- Select the appropriate piston and cylinder assembly for the desired pressure range.
- Remove shipping plugs from the body outlet.
Specs in practice
- Operating Fluid
- Standard: Light grade machine oils (SAE 20). Hydraulic: Phosphate ester base fluids (Skydrol/Pydraul). Oxygen: Distilled water with corrosion inhibitor.
- Max Pressure
- Up to 10,000 psi (70,000 kPa).
Images and diagrams
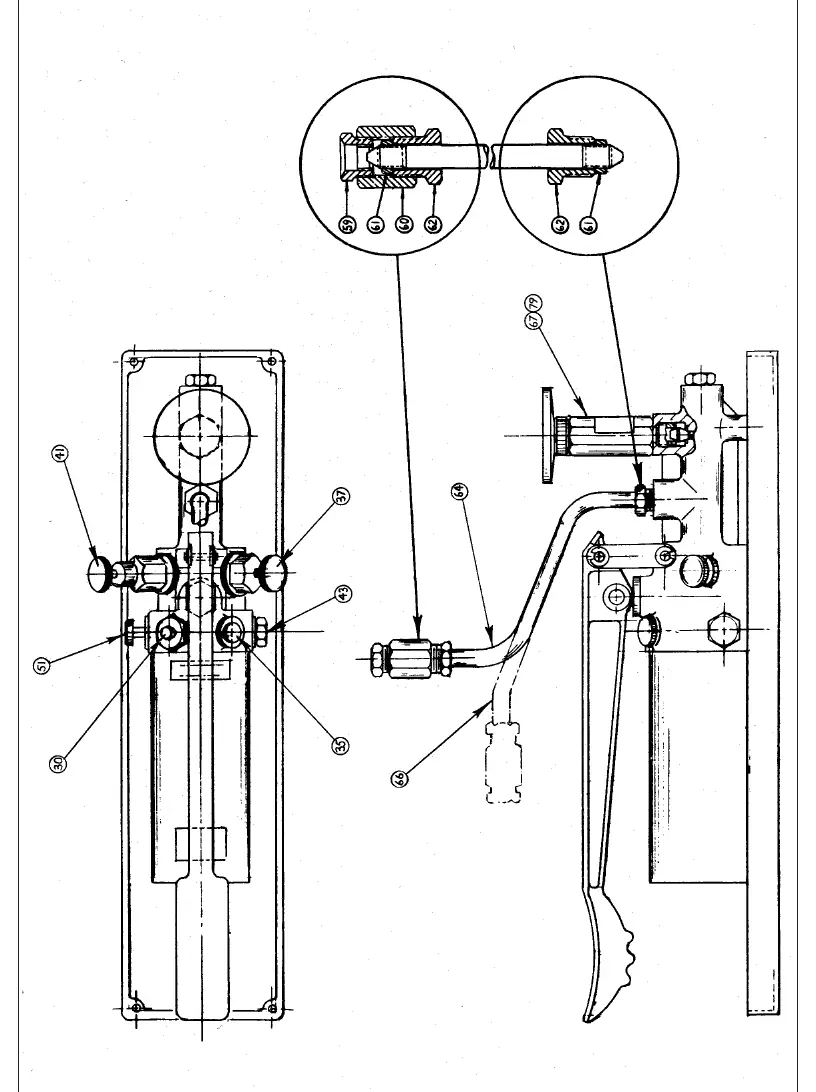
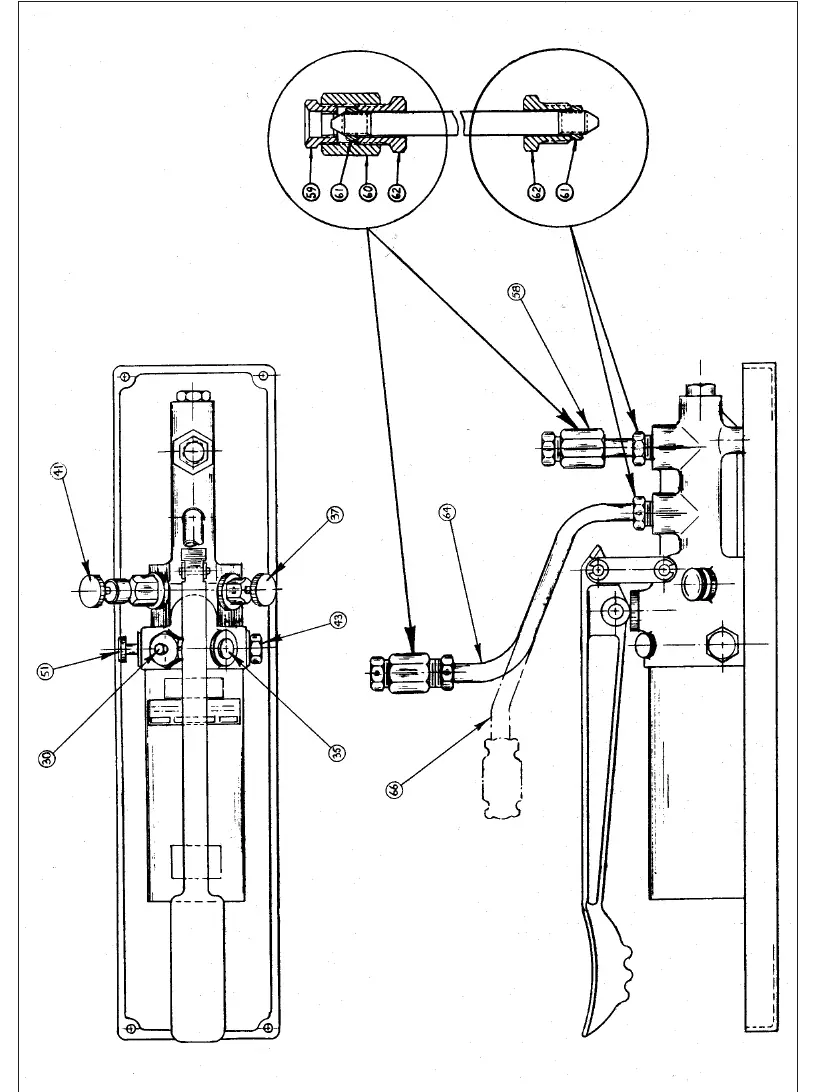
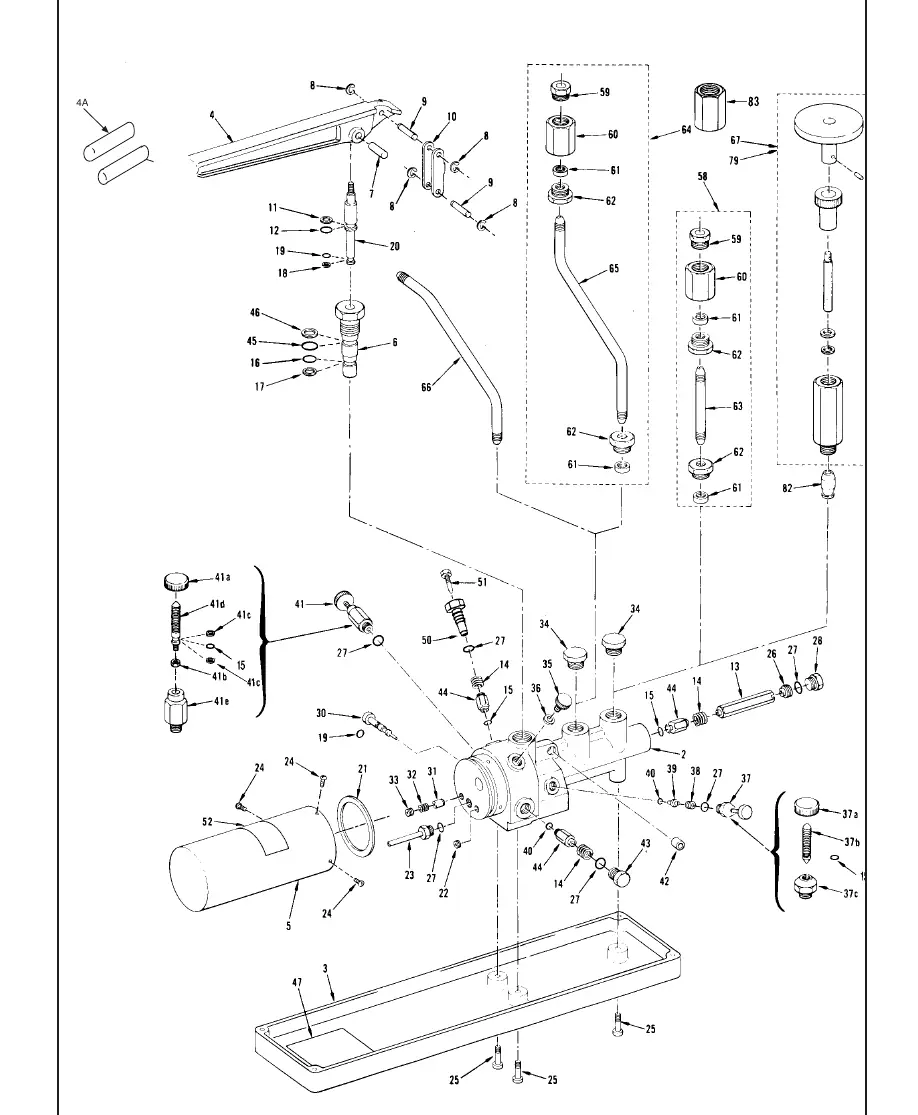
- Figure 2-1: Exploded view and connection diagram for 1305D Deadweight Tester.
- Figure 2-2: Exploded view and connection diagram for 1327D Portable Test Pump.
Model compatibility
- Standard testers (oil service) must not be used with water for oxygen service.
- Hydraulic service testers should not be filled with water or non-hydraulic oils to prevent O-ring damage.

Manual page author
David Miller
Documentation analyst
Organizes user manual content into clear summaries, with attention to model details, product context, and everyday usability.