Electronics / Special Effects
User Manual for Audibax Volcano 1500 RGBW Smoke Machine
Quick guide for the Audibax Volcano 1500 RGBW smoke machine. Includes setup, DMX configuration, timer settings, fuse replacement, and safety instructions.
Table of contents
Manual images
Click an image to enlargeQuick guide from the manual
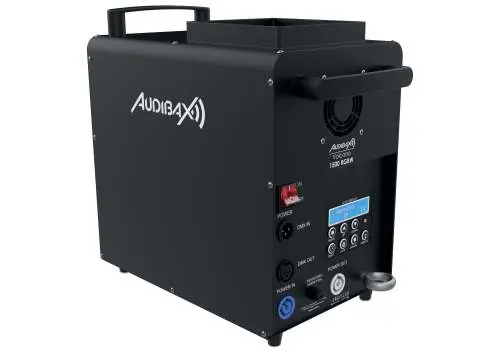
The Audibax Volcano 1500 RGBW is a professional smoke machine designed for event technology. This guide covers essential setup, operation, and maintenance. Always ensure the device is placed on a flat, stable surface (maximum 10° tilt) and filled with high-quality smoke fluid before use. Ensure the mains voltage matches the product label and that the device is properly grounded.
Safety Instructions
General Safety:
- Do not operate near heat sources, flammable materials, or water.
- Keep ventilation slits unobstructed.
- Do not open or modify the equipment.
- If the device is damaged or fluids enter the unit, switch off immediately and unplug.
- Only qualified personnel should perform repairs.
Electrical Safety:
- Always connect to a grounded wall outlet.
- Do not touch the power cord with wet hands.
- Unplug the device when not in use or during cleaning.
- Replace fuses only with the same type and rating.
Operation
To operate the unit:
- Place the unit on a flat, stable surface.
- Fill the tank with high-quality smoke fluid up to the marking.
- Switch the unit on using the rear power switch.
- Use the control panel to adjust settings or trigger fog.
- Switch off and unplug after use.
- Rinse the unit regularly with clean water.
Display and Settings
Use the Menu key to navigate settings:
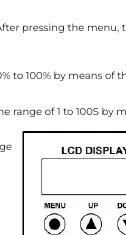
- Main Vol Out: Adjust manual fog output (0-100%).
- Interval Set: Adjust time between fog emissions (1-100s).
- Duration Set: Adjust length of each fog emission (1-100s).
- Volume Out: Adjust volume output during timer function (0-100%).
- DMX 512: Set the DMX start address.
- LED Pro Set: Select LED program (0-11).
- LED Spe: Adjust LED speed/strobe/fade.
- Temper Max: Adjust heating element temperature (285-330°C).
- LED Sync Set: Set LED mode (Yes = sync with smoke, No = always on).
Timer Control
Press the Timer key to activate. The display counts down the interval. Once finished, fog is emitted based on the "Volume Out" and "Duration Set" parameters. Press Timer again to deactivate.
DMX-512 Connection
The machine uses a 3-pin XLR connector. Connect the DMX output of the controller to the DMX input of the first unit. Daisy-chain subsequent units. Terminate the last fixture in the chain by soldering a 120 Ohm resistor between signal (-) and signal (+) in a 3-pin XLR connector.

Replacing the Fuse
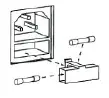
- Unplug the power cord.
- Open the fuse holder on the rear panel using a screwdriver.
- Remove the old fuse.
- Install a new fuse of the same type and rating.
- Replace the fuse holder.
Practical help
Common problems
Fog not emitting
Check fluid level, ensure the unit is switched on, and verify timer/manual settings.
Fuse blows repeatedly
Contact an authorized service center; do not attempt to bypass the fuse.
DMX not responding
Check DMX address settings, ensure cables are connected correctly, and verify there are no overlapping channels.
Before use
- Place on a flat, stable surface (max 10° tilt).
- Fill the tank with high-quality smoke fluid.
- Verify mains voltage matches the product label.
- Ensure proper electrical grounding.
- Check all cables for damage.
Specs in practice
- Main Vol Out
- Manual fog output volume (0-100%).
- Interval Set
- Time between fog emissions (1-100 seconds).
- Duration Set
- Length of each fog emission (1-100 seconds).
Images and diagrams
- Display Panel: Shows menu navigation buttons (Menu, Up, Down, Timer, Lock, Manual).
- DMX Wiring: Shows 3-pin XLR pinout for termination.
- Fuse Replacement: Shows how to open the fuse holder on the rear panel.
Model compatibility
- Requires 3-pin XLR DMX controller.
- Use a 5-pin to 3-pin adapter if your controller has a 5-pin output.

Manual page author
Emily Carter
User documentation editor
Prepares concise manual descriptions and highlights the most useful setup, operation, and maintenance information for readers.