Electronics / PA Systems
User Manual for Audibax Joliet 100FC Zoom Stage Light
Quick guide for the Audibax Joliet 100FC Zoom. Includes installation, DMX configuration, safety instructions, maintenance, and technical specifications.
Table of contents
Manual images
Click an image to enlargeQuick guide from the manual
The Audibax Joliet 100FC Zoom is a professional stage lighting fixture. Before initial use, inspect the unit for transport damage. Ensure the ambient temperature is between -5°C and +45°C. This device is for indoor use only (IP20 rating). Always disconnect from the mains before cleaning or maintenance. The fixture supports RDM and DMX-512 control protocols.
Safety instructions
- Electrical Safety: Ensure the device is connected to the proper voltage (100-240V AC). Always ground the fixture. Unplug before opening the housing.
- Thermal Safety: The housing can become hot during operation. Allow at least 10 minutes for the unit to cool down before handling.
- Operational Safety: Avoid looking directly into the light source. Wear protective equipment when working near the fixture.
Installation
The fixture can be mounted on a flat surface or clamped to a truss. Ensure the mounting structure can support at least 10 times the weight of the equipment.
- Surface Mounting: Fasten securely to a hard, fixed surface.
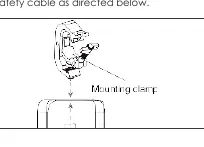
- Truss Mounting: Use a rigging clamp (M10, grade 8.8 steel minimum) and a safety cable. When hanging vertically, an open-type clamp (G-clamp) may be used; for other orientations, use a half-coupler clamp that encircles the truss chord.
- Safety Cable: Always secure the fixture with a safety cable looped through the eyebolt on the back of the unit and around a secure anchoring point.
Operation
The fixture can operate in standalone or master/slave configurations. Use the control menu on the base of the device to set the DMX address and channel mode.
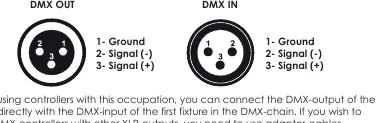
- DMX-512 Connection: Connect the DMX output of the controller to the DMX input of the first fixture. Use a DMX terminator (120 Ohm resistor between pins 2 and 3) at the last fixture in the chain to prevent signal corruption.
- Power Linking: You can link up to 8 units using the PowerCON in/out sockets.
- RDM Control: The device supports RDM for remote configuration and status monitoring.
Maintenance
- Cleaning: Periodically clean internal and external optical lenses and mirrors to optimize light output. Use a soft, lint-free cloth with a weak detergent solution. Do not rub glass surfaces hard.
- Fuse Replacement: If the fixture does not work, check the fuse located in the holder next to the MAINS OUT socket. Disconnect power, unscrew the cap, and replace with a fuse of the same size and rating.
Troubleshooting
If the fixture does not work or produces no light, check the following:
- Verify the power connection and main fuse.
- Ensure the external fuse has not blown.
- Measure the mains voltage on the main connector.
Technical specifications
- Light source: 100W LED
- Zoom scale: 25° - 65° motorized
- Power connection: PowerCON in & out
- Signal connection: 3-pin XLR in & out
- DMX channels: Multiple modes (3CH, 4CH, 5CH, 6CH, 12CH)
- Weight: 6.6 kg
Practical help
Common problems
Fixture does not work / no light
Check the power connection, ensure the main fuse is intact, and verify the mains voltage on the connector.
Before use
- Inspect for transport damage.
- Ensure ambient temperature is between -5°C and +45°C.
- Verify power supply matches 100-240V AC.
- Ensure the fixture is properly grounded.
- Check that ventilation slots are not blocked.
- Secure the fixture with a safety cable.
Specs in practice
- Power linking
- Maximum of 8 units can be daisy-chained.
- DMX terminator
- Required at the end of the DMX chain to prevent signal corruption.
Images and diagrams
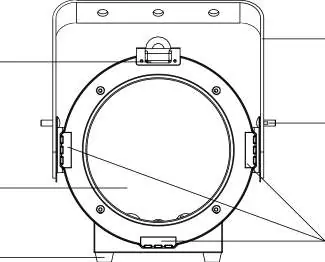
- Front view: Shows lens, yoke, and barn door holder.
- Rear view: Shows control menu, power in/out, and DMX in/out ports.
- Mounting: Illustrates clamping to a truss with a safety cable.
Model compatibility
- Requires DMX-512 controller for advanced operation.
- Supports RDM protocol for remote management.
- 3-pin XLR connection standard (5-pin optional).

Manual page author
Michael Turner
Technical manual editor
Reviews PDF manuals for structure, safety notes, and practical product details so readers can find the right information quickly.