Lighting / Stage Lighting
User Manual for Audibax Aurora 150T Stage Light
Quick guide for the Audibax Aurora 150T stage light. Includes installation instructions, DMX setup, operation modes, safety warnings, and technical specifications.
Table of contents
Manual images
Click an image to enlargeQuick Guide
The Audibax Aurora 150T is a versatile stage lighting fixture. Before initial use, inspect the unit for transport damage. Ensure the device is installed in a dry, well-ventilated area, and always follow safety protocols regarding electrical connections and mounting.
Safety Instructions
- Indoor use only: The device has an IP20 rating and must not be exposed to rain or moisture.
- Temperature: Ambient temperature must be between -5°C and +45°C.
- Electrical Safety: Always ensure the device is grounded. Unplug the mains lead before opening the housing.
- Hot Surface: Certain parts of the housing become hot during operation. Allow at least 10 minutes for cooling before handling.
- Eye Safety: Avoid looking directly into the light source.
Installation
The fixture can be mounted on a flat surface or clamped to a truss.
- Flat Surface: Ensure the surface and fasteners can support at least 10 times the weight of the equipment.
- Truss Mounting: Use a rigging clamp (M10, grade 8.8 steel minimum). When hanging vertically, a G-clamp may be used; otherwise, use a half-coupler clamp.
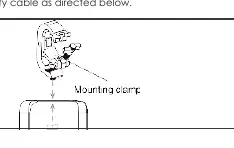
- Safety Cable: Always secure the fixture with an approved safety cable looped through the eyebolt on the back of the unit.
Operation
The Aurora 150T features a multi-function rotary knob on the rear panel for navigation and control.
- Rotary Knob: Rotate right for Down/Increase, rotate left for Up/Decrease, and press to Enter.
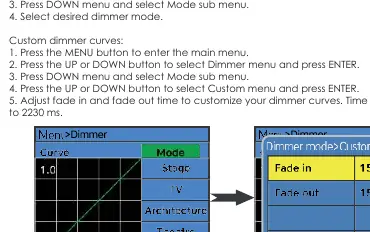
- Dimmer Control: Access via the Menu to select preset or custom dimmer curves (fade in/out times from 150ms to 2230ms).
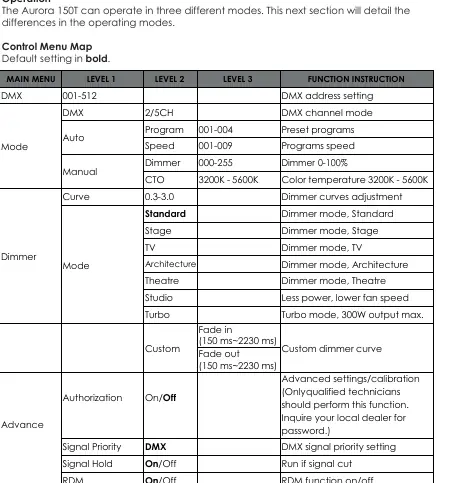
- Operating Modes: Supports DMX, RDM, and manual control.
DMX-512 Connection
The fixture uses 3-pin XLR connectors for DMX signal.
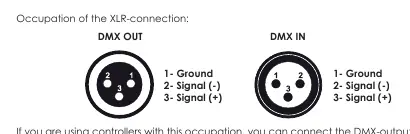
- Pinout: Pin 1 (Ground), Pin 2 (Signal -), Pin 3 (Signal +).
- Daisy Chaining: Connect the DMX output of the controller to the input of the first fixture, then link subsequent fixtures.
- Termination: For long cable runs or noisy environments, use a DMX terminator (120 Ohm resistor between pins 2 and 3) at the last fixture.
Maintenance
Periodically clean internal and external optical lenses and mirrors to optimize light output. Frequency depends on the environment (smoke, dust, etc.). In heavy use, clean monthly. Disconnect from power and allow to cool for 10 minutes before cleaning.
Troubleshooting
- No Light: Check power connection and the main fuse. Ensure the external fuse has not blown. Measure mains voltage on the connector.
Technical Specifications
- Power Supply: AC100-240V, 50/60Hz
- Light Source: 720 x 2 SMD LED
- Power Consumption: 150W max
- Color Temperature: 3200K - 5600K tunable
- DMX Channels: 2 or 5 CH
- Dimensions: 398 x 150 x 299 mm
- Weight: 5.5 kg
Practical help
Common problems
The fixture does not work, no light
Check the power connection and the main fuse. Ensure the external fuse has not blown. Measure the mains voltage on the main connector.
DMX signal issues
Use a DMX terminator (120 Ohm resistor between pins 2 and 3) at the end of the DMX chain, especially for long distances or electrically noisy environments.
Before use
- Inspect the unit for transport damage.
- Ensure the installation location is dry and well-ventilated.
- Verify the mounting surface can support 10x the fixture weight.
- Ensure the fixture is properly grounded.
- Check that ventilation slots are not blocked.
Specs in practice
- Power Linking
- Maximum of 6 units can be linked together.
- Color Temperature
- Tunable range from 3200K (warm) to 5600K (cool).
Images and diagrams
- XLR Pinout: Pin 1 is Ground, Pin 2 is Signal (-), Pin 3 is Signal (+).
- Rotary Knob: Right rotation decreases/moves down, left rotation increases/moves up, press to enter.
Model compatibility
- Ambient temperature must be between -5°C and +45°C.
- Supports RDM (Remote Device Management) for remote DMX addressing.

Manual page author
David Miller
Documentation analyst
Organizes user manual content into clear summaries, with attention to model details, product context, and everyday usability.