Home Appliances / Rice Cookers
User Manual for Avantco 177RCSB90 Electric Rice Cooker/Warmer
Comprehensive user guide for the Avantco 177RCSB90 Electric Rice Cooker/Warmer. Includes setup, operation, cleaning, maintenance, and troubleshooting instructions.
Quick answers from the manual
Quick answer
- To operate the Avantco 177RCSB90, rinse your rice, use a 1:1 water-to-rice ratio, secure the lid, and press the 'Cook' button. The unit will automatically switch to 'Keep Warm' after cooking. p. 8, 9
Key actions
- Cooking rice p. 8
- Cleaning the unit p. 6, 7
First start
- Unbox, inspect for damage, place on stable surface with 12" clearance, and connect to a dedicated circuit. p. 5, 6
Problems and fixes
Rice not heating
Plug in, close lid, check pot condition.
p. 11
Rice not cooked
Check 1:1 water ratio, check pot condition.
p. 11Error codes
| Code | Meaning | Action | Pages |
|---|---|---|---|
| E1 | Bottom sensor short circuit | Contact manufacturer | p. 11 |
| E2 | Bottom sensor open circuit | Contact manufacturer | p. 11 |
| E3 | Bottom sensor overheated | Contact manufacturer | p. 11 |
| E4 | Top sensor short circuit | Contact manufacturer | p. 11 |
| E5 | Top sensor open circuit | Contact manufacturer | p. 11 |
Technical specifications
| Parameter | Value | Meaning | Pages |
|---|---|---|---|
| Voltage | 240V | Operating voltage | p. 2 |
| Wattage | 2500W | Power consumption | p. 2 |
| Capacity (Raw) | 45 Cups | Raw rice capacity | p. 2 |
| Capacity (Cooked) | 90 Cups | Cooked rice capacity | p. 2 |
Where to find it in the PDF
- Specifications p. 2
- Parts Identification p. 5
- Operation p. 8, 9
- Troubleshooting p. 11
Table of contents
Manual images
Click an image to enlargeQuick guide from the manual
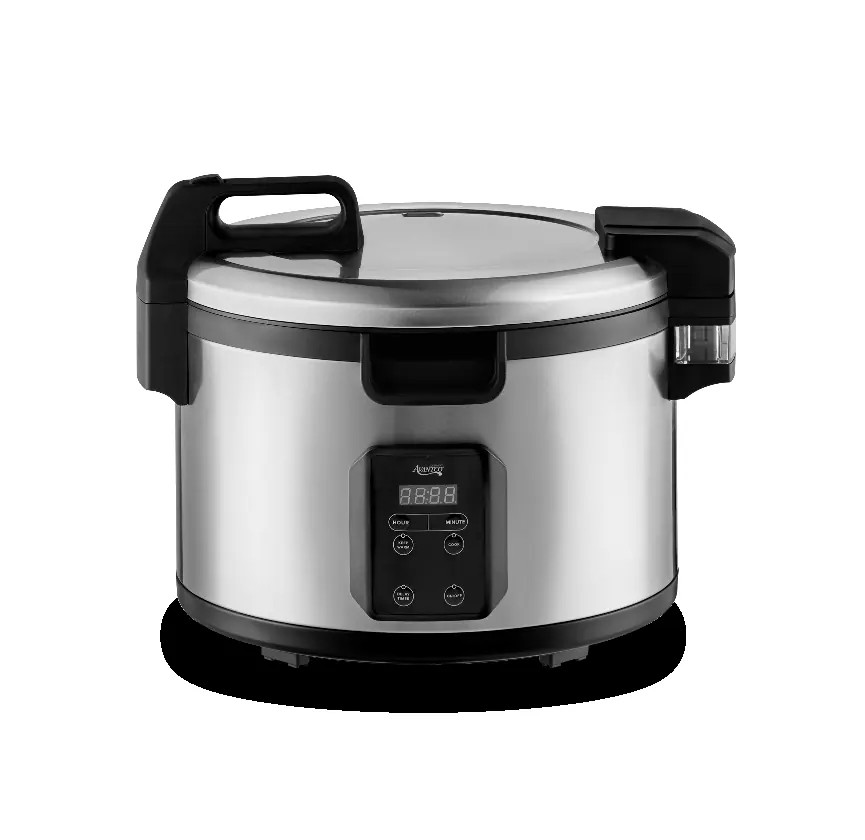
The Avantco 177RCSB90 is a commercial electric rice cooker and warmer. To operate, rinse rice thoroughly, use a 1:1 water-to-rice ratio, secure the lid, and press the 'Cook' button. Ensure the unit is placed on a stable surface with at least 12 inches of clearance on all sides.
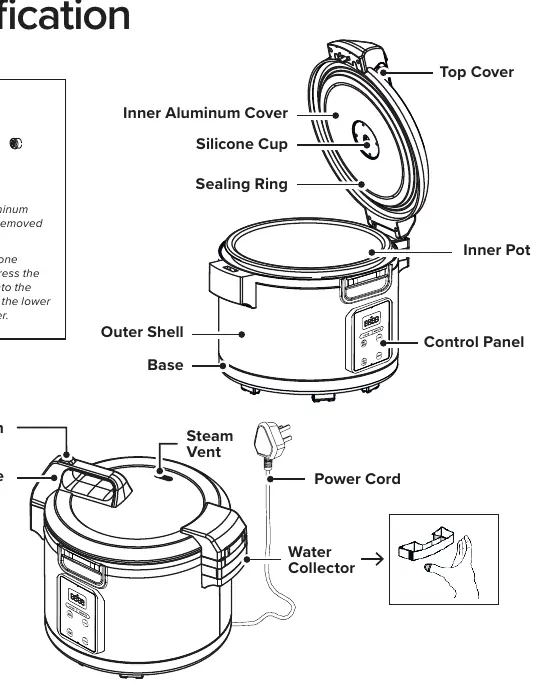
Parts Identification
The unit consists of an outer shell, base, inner pot, top cover, and control panel. Accessories include a measuring cup and rice scoop. The inner aluminum cover, silicone cup, and water collector are removable for cleaning.
Initial Setup
- Inspection: Check packaging for shipping damage.
- Placement: Place on a stable, level surface in a climate-controlled room. Ensure 12" clearance on all sides.
- Electrical: Connect to a dedicated circuit. Do not use extension cords.
Operation
Preparing Rice: Rinse raw rice under cold water until clear. Use a 1:1 ratio of rice to water (adjust based on preference). Note that a 'rice cup' is 3/4 of a U.S. standard cup.
Cooking Process:
- Ensure the unit is in 'OFF' position and plugged into a dedicated circuit.
- Load the clean, dry inner pot with rice and water.
- Close and latch the lid securely.
- Press 'ON/OFF' to enter standby mode.
- Press 'COOK' to begin. The display will show a running circle.
- Once complete, the unit automatically switches to 'KEEP WARM' for up to 12 hours.
Cleaning and Maintenance
Cleaning: Always unplug and allow the unit to cool before cleaning. Wash the inner pot, inner aluminum cover, silicone cup, measuring cup, rice paddle, and water collector with warm, soapy water. Rinse thoroughly and air dry.
Monthly Checks: Inspect the plug, cord, seals, gaskets, and hinges for signs of wear or damage. Replace components as necessary.
Troubleshooting
If the unit is not heating, ensure it is plugged in, the lid is closed, and the pot is free of dents. If the indicator light is off, check the power supply and circuit. For specific error codes (E1-E5), contact the manufacturer.
Manufacturer information
Avantco Equipment
Practical help
Common problems
Rice cooker not heating
Ensure the unit is plugged in, the lid is closed, and the pot is free of dents or residue.
Rice is not cooked
Verify the 1:1 water-to-rice ratio and ensure the pot is not damaged.
Indicator light is not on
Check that the circuit board power supply is connected and the unit is receiving power.
Before use
- Inspect packaging for damage.
- Place on a stable surface with 12" clearance.
- Connect to a dedicated electrical circuit.
- Wash the inner pot and accessories before first use.
- Ensure the inner pot is clean and dry before loading.
Specs in practice
- Capacity (Raw)
- 45 Cups
- Capacity (Cooked)
- 90 Cups
Images and diagrams
- The parts diagram identifies the top cover, inner aluminum cover, silicone cup, sealing ring, inner pot, outer shell, base, control panel, steam vent, water collector, measuring cup, and rice scoop.
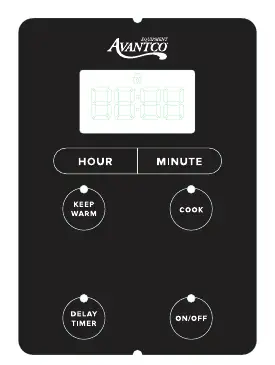
- The control panel features buttons for Hour, Minute, Keep Warm, Cook, Delay Timer, and On/Off.
Model compatibility
- Indoor use only.
- Use only the provided power cord.
- Do not use extension cords.

Manual page author
Emily Carter
User documentation editor
Prepares concise manual descriptions and highlights the most useful setup, operation, and maintenance information for readers.