Home Appliances / Coffee Equipment
User Manual for Avantco 177C10 and 177C15 Coffee Brewers
Quick guide for Avantco 177C10 and 177C15 coffee brewers. Includes installation steps, operation instructions, cleaning procedures, and maintenance tips.
Quick answers from the manual
Quick answer
- The Avantco 177C10 and 177C15 are commercial coffee brewers. Installation requires placing the unit on a level surface, filling the reservoir with 75 oz of water, and running two water-only cycles before first use. p. 4
Key actions
- Run two cleaning cycles before first use p. 4
- Perform deliming every 6 months p. 5
First start
- Position on level surface, fill reservoir with 75 oz water, turn ON, wait for cycle to end, repeat twice. p. 4
Problems and fixes
Overflow
Turn power switch OFF immediately.
p. 4Technical specifications
| Parameter | Value | Meaning | Pages |
|---|---|---|---|
| Electrical | 120V, 50-60Hz; 1650W(C10), 1450W(C15) | Power requirements and consumption. | p. 3 |
Where to find it in the PDF
- Parts Diagram p. 2
- Specifications p. 3
- Installation p. 4
- Cleaning and Deliming p. 5
Table of contents
Manual images
Click an image to enlargeQuick guide from the manual
This manual provides instructions for the Avantco 177C10 and 177C15 coffee brewers. Before first use, it is essential to place the unit on a level surface, fill the reservoir with water, and run two brewing cycles to clean internal components. Always ensure the unit is unplugged before cleaning and never immerse it in water.
Parts Diagram
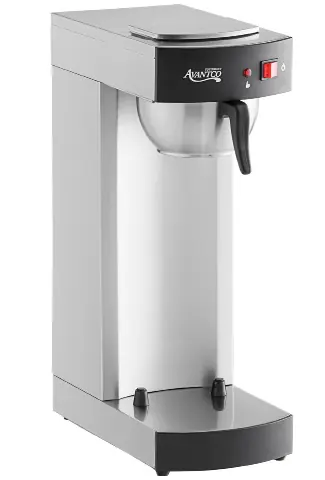
The unit consists of several key components, including the warming plate, reservoir lid, stainless steel brewing funnel, power switch, and indicator light. Refer to the parts diagram on page 2 for specific identification of parts for models 177C10 and 177C15.
Specifications
- Electrical: 120V, 50-60Hz; 1650W (177C10), 1450W (177C15)
- Water Capacity: 2.2 liters
Warnings
- Designed for commercial use only.
- Place on a level surface capable of supporting the weight.
- Do not leave unattended during operation.
- Never immerse in water.
- Do not overfill the water reservoir.
- Do not touch hot surfaces; use caution.
- Do not allow empty decanters to sit on the hot plate.
Installation
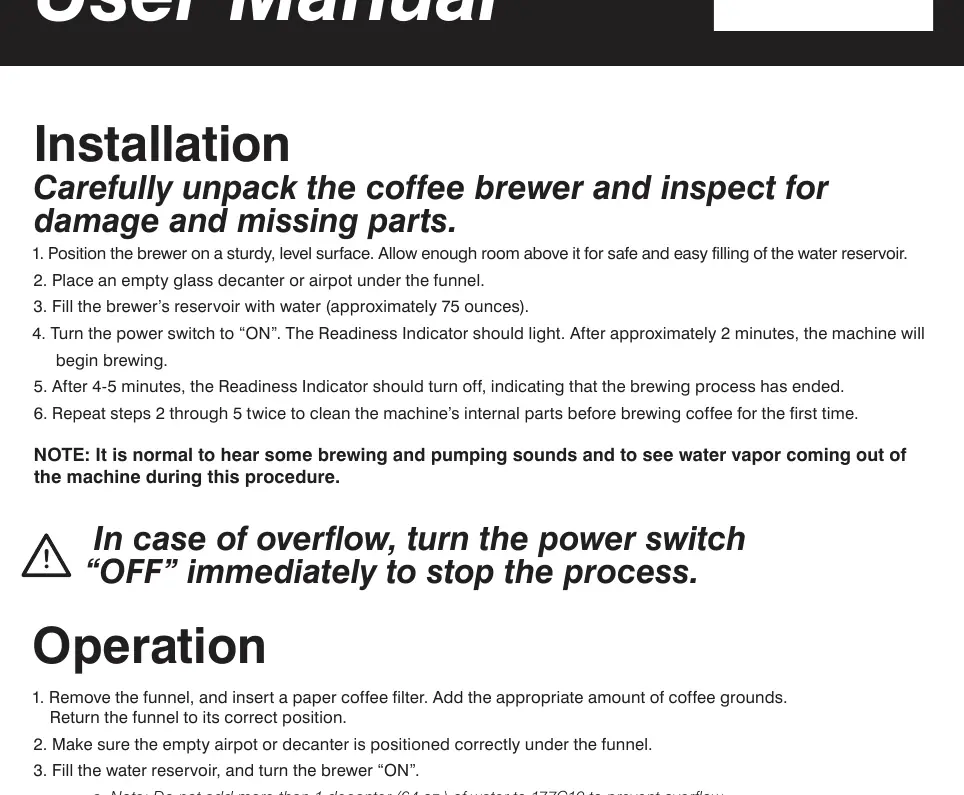
- Position the brewer on a sturdy, level surface with adequate clearance above for filling.
- Place an empty glass decanter or airpot under the funnel.
- Fill the reservoir with approximately 75 ounces of water.
- Turn the power switch to ON. The Readiness Indicator will light.
- After approximately 2 minutes, brewing begins. When the indicator turns off (4-5 minutes), the cycle is complete.
- Repeat this process twice to clean internal parts before brewing coffee for the first time.
Operation
- Remove the funnel and insert a paper coffee filter. Add coffee grounds and return the funnel to position.
- Ensure the decanter is positioned correctly under the funnel.
- Fill the water reservoir and turn the brewer ON.
- Wait for the Readiness Indicator to turn off, signaling the cycle is complete.
- Dispose of used grounds and rinse the funnel.
Cleaning and Deliming
Regular cleaning with a damp cloth and non-abrasive detergent is recommended. For deliming, which should be performed at least every 6 months (or monthly for hard water):
- Mix 10 oz. of lemon juice with 32 oz. of water and pour into the reservoir.
- Run a brewing cycle as if brewing coffee.
- If the unit stops working, a deliming spring may be needed to clear the spray head.
- After the cycle, turn the unit OFF and empty the decanter.
- Run two or three cycles of plain water to rinse the system.
Manufacturer information
Avantco Equipment
Practical help
Common problems
Machine stops working during a normal brewing cycle
The unit may require deliming to remove lime deposits in the spray head.
Overflow
Turn the power switch OFF immediately to stop the process.
Before use
- Place the brewer on a sturdy, level surface.
- Ensure there is enough room above the unit for filling the reservoir.
- Run two brewing cycles with water only to clean internal parts.
- Ensure the decanter is empty and positioned correctly under the funnel.
Specs in practice
- Water Capacity
- 2.2 liters total capacity.
Images and diagrams
- The parts diagram identifies the warming plate, reservoir lid, brewing funnel, power switch, and indicator light.
- Model 177C10 includes an additional power switch for the upper warming plate.
Model compatibility
- 177C10 model: Do not add more than 1 decanter (64 oz.) of water to prevent overflow.

Manual page author
David Miller
Documentation analyst
Organizes user manual content into clear summaries, with attention to model details, product context, and everyday usability.