Home Appliances / Commercial Kitchen Equipment
User Manual for Avantco 177MIX8GY Commercial Countertop Mixer
Comprehensive user guide for the Avantco commercial countertop mixer (models 177MIX8GY, 177MIX8WH, 177MIX8BK). Includes installation, operation, mixing speeds, maintenance, and troubleshooting.
Quick answers from the manual
Quick answer
- The Avantco commercial countertop mixer is a 600W, 5-speed appliance. It requires a 110-120V grounded outlet. Operation requires the bowl to be attached and the lift handle to be in the 'up' position. p. 3, 4, 6
Key actions
- Start the mixer p. 6
- Adjust speed/timer p. 6
First start
- Clean before use p. 6
Problems and fixes
Mixer fails to operate
Check if the mixer is plugged in and if the circuit fuse/breaker is working.
p. 9Error codes
| Code | Meaning | Action | Pages |
|---|---|---|---|
| E2 | Level Lifting Error | Lift the bowl up, check the switch by the back of the machine or the circuit board. | p. 10 |
| E8 | Overheating, High Electricity, Overworking | Unplug and wait for about 30 minutes. | p. 10 |
| E9 | Motor/Bowl Overload or Blocked | Remove ingredients from bowl. | p. 10 |
Technical specifications
| Parameter | Value | Meaning | Pages |
|---|---|---|---|
| Motor | 600 Watt | Power rating | p. 4 |
| Electrical | 110-120V | Voltage requirement | p. 4 |
| Speed | 100-500 RPM | Operating speed range | p. 4 |
Where to find it in the PDF
- Overview and Safety p. 3
- Specifications p. 4
- Operation and Controls p. 6
- Troubleshooting p. 10
Table of contents
Manual images
Click an image to enlargeQuick Guide
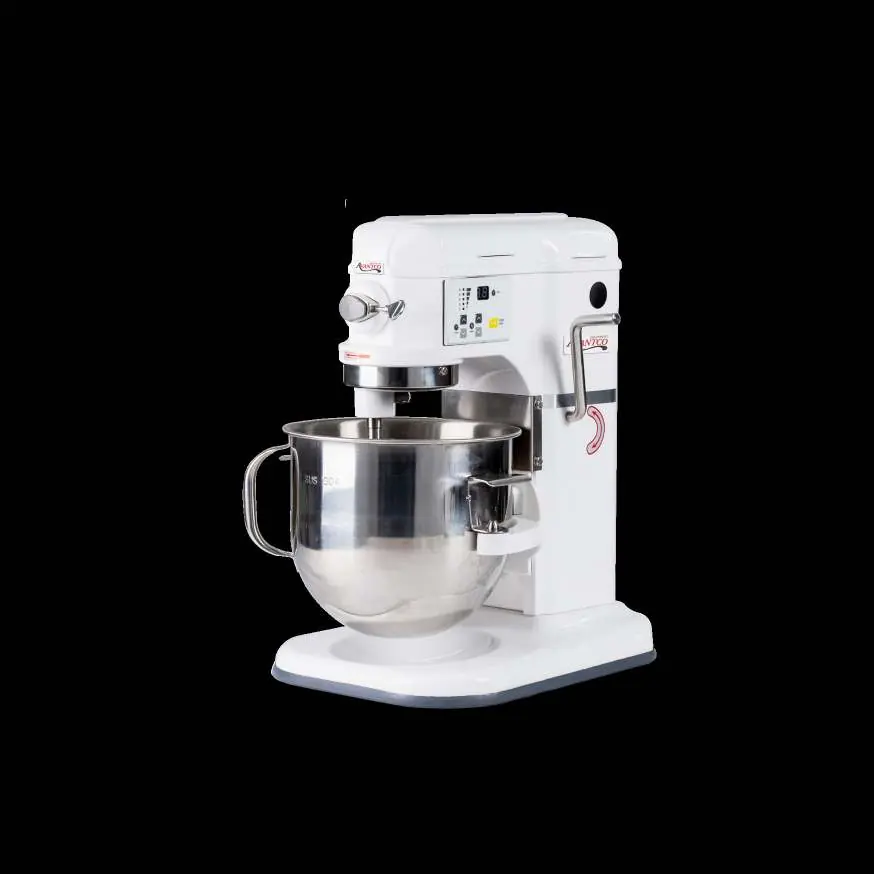
The Avantco commercial countertop mixer is a 600W, 5-speed unit designed for professional use. Before first use, thoroughly wash the bowl and all attachments with hot water and mild soap. Ensure the mixer is placed on a sturdy, level surface and connected to a properly grounded 110-120V outlet. The mixer will not operate unless the bowl lift is engaged in the 'up' position.
Overview and Safety
This mixer features a heavy-duty 4/5 HP motor, planetary mixing action, and a digital timer. Safety is paramount: keep hands, clothing, and rigid objects away from the bowl and attachments during operation. Never immerse the mixer in water or use a water hose for cleaning. Always disconnect the power source before performing maintenance.
Installation
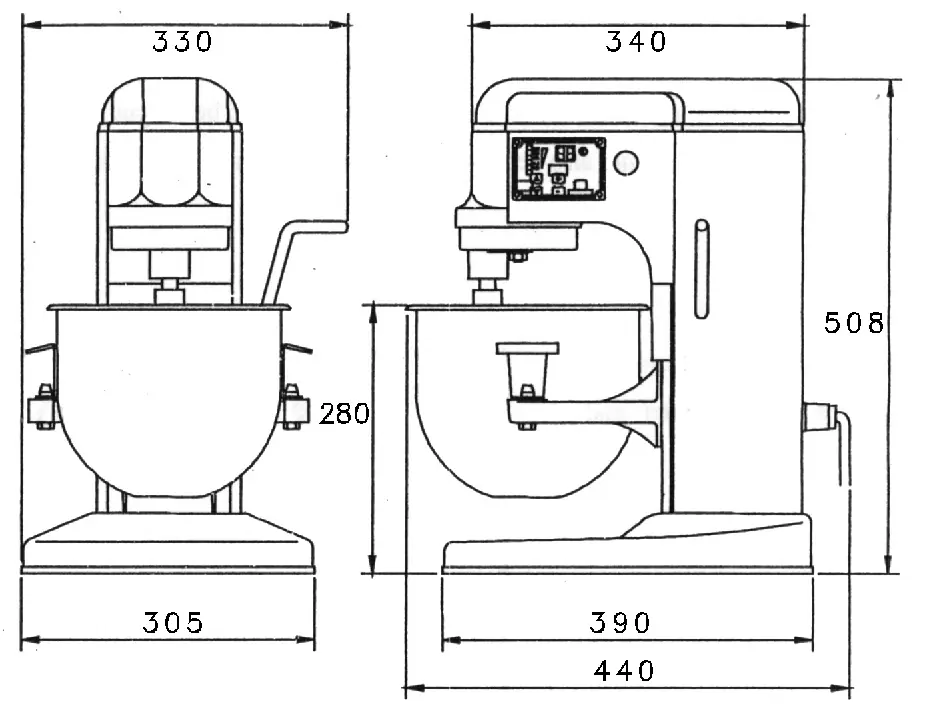
Place the mixer on a sturdy, level surface with adequate space for operation and bowl removal. The unit requires a properly grounded outlet. Before installing, verify that your electrical service specifications match those listed on the mixer's nameplate.
Operation
Powering On: After plugging in, the unit enters standby mode. The digital display shows 0 and speed level 1.
Starting the Mixer: Ensure the bowl is attached and the lift is engaged in the 'up' position. Press the Start/Pause button to begin. You can adjust speed and timer settings using the arrow buttons on the control panel.
Timer: The digital timer can be set from 1 to 30 minutes. When the countdown is less than 15 seconds, an alarm sounds every 2 seconds until the timer reaches 0, at which point the motor stops automatically.
Mixing Speeds and Attachments
The mixer offers five speeds (100-500 RPM) for different applications:
- Speed 1: Slow mixing, mashing, and kneading yeast dough.
- Speed 2: Medium mixing for cookie and cake batters.
- Speed 3: Medium beating for creaming and medium-fast whipping.
- Speed 4: Fast beating for heavy cream, egg whites, and boiled frostings.
- Speed 5: Fast whipping for small amounts of heavy cream and egg whites.
Attachments: Use the flat beater for normal to heavy mixtures (cakes, cookies, mashed potatoes), the wire whip for mixtures requiring air (eggs, whipped cream), and the dough hook for yeast doughs.
Maintenance
Disconnect the unit from electrical power before any maintenance. Clean the mixer thoroughly after each use. Never use a metal or stiff brush, and never use a water hose or fluid pressure to clean the unit. If the attachment strikes the bowl, stop the mixer immediately.
Troubleshooting
If the mixer fails to operate, check if it is plugged in and if the circuit fuse or breaker is functional. If the mixer displays an error code, refer to the troubleshooting section for specific solutions, such as clearing an overload or allowing the unit to cool down.
Manufacturer information
Avantco Equipment
Practical help
Common problems
Error Code E2
Level Lifting Error. Lift the bowl up and check the switch by the back of the machine or the circuit board.
Error Code E8
Overheating, high electricity, or overworking. Unplug the unit and wait for about 30 minutes.
Error Code E9
Motor/Bowl Overload or Blocked. Remove ingredients from the bowl.
Attachment strikes the bowl
Stop the mixer immediately.
Before use
- Wash bowl and agitators with hot water and mild soap before first use.
- Ensure the mixer is placed on a sturdy, level surface.
- Verify the electrical service matches the nameplate specifications.
- Ensure the mixer is plugged into a properly grounded outlet.
- Confirm the bowl is attached and the lift is engaged in the 'up' position.
Images and diagrams
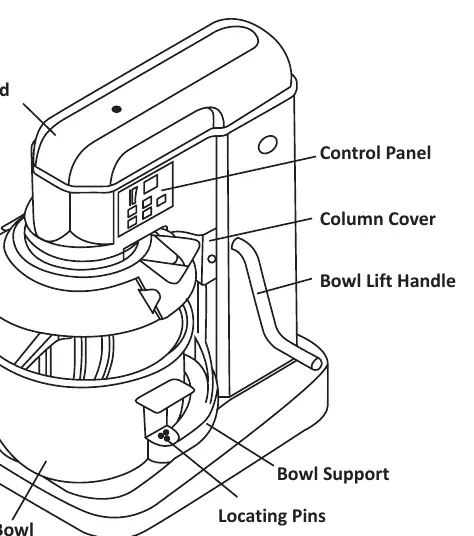
- The control panel allows for Start/Pause, Stop, and adjustment of time and speed.
- The bowl lift handle must be in the 'up' position for the mixer to operate.
- The safety guard (optional) includes a micro switch that shuts off power when opened.
Model compatibility
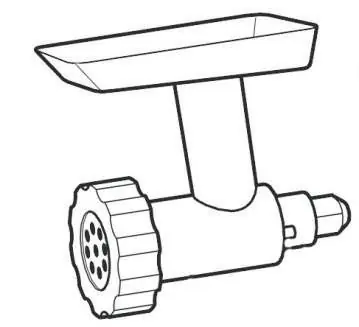
- Meat grinder and pasta accessory kits are available separately.
- Clear safety guard is available as an optional accessory.
- The mixer will run without the bowl if the handle is in the 'up' position.

Manual page author
David Miller
Documentation analyst
Organizes user manual content into clear summaries, with attention to model details, product context, and everyday usability.