Home Appliances / Commercial Kitchen Equipment
User Manual for Avantco Electric Floor Fryer 177EF40B
Comprehensive user guide for Avantco Electric Floor Fryers. Includes installation instructions, operation procedures, cleaning, maintenance, and troubleshooting steps for models 177EF40B, 177EF40C, 177EF40D, and 177EF40E.
Quick answers from the manual
Quick answer
- The Avantco Electric Floor Fryer is designed for frying food indoors. Operation requires filling the oil container between the MIN and MAX lines, switching the unit on, and monitoring the heating indicator. If the unit overheats, press the RESET button located in the bottom cabinet. p. 5, 6
Key actions
- Resetting the unit after overheating p. 6
- Cleaning the frypot p. 6
First start
- Unpack the device and remove all packaging materials. p. 5
- Place on a stable surface and ensure the drain valve is closed. p. 5
- Fill with oil between MIN and MAX markings. p. 5
Problems and fixes
Unit does not heat up
Check for blown fuse, ensure switching unit is installed correctly, or press RESET button.
p. 7Maintenance and reset
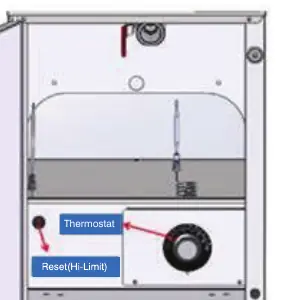
- Press the RESET button in the bottom cabinet if the unit overheats. p. 6
Technical specifications
| Parameter | Value | Meaning | Pages |
|---|---|---|---|
| EF20-240-1 | 14kW, 240V, 1 Phase, 59 Amps | Technical specifications for model EF20-240-1 | p. 5 |
| EF20-240-3 | 14kW, 240V, 3 Phase, 34 Amps | Technical specifications for model EF20-240-3 | p. 5 |
| EF20-208-1 | 12kW, 208V, 1 Phase, 58 Amps | Technical specifications for model EF20-208-1 | p. 5 |
| EF20-208-3 | 12kW, 208V, 3 Phase, 34 Amps | Technical specifications for model EF20-208-3 | p. 5 |
Where to find it in the PDF
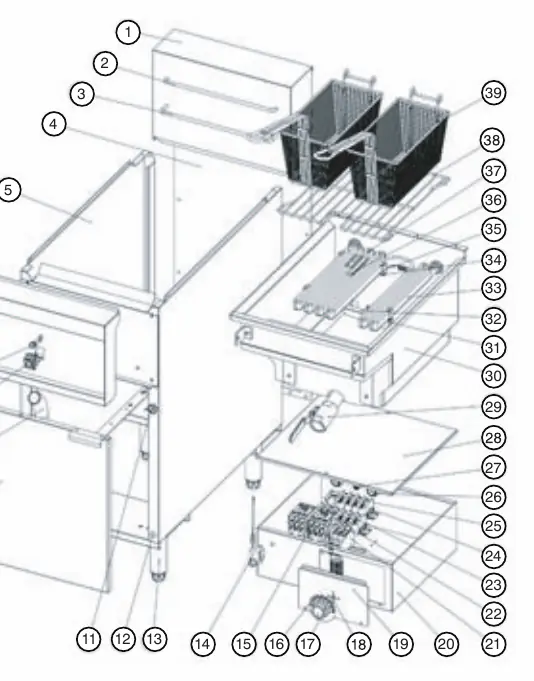
- Parts Diagram p. 4
- Technical Data p. 5
- Troubleshooting p. 7
Table of contents
Manual images
Click an image to enlargeQuick Guide
This manual provides essential instructions for the safe installation, operation, and maintenance of Avantco Electric Floor Fryers. Key safety requirements include indoor use only, ensuring the device is placed on a stable surface, and maintaining proper oil levels between the MIN and MAX markings. Never operate the device without oil, and always disconnect from power before cleaning or maintenance.
Installation and Connection
The device must be installed by a qualified specialist in accordance with local codes. Ensure the unit is placed on a solid, stable surface away from heat sources and water. Before installation, verify that the local power grid specifications match the device requirements. Remove all packaging, including the lid, basket, and handle, before use.
Operation
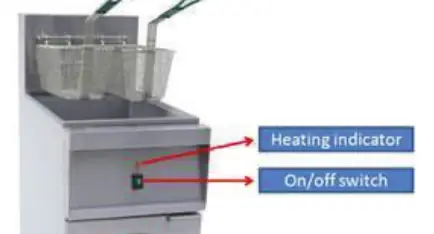
The fryer is operated using an ON/OFF switch and features an orange heating indicator light that cycles on and off to maintain the set temperature. Important: Always ensure the oil level is between the MIN and MAX markings before turning the unit on. Do not use stale oil, as it may foam and ignite. If the unit overheats, it will shut down; you can restart it by pressing the RESET button located in the bottom cabinet.
Cleaning and Maintenance
Regular cleaning is essential for safety and performance. Disconnect the device from the power supply and allow it to cool completely before cleaning. Do not use water jets or pressure washers. Clean the frypot daily with detergent and hot water, rinsing twice. Add 1/4 cup of white vinegar to the final rinse to neutralize alkalinity. Dry all parts thoroughly before reassembly.
Troubleshooting
If the unit fails to heat or the indicator lights do not function, check for a blown fuse, ensure the switching unit is properly installed, or check if the overheating protection has triggered. If the overheating protection has activated, press the RESET button on the switching unit. For persistent issues, contact a qualified technician or the manufacturer.
Manufacturer information
Avantco Equipment
Practical help
Common problems
Unit does not heat up and green light is off
Check for a blown fuse, ensure the switching unit is properly installed, or press the RESET button on the switching unit if overheating protection has triggered.
Heating element stops functioning during use
The overheating control may have activated. Allow the unit to cool and press the RESET button on the switching unit.
Heating indicator light does not come on
Verify the desired temperature has not already been reached or contact a sales agent if the temperature control is damaged.
Before use
- Ensure the device is placed on a solid, stable surface.
- Verify the local power grid matches the device specifications.
- Ensure the oil drainage valve is closed.
- Fill the oil container with oil between the MIN and MAX markings.
- Ensure all parts are dry before assembly.
- Check that the power cable is undamaged and unrolled.
Images and diagrams
- The parts diagram identifies components such as the basket, heating elements, thermostat, and drain valve.
- The control panel diagram shows the location of the heating indicator and the ON/OFF switch.
- The reset button diagram shows the location of the safety reset switch inside the bottom cabinet.
Model compatibility
- For indoor use only.
- Not suitable for direct washing via water jets.
- Standard product does not ship with a lid; the lid is optional.

Manual page author
Emily Carter
User documentation editor
Prepares concise manual descriptions and highlights the most useful setup, operation, and maintenance information for readers.