Home Appliances / Food Processing Equipment
User Manual for Avantco 177MX20GRNDR Meat Grinder Attachment
Comprehensive user manual for the Avantco 177MX20GRNDR meat grinder attachment. This guide covers assembly, installation on #12 hub mixers, safe operation, cleaning procedures, and troubleshooting tips.
Quick answers from the manual
Quick answer
- The Avantco 177MX20GRNDR is a meat grinder attachment for mixers with a #12 hub. It requires manual assembly of the auger, knife, and plate, and must be secured to the mixer hub using the provided thumbscrew. p. 1, 4
Key actions
- Assemble the grinder by inserting the auger, knife, and plate into the chamber head, then securing with the retainer ring. p. 3, 4
- Mount the unit by inserting the shaft into the mixer hub and tightening the thumbscrew. p. 4
First start
- Clean all components with mild soap and water before the first use. p. 3
Problems and fixes
Attachment cannot be installed into mixer hub
Rotate mixer's shaft slowly until insert could be done.
p. 6
Mounted unit rattles when under power
Tighten or replace thumbscrew.
p. 6Maintenance and reset
- Clean the unit immediately after use or before switching food products by hand washing components. p. 5
Where to find it in the PDF
- Safety Instructions p. 2
- Assembly and Installation p. 3, 4
- Cleaning and Maintenance p. 5
- Troubleshooting p. 6
Table of contents
Manual images
Click an image to enlargeQuick Guide from the Manual
The Avantco 177MX20GRNDR is a meat grinder attachment designed for mixers equipped with a #12 hub. Safety is paramount: always disconnect the electrical power supply before installing, uninstalling, or performing maintenance on the unit. Never insert hands or utensils into the hopper while the unit is in operation. Always wear protective gloves when handling knives, cutting plates, or cutting assemblies.
Assembly
Before first use, ensure all components are clean. Assemble the unit as follows:
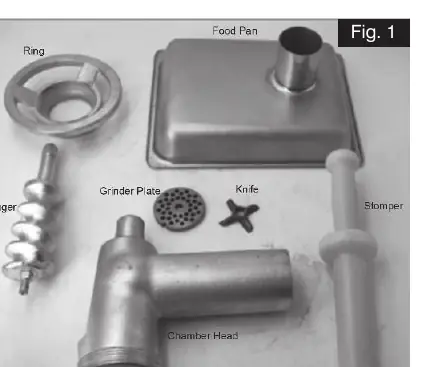
- Insert the auger into the chamber head.
- Insert the knife and the grinder plate into the chamber head in that specific order.
- Ensure the auger, knife, and grinder plate are secure within the chamber head.
- Lift the retainer ring and spin it clockwise onto the chamber head to tighten.
- Attach the food pan to the top of the chamber head.
Installation
To mount the attachment to your mixer:
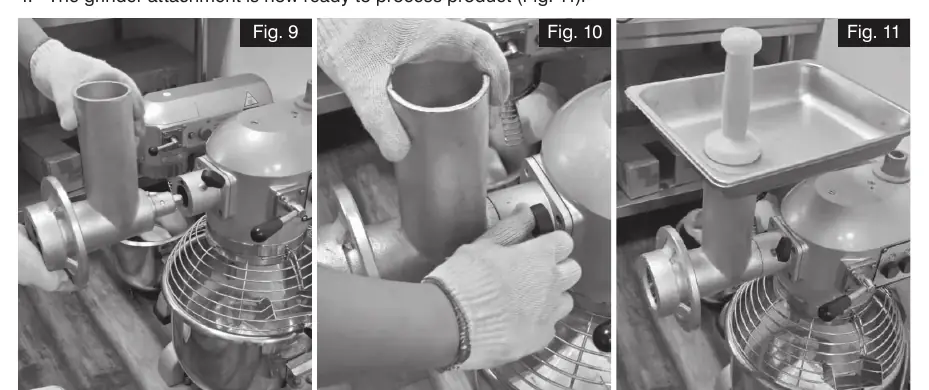
- Ensure the power source equipment is turned off.
- Lift the assembled unit and insert the square milled shaft end into the mixer's hub.
- Turn the unit slightly to engage the square end of the shaft with the square hole in the adapter.
- Slide the unit fully forward onto the hub and tighten the thumbscrew to secure it.
Operation
- Connect the electrical supply to the mixer and turn it on.
- Place meat into the feed hopper.
- Use the stomper to gently push the product into the rotating plate unit. Keep hands and fingers out of the hopper at all times.
Cleaning & Maintenance
For sanitary operation, clean the unit immediately after use or before switching food products:
- Safety: Wear hand protection.
- Washing: Wash all components by hand using a mild soap and water solution. Use a long-handled scrub brush on plate units to avoid cutting fingers.
- Drying: Dry all component parts with a soft cloth.
- Storage: Do not rest knives, plates, auger, or the retaining ring on uneven surfaces.
- Warning: Never hose down the unit while it is mounted to the power source equipment, as this may cause electrical shock.
Manufacturer information
Avantco Equipment
Practical help
Common problems
Attachment cannot be installed into mixer hub
Rotate the mixer's shaft slowly until the insert can be properly aligned and installed.
Mounted unit rattles when under power
Check if the thumbscrew or securing mechanism is loose or missing. Tighten or replace the thumbscrew.
Auger scrapes inside the chamber head
The auger may not be positioned well. Adjust its position and apply a small amount of oil onto the auger surface.
Before use
- Ensure the power source equipment is turned off and disconnected before assembly.
- Wear protective gloves when handling knives and cutting plates.
- Clean all components with mild soap and water before first use.
- Verify all parts (auger, knife, plate, ring, pan) are present and undamaged.
- Ensure the mixer has a compatible #12 hub.
Specs in practice
- Hub Compatibility
- Designed for mixers with a #12 hub.
Images and diagrams
- Fig 1: Exploded view of components including ring, food pan, auger, grinder plate, knife, and chamber head.
- Fig 9-11: Shows the process of inserting the shaft into the hub and tightening the thumbscrew.
Model compatibility
- Compatible with 177MX20 and other mixers featuring a #12 hub.

Manual page author
David Miller
Documentation analyst
Organizes user manual content into clear summaries, with attention to model details, product context, and everyday usability.