Plumbing / Showers & Tubs
Installation Guide for AXOR Starck 10751XX1 Shower Mixer
Quick installation and user guide for the AXOR Starck 10751XX1 shower mixer. Includes technical specifications, step-by-step installation instructions, troubleshooting, and maintenance tips.
Table of contents
Manual images
Click an image to enlargeQuick guide from the manual
The AXOR Starck 10751XX1 is a thermostatic shower mixer trim. Important: This unit requires the rough valve model 10750181 (not included) for installation. Hansgrohe strongly recommends that installation be performed by a licensed, professional plumber to ensure proper function and safety. Always turn off the main water supply before beginning installation.
Technical specifications
- Water pressure: Recommended 15-75 PSI (0.1-0.5 MPa); Maximum 145 PSI (1 MPa).
- Hot water temperature: Recommended 120°-140°F (48°-60°C); Maximum 158°F (70°C).
- Flow rate: 5.0 GPM (18.9 L/min) at 44 PSI (0.3 MPa).
- Compatibility: Designed for use with showerheads rated at 1.1 GPM (4.2 L/min) or higher.
Installation steps
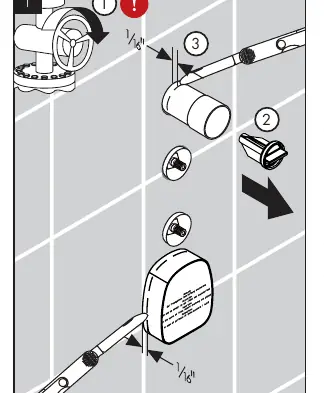
- Preparation: Turn off the main water supply. Cut the plaster shields so they extend 1/16" (1 mm) outside the finished wall surface.
- Sealing: Seal the wall around the plaster shields using waterproof sealant. Install the slip connectors.
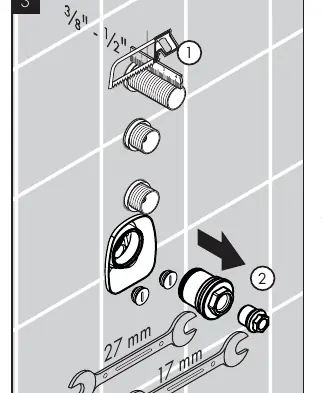
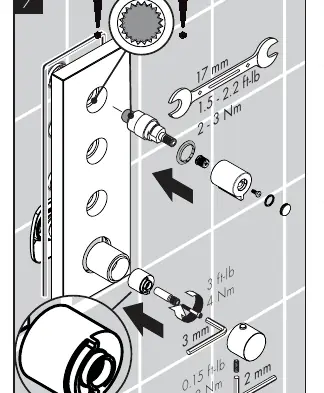
- Connectors: Cut the slip connector so it extends 3/8" - 1/2" (10-13 mm) outside the finished wall. Remove the insert, plug, and check valve covers from the thermostatic mixer.
- Spindles: Install the extension spindles. Cut them so they extend 3/4" - 7/8" (20-23 mm) outside the finished wall. Install the check valves and covers.
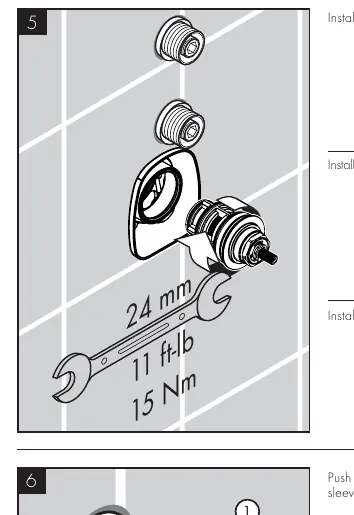
- Cartridge: Install the thermostatic cartridge using a 24 mm wrench (11 ft-lb / 15 Nm).
- Volume Control: Push the extension spindles into the volume control sleeves.
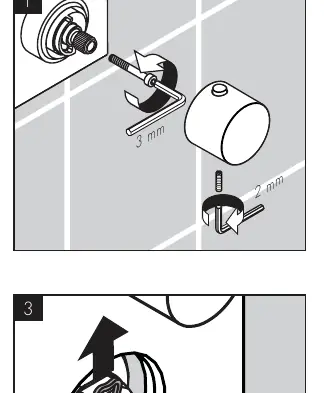
- Trim Plate: Push the trim plate against the wall. Install the volume control sleeves, snap connectors, and handles. Tighten screws and install o-rings and screw covers. Install the thermostatic mixer sleeve, stop ring, stem extension, and handle.
- Finishing: Apply a dab of waterproof sealant on the wall at the grout joints.
Setting the high temperature limit
To adjust the maximum temperature:
- Remove the handle and the temperature limit stop ring.
- Adjust the stop ring to the desired position.
- Verify the temperature with a thermometer while running the water.
- Reinstall the stop ring and handle.
Cleaning and maintenance
To maintain the finish and functionality:
- Clean the product when necessary to prevent mineral scale and soap residue buildup.
- Use a soft cloth or sponge. Do not spray cleaners directly onto the product.
- Avoid cleaners containing hydrochloric acid, formic acid, lye, or acetic acid.
- Do not use abrasive powders, pads, brushes, steam cleaners, or "no-rinse" agents.
- Rinse thoroughly with clear water after cleaning and polish dry.
Troubleshooting
- Insufficient water: Check supply pressure, clean the thermostat cartridge filter, clean the screen washer between the hand shower and hose, or clean the check valve filters.
- Crossflow (hot/cold mixing when closed): Clean or replace the check valves.
- Temperature regulation not possible: Clean or replace the thermostat cartridge. Ensure the rough valve is correctly connected (cold right, hot left) and not installed with a 180° rotation.
- Safety stop button not operating: Clean or replace the spring and/or button.
Manufacturer information
AXOR
Practical help
Common problems
Insufficient water flow
Check supply pressure, clean thermostat cartridge filter, clean screen washer, or clean check valve filters.
Hot water forced into cold pipe (crossflow)
Clean or replace the check valves.
Temperature regulation not possible
Clean or replace the thermostat cartridge; check if the rough valve is installed with 180° rotation or incorrect connections.
Safety stop button not working
Clean or replace the spring and/or button.
Before use
- Ensure rough valve model 10750181 is installed.
- Turn off the main water supply.
- Verify you have the necessary tools: 27mm, 24mm, 17mm wrenches, and a screwdriver.
- Check local plumbing codes for temperature settings.
- Inspect the product for damage before installation.
Specs in practice
- Recommended Water Pressure
- 15-75 PSI (0.1-0.5 MPa) for optimal performance.
- Hot Water Temperature
- Recommended 120°-140°F (48°-60°C) for safe operation.
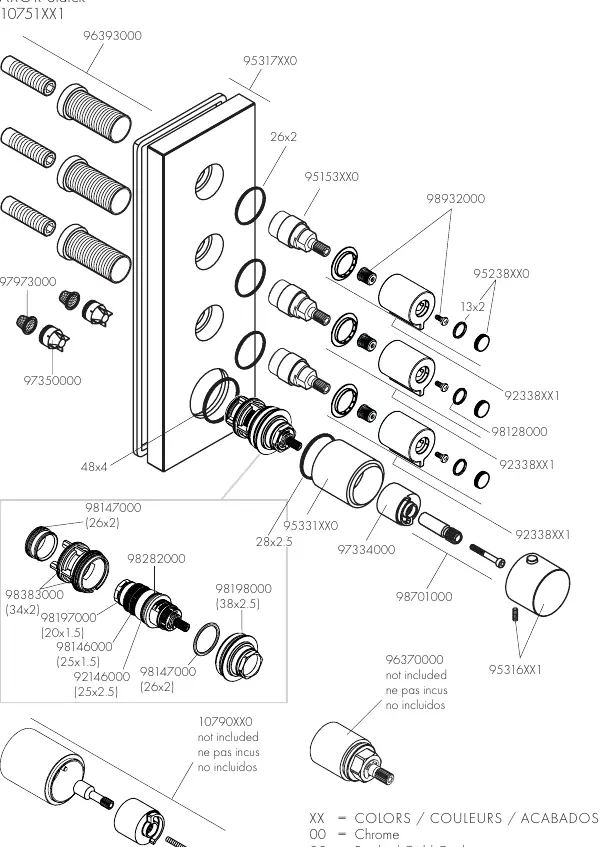
Images and diagrams
- Page 3: Dimensions and required tools.
- Page 11: Exploded view of replacement parts and color codes.
- Page 12: Operation instructions for on/off and temperature control.
Model compatibility
- Requires rough valve model 10750181 (not included).
- Compatible with showerheads rated at 1.1 GPM (4.2 L/min) or higher.

Manual page author
David Miller
Documentation analyst
Organizes user manual content into clear summaries, with attention to model details, product context, and everyday usability.