Electronics / Security Cameras
User Manual for Baseus Security N1 Outdoor Camera 2K 2-Cam Kit
Quick start guide for the Baseus Security N1 Outdoor Camera 2K 2-Cam Kit. Includes setup, camera charging, installation, hard drive expansion, and technical specifications.
Quick answers from the manual
Quick answer
- The Baseus Security N1 is a 2-camera security system with a HomeStation. Setup involves connecting the HomeStation to your router, downloading the baseus Security app, and pairing the cameras. p. 4, 5
Key actions
- Charge cameras before first use p. 6
- Install hard drive p. 7
First start
- Connect HomeStation to power and router, wait for blue light, then use app to pair. p. 5
Problems and fixes
General issues
Use the Service Center module in the baseus Security App.
p. 7Maintenance and reset
- Reset button is located on the back of the H1 HomeStation. p. 4
Technical specifications
| Parameter | Value | Meaning | Pages |
|---|---|---|---|
| Resolution | 2304 x 1296 | Camera video resolution | p. 8 |
| Waterproof Rating | IP67 | Camera weather resistance | p. 8 |
Where to find it in the PDF
- Package Contents p. 4
- Charging p. 6
- Installation p. 6
- Hard Drive p. 7
Table of contents
Manual images
Click an image to enlargeQuick guide from the manual
This guide provides essential instructions for setting up and maintaining your Baseus Security N1 Outdoor Camera 2K 2-Cam Kit. The system consists of an H1 HomeStation and two N1 Cameras. Before first use, ensure both cameras are fully charged (approx. 5 hours). The system requires the baseus Security app for setup and management.
Product Overview
H1 HomeStation: Features an indicator light, hard drive slot, reset button, USB port, LAN port, and DC power input.
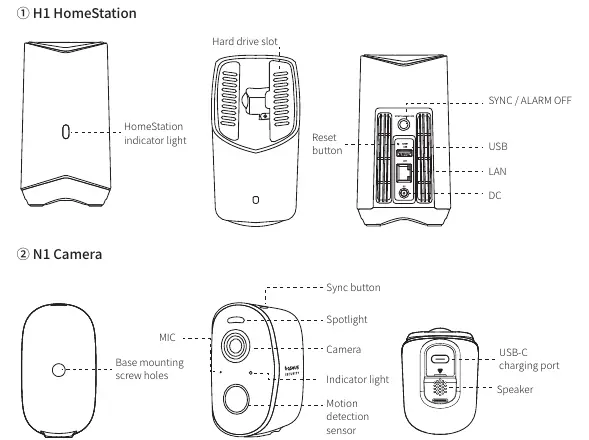
N1 Camera: Includes a microphone, spotlight, motion detection sensor, sync button, speaker, and USB-C charging port.
Setup Instructions
1. Connect the H1 HomeStation to a power outlet using the included adapter.
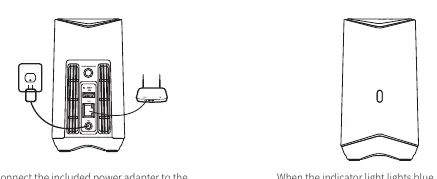
2. Connect the HomeStation to your router using the provided Ethernet cable.
3. Wait for the indicator light to turn blue (takes about 1 minute).
4. Download and install the baseus Security app, register an account, and follow the on-screen instructions to pair the devices.
Camera Charging
Please fully charge both cameras before first use. Charging takes approximately 5 hours. The indicator light flashes blue while charging and turns off when fully charged. You can charge the camera using the HomeStation USB port or a 5V USB charger.
Camera Installation
1. Choose a location with an ideal viewing angle, ideally 2-3 meters (7-10 feet) above the ground.
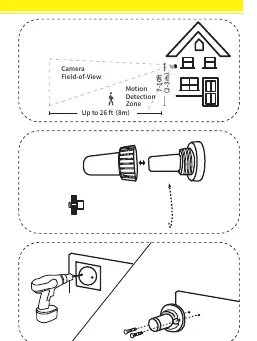
2. Loosen the mounting bracket knob by turning it counterclockwise.
3. Drill holes using a 6mm (15/64-inch) drill bit and insert expansion bolts if mounting on hard surfaces like concrete, brick, or stucco.
4. Secure the bracket, attach the camera, and adjust the angle while checking the live feed in the app.
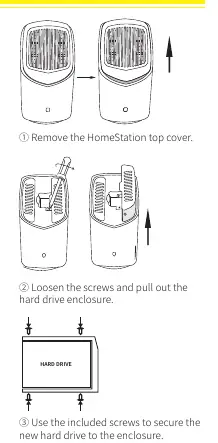
Expanding Hard Drive (Optional)
The H1 HomeStation has 16GB of built-in storage, which can be expanded with an external 2.5-inch SATA HDD or SSD (up to 16TB). Ensure the HomeStation is powered off before installing or removing the drive. After installation, the new drive must be initialized via the baseus Security app.
Safety and Notice
The device is not a toy. Keep small parts and cords out of reach of children to prevent choking or strangulation hazards. Operating temperatures for the N1 camera are -20°C to 50°C, and -10°C to 40°C for the H1 HomeStation. Use only the provided power adapter.
Customer Service
For troubleshooting and tutorial videos, visit https://support.baseus.com or contact [email protected]. The product includes a 24-month limited warranty.
Official resources from the manual
Manufacturer information
Baseus
Practical help
Common problems
HomeStation not ready for setup
Ensure the indicator light is blue. It takes about 1 minute to boot up after powering on.
Camera not charging
Ensure it is connected to a 5V USB charger or the HomeStation USB port. Charging takes about 5 hours.
Hard drive not recognized
Ensure the HomeStation is powered off during installation. The drive must be initialized via the app.
Before use
- Fully charge both cameras (approx. 5 hours).
- Ensure you have a stable internet connection for the HomeStation.
- Download the baseus Security app.
- Prepare a 2.5-inch SATA HDD/SSD if expanding storage.
Specs in practice
- Waterproof Rating
- IP67 (suitable for outdoor use)
Images and diagrams
- H1 HomeStation: Indicator light, hard drive slot, reset button, USB, LAN, DC ports.
- N1 Camera: Mic, spotlight, motion sensor, sync button, USB-C charging port.
Model compatibility
- Supports 2.5-inch SATA HDD/SSD up to 16TB.
- Cameras should be mounted 2-3 meters above the ground.

Manual page author
David Miller
Documentation analyst
Organizes user manual content into clear summaries, with attention to model details, product context, and everyday usability.