Electronics / Security Cameras
User Manual for Baseus Security S1 Pro Outdoor Dual Camera 3K 2-Cam Kit
Comprehensive user guide for the Baseus Security S1 Pro Outdoor Dual Camera 3K 2-Cam Kit. Learn how to set up your HomeStation, install cameras, manage expandable storage, and troubleshoot your security system.
Table of contents
Manual images
Click an image to enlargeQuick guide from the manual
The Baseus Security S1 Pro system consists of a HomeStation and wireless cameras. To get started, connect the HomeStation to your router, download the Baseus Security app, and follow the in-app instructions to pair your devices. Ensure cameras are fully charged before initial use.
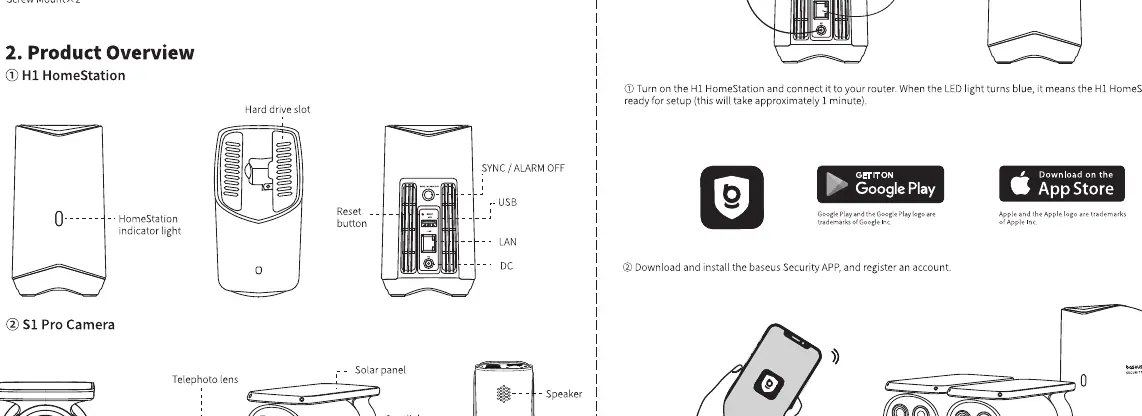
Product Overview
HomeStation: Features a hard drive slot, indicator light, reset button, USB port, LAN port, and DC power input.
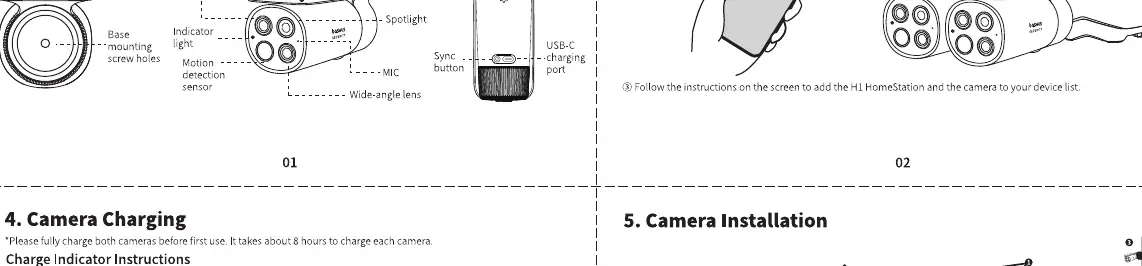
S1 Pro Camera: Equipped with a telephoto lens, wide-angle lens, spotlight, motion detection sensor, microphone, speaker, and a solar panel for charging.
Setup Instructions
- Turn on the HomeStation and connect it to your router using the provided cable. The light will turn blue when ready.
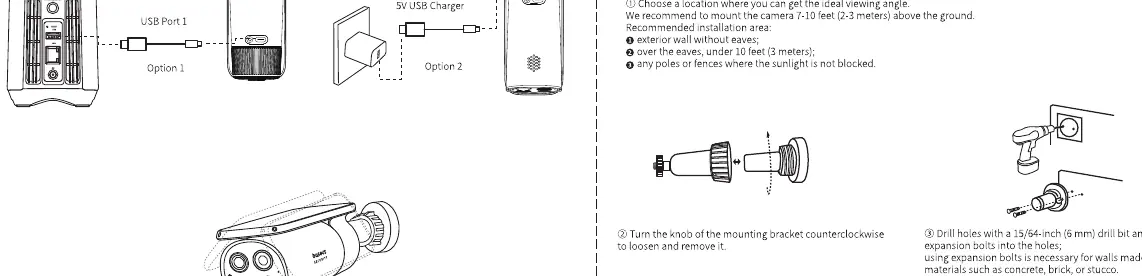
- Download the Baseus Security app from the Google Play Store or Apple App Store and register an account.
- Follow the in-app instructions to add the HomeStation and pair the cameras.
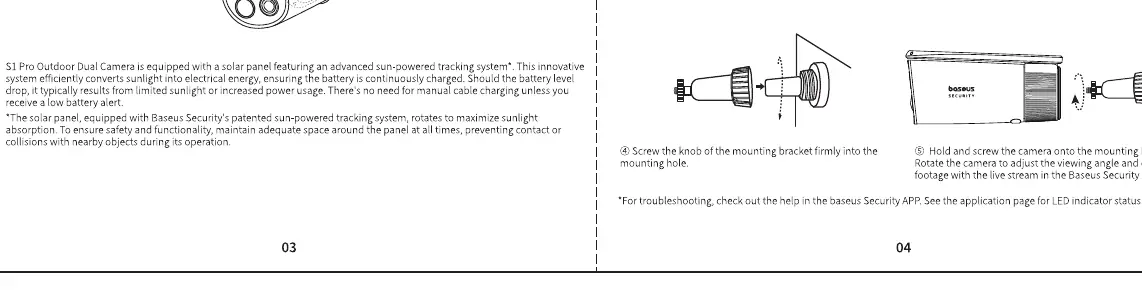
Camera Charging
Cameras should be fully charged before the first use. It takes approximately 8 hours to charge each camera. The indicator light will be solid blue while charging and turn off when fully charged.
Camera Installation
For optimal performance, follow these guidelines:
- Install the camera at a height of approximately 3 meters (10 feet) above the ground.
- Place the camera under eaves or in areas where it is not directly exposed to harsh, constant sunlight.
- Ensure the camera has a clear view of the area you wish to monitor.
- Use the provided mounting hardware to secure the camera firmly to the wall or fence.
Expandable Storage
The HomeStation includes 16GB of built-in storage and supports expansion with a 2.5-inch HDD or SSD (SATA interface, up to 16TB). To install:
- Turn off the HomeStation.
- Remove the top cover.
- Insert the hard drive into the slot and secure it with the included screws.
- Replace the cover. The drive will be initialized via the Baseus Security app.
Safety and Regulatory
The device is not a toy and contains small parts that may pose a choking hazard. Keep away from children. Use only the provided power adapter. The operating temperature range is -20°C to 50°C. Do not disassemble the device or replace the battery yourself.
Manufacturer information
Baseus
Practical help
Common problems
Camera not charging
Ensure the charging cable is properly connected and the power source is active. Charging takes approximately 8 hours.
HomeStation not connecting
Ensure the Ethernet cable is securely connected to both the HomeStation and your router. Wait for the indicator light to turn blue.
Before use
- Download the Baseus Security app
- Register a user account
- Charge cameras for 8 hours
- Connect HomeStation to router via LAN cable
Images and diagrams
- HomeStation: Shows ports for LAN, USB, and DC power.
- Camera: Shows solar panel, lenses, and mounting points.
- Installation: Shows recommended height of 3 meters.
- HDD Installation: Shows removing the top cover to access the drive slot.
Model compatibility
- Supports 2.5-inch SATA HDD or SSD.
- Requires 2.4GHz Wi-Fi network.

Manual page author
Michael Turner
Technical manual editor
Reviews PDF manuals for structure, safety notes, and practical product details so readers can find the right information quickly.